


Default Scanline Renderer in 5 Easy Steps (For Small Interior Spaces)
+22
Abdel_khafidz@yahoo.com
dhandora
eragasco
enigma
roycristobal
kamaynicain
TariqRaheel
darkbeauty
taga_probins
quicksilver21
vamp_lestat
alwin
jhaamm
NOCHI
Muggz
jhames joe albert infante
nomeradona
Jameskee
xboy360
Butz_Arki
abl_langs
bokkins
26 posters
Page 2 of 2
Page 2 of 2 •  1, 2
1, 2
Default Scanline Renderer in 5 Easy Steps (For Small Interior Spaces)
![]() by bokkins Sun Nov 16, 2008 9:33 pm
by bokkins Sun Nov 16, 2008 9:33 pm
First topic message reminder :
Hi guys. Finally, natapos ko din itong default scanline tutorial ko. mga references ko nito ay sina smoke3d at enigma, thank you mga idol ko. hehe. I tried to simply this tutorial para mas mabilis maintindihan at maalala. Marami pang ibang ways to do scanline, and this tutorial is one way. sana magustuhan nyo. ok, lets start!
This tutorial will focus on how to use the 3d studio max default scanline renderer for small interior spaces. for this tutorial, we will be needing a textured interior model. You can download the model here. CLICK ME.

STEP 1 - Add 1 omni light in the middle of your scene, this will serve as your ambient/fill light, you can increase or decrease its value depending on how you wanted your scene being lit. Check the "use" and "show" on your far attenuation, this will dictate the coverage of your fill light. On advance effects rollout, check ambient only.

Hi-res --> https://2img.net/h/i20.photobucket.com/albums/b236/bokkins/tutorials/bigstep1-1.jpg
STEP 2 - Add 16 omni lights, split it into two layers of 8's. I call this "the omni field". This will enhance your shadows. Again, use far attenuation as not to over brighten your scene. In your shadow map params, change the size to 64, this will fade your shadow to a minimum.
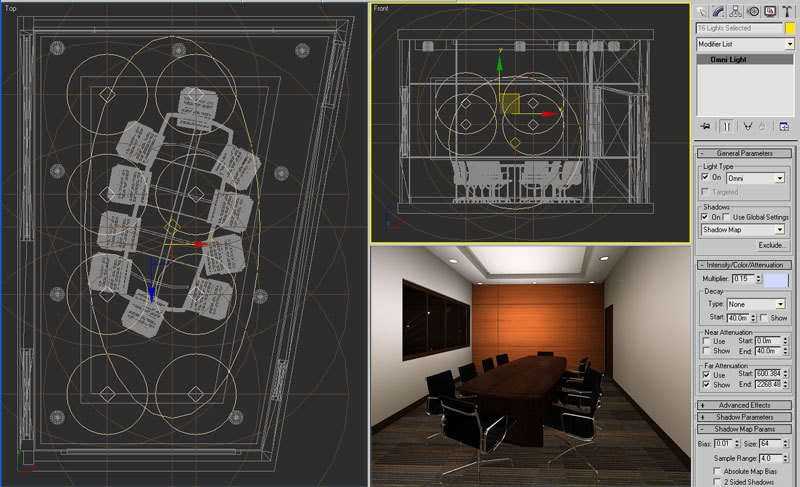
Hi-res --> https://2img.net/h/i20.photobucket.com/albums/b236/bokkins/tutorials/bigstep2.jpg
STEP 3 - Add your IES Lights
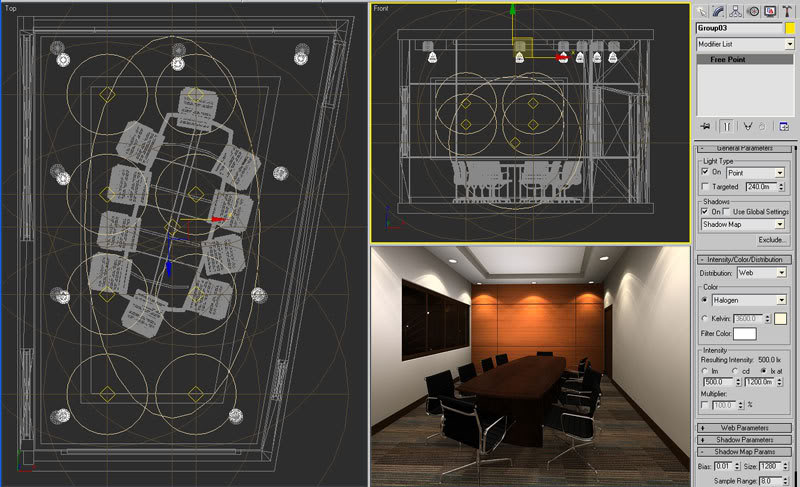
Hi-res --> https://2img.net/h/i20.photobucket.com/albums/b236/bokkins/tutorials/bigstep3.jpg
STEP 4 - Add a direct light directly on top of the center to further enhance the shadow on the flloor.

Hi-res --> https://2img.net/h/i20.photobucket.com/albums/b236/bokkins/tutorials/bigstep4-1.jpg
STEP 5 - Add an ambiently only omni right below your table to darken the shadow cast by the lights. use a negative value to introduce dark light into the scene. and we're done! Hope you enjoyed the tutorial as I did while doing this. Yay!

Hi-res --> https://2img.net/h/i20.photobucket.com/albums/b236/bokkins/tutorials/bigstep5.jpg
Hi guys. Finally, natapos ko din itong default scanline tutorial ko. mga references ko nito ay sina smoke3d at enigma, thank you mga idol ko. hehe.
I tried to simply this tutorial para mas mabilis maintindihan at maalala. Marami pang ibang ways to do scanline, and this tutorial is one way. sana magustuhan nyo. ok, lets start! This tutorial will focus on how to use the 3d studio max default scanline renderer for small interior spaces. for this tutorial, we will be needing a textured interior model. You can download the model here. CLICK ME.
STEP 1 - Add 1 omni light in the middle of your scene, this will serve as your ambient/fill light, you can increase or decrease its value depending on how you wanted your scene being lit. Check the "use" and "show" on your far attenuation, this will dictate the coverage of your fill light. On advance effects rollout, check ambient only.
Hi-res --> https://2img.net/h/i20.photobucket.com/albums/b236/bokkins/tutorials/bigstep1-1.jpg
STEP 2 - Add 16 omni lights, split it into two layers of 8's. I call this "the omni field". This will enhance your shadows. Again, use far attenuation as not to over brighten your scene. In your shadow map params, change the size to 64, this will fade your shadow to a minimum.
Hi-res --> https://2img.net/h/i20.photobucket.com/albums/b236/bokkins/tutorials/bigstep2.jpg
STEP 3 - Add your IES Lights
Hi-res --> https://2img.net/h/i20.photobucket.com/albums/b236/bokkins/tutorials/bigstep3.jpg
STEP 4 - Add a direct light directly on top of the center to further enhance the shadow on the flloor.
Hi-res --> https://2img.net/h/i20.photobucket.com/albums/b236/bokkins/tutorials/bigstep4-1.jpg
STEP 5 - Add an ambiently only omni right below your table to darken the shadow cast by the lights. use a negative value to introduce dark light into the scene. and we're done! Hope you enjoyed the tutorial as I did while doing this. Yay!
Hi-res --> https://2img.net/h/i20.photobucket.com/albums/b236/bokkins/tutorials/bigstep5.jpg

bokkins- Special Ops

- Number of posts : 10369
Registration date : 18/09/2008 -

Re: Default Scanline Renderer in 5 Easy Steps (For Small Interior Spaces)
![]() by symphonicmetal Sun Sep 25, 2011 1:55 am
by symphonicmetal Sun Sep 25, 2011 1:55 am
hello sir..ganda..light tracer po ba ito or radiosity?thanks
symphonicmetal- CGP Newbie

- Number of posts : 12
Registration date : 15/04/2010
Re: Default Scanline Renderer in 5 Easy Steps (For Small Interior Spaces)
![]() by bokkins Sun Sep 25, 2011 3:48 am
by bokkins Sun Sep 25, 2011 3:48 am
symphonicmetal wrote:hello sir..ganda..light tracer po ba ito or radiosity?thanks
Pure scanline lang. Notice madaming ilaw ang ginamit to simulate light bounce.
bokkins- Special Ops
- Number of posts : 10369
Registration date : 18/09/2008 -
Re: Default Scanline Renderer in 5 Easy Steps (For Small Interior Spaces)
![]() by DESIÑO Thu Nov 15, 2012 1:58 am
by DESIÑO Thu Nov 15, 2012 1:58 am
ito ang kailangan ko sa office namin sir sakto maraming salamat......good tips

DESIÑO- CGP Apprentice

- Number of posts : 407
Age : 42
Location : Jubail Industrial city,Saudi
Registration date : 10/08/2012
Re: Default Scanline Renderer in 5 Easy Steps (For Small Interior Spaces)
![]() by russelyacat Thu Nov 15, 2012 10:55 pm
by russelyacat Thu Nov 15, 2012 10:55 pm
wow sir, Thankyou For sharing 

russelyacat- CGP Apprentice
- Number of posts : 802
Location : gapan nueva ecija
Registration date : 06/02/2012 -
Sponsored content
Page 2 of 2 • 1, 2
» 3ds max scanline renderer with skylight and light tracer
» 3ds Max 2009 rendering with default scanline: Proposed 3 storey residential
» 3ds Max 2009 rendering with default scanline: Proposed 3 storey residential (updated)
» Innovative ideas for small spaces
» Small Spaces Living Room
» 3ds Max 2009 rendering with default scanline: Proposed 3 storey residential
» 3ds Max 2009 rendering with default scanline: Proposed 3 storey residential (updated)
» Innovative ideas for small spaces
» Small Spaces Living Room
Page 2 of 2
Permissions in this forum:
You cannot reply to topics in this forum