


simple house modelling by f41
+17
Reve24
TariqRaheel
Butz_Arki
darkbeauty
wyulethe
Kaberto
alwin
scofield14
jenaro
gamer_11
jefferson01
yaug_03
westcoastwindblow
bokkins
Stryker
deosrock
Norman
21 posters
Page 2 of 2
Page 2 of 2 •  1, 2
1, 2
simple house modelling by f41
![]() by Norman Fri Aug 28, 2009 10:22 am
by Norman Fri Aug 28, 2009 10:22 am
First topic message reminder :
second share ko ng tips mga pips....para sa mga baguhan pong mag model I hope makatulong po sa inyo...first thing, mahirap pala gumawa ng modelling tutorial, pero try ko para sa inyo. and para kay sir erick,, request nya ito e. matagal na nya ako kinukulit.
isang diskarte palang ito sa max. pero syempre basic tyo lagi magsisimula, and pag nakuha nyo ito makukuha nyo na rin yung whole idea ng modelling sa max. eventually, kayo mismo makaka figure kung paano gagawin.....
check nyo rin yung http://www.cgpinoy.org/3d-studio-max-tutorials-f46/3d-max-modelling-tips-t3696.htm para sa dagdag pang kaalaman.......yung mga tinuturo nila is very much useful.
before we start remember you can use keyboard shortcuts [b]F2[b], [b]F3[b] and [b]F4[b] for [b]wire toggles[b] try nyo very useful yan sa modelling meron din ito sa SU.
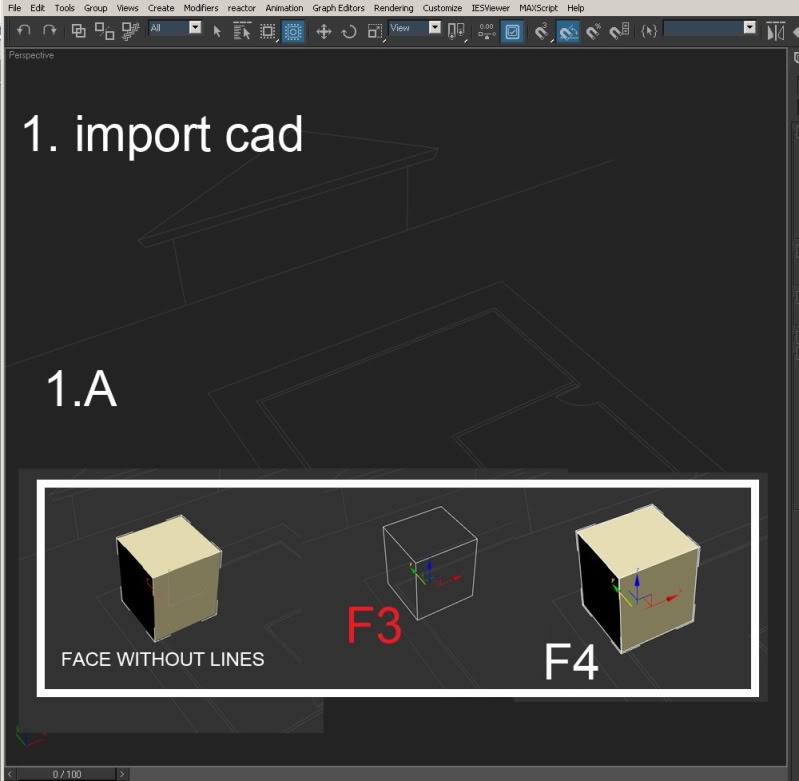
1. First, import muna na tyo ng file; Ito po yung link, di ko na po tuturo hehe.....modelling na po tyo mag focus.
http://www.caddigest.com/subjects/autocad/tutorials/select/081803_parsai_import_max.htm
1.A ito yung sample ng F2, F3 and F4 for wire toggles
Note: make sure tama yung scale nyo from architectural and decimal…minsan malaki impact pag mali yng scale na ginamit nyo pag import sa max...

2. RIGHT CLICK>convert to editable poly
NOTE: e-freeze nyo yung cad file nyo para di magalaw: RIGHT CLICK>freeze selection.

3.a go to VERTEX under MODIFY TAB tab
3.b go to snaps toggles…same idea with osnaps sa autocad….Tutorial: http://animation.about.com/od/3danimationtutorials/ss/3dsmax_less1p4_4.htm
3.c TOPVIEW, select vertex
3.d then MOVE, since snaps toggle is on, maharanis nyo yung group of points nag aapply yung snaps sa autocad object nyo
Since you have a wall now. We can start to modify our block.
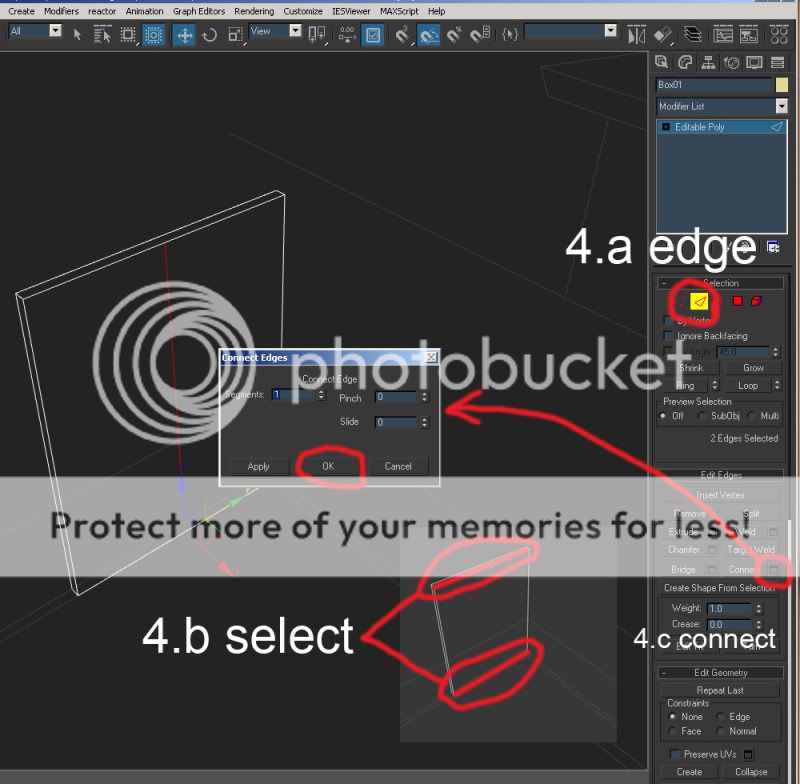
4.a go to EDGE
4.b SELECT nyo yung upper line ng wall and yung lower line, parallel to each other.
4.c click connect icon on the right side. Then may window na lalabas Kita nyo yung segment? Segment determines the CUT ng face. For now 1 lang ang kailangan natin(try nyo na ring paglaruan yung PINCH and SLIDE).
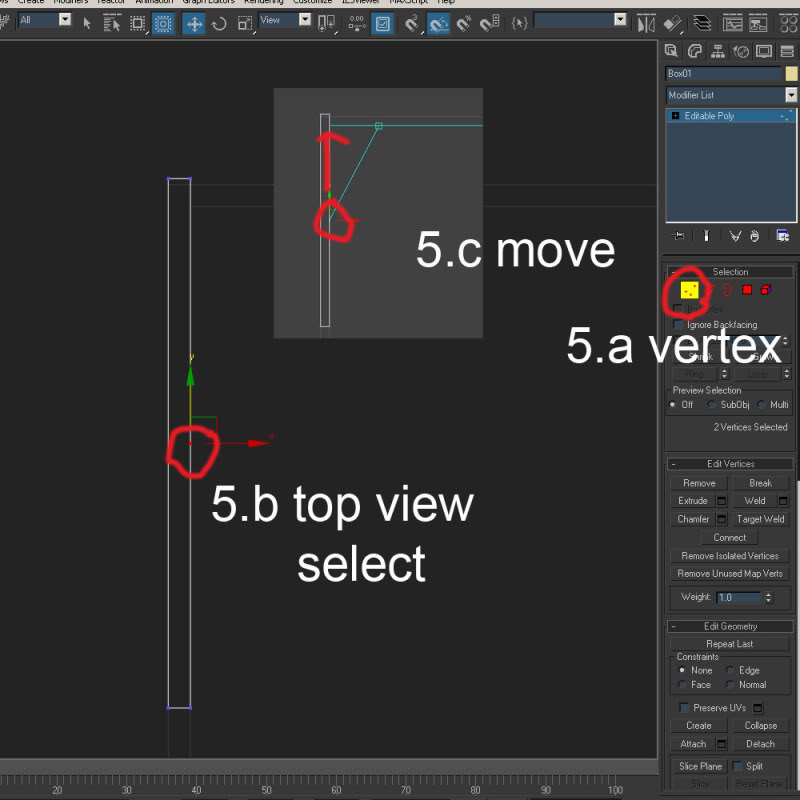
5. Top view ulit tyo.
5.a balik tyo sa VERTEX
5.b from TOP VIEW, select natin yung naging point dun sa ginawa nating cut from procedure 4.
5.c MOVE natin yung line according sa cad file na in import natin.
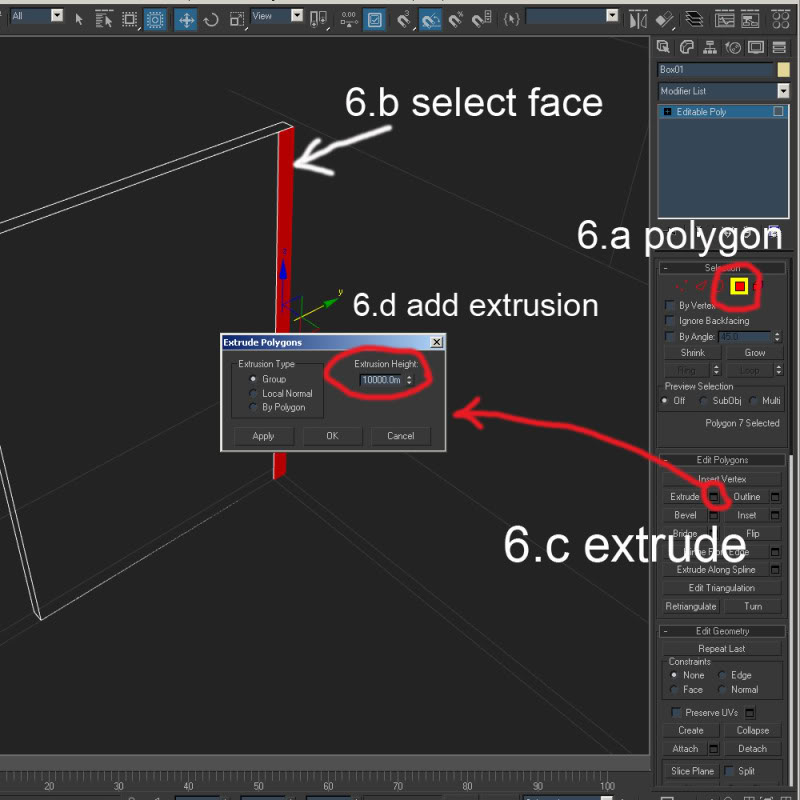
6.a Dun tyo sa POLYGON naman pumunta.
6.b select FACE then
6.c EXTRUDE: a new window will pop out.- you’ll see sa EXTRUSION HEIGHT PARAMETER lagyan nyo ng value.

7.a move natin yung FACE na in-extrude base sa cad file ulit.
7.b once done. Repeat natin yung procedure(from4 to 7) kung paano magdagdag ng line and mag extrude
8. Pagdating natin sa door ganito yung gagawin nating procedure
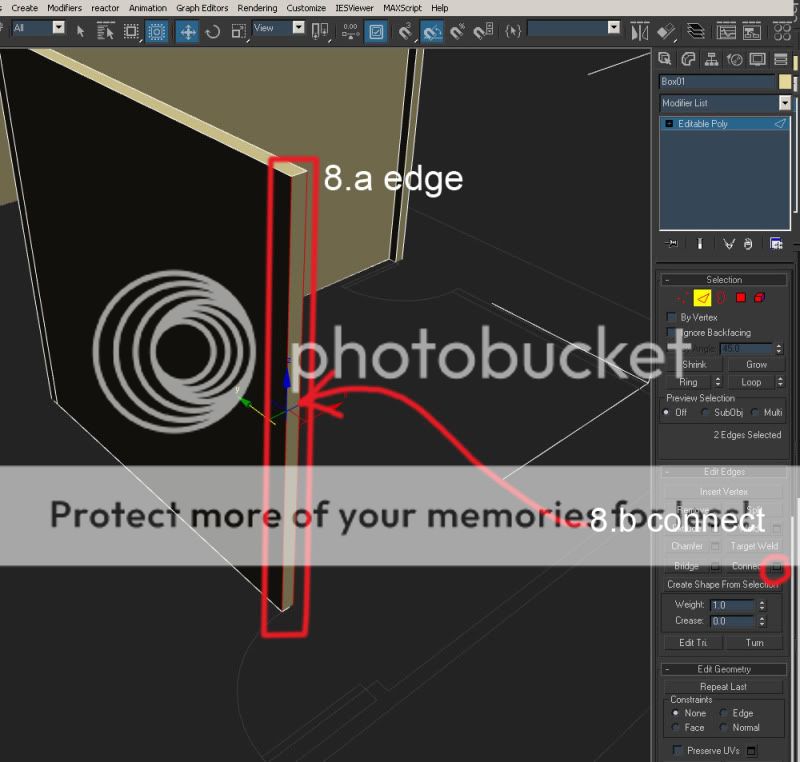
8.a from [b]EDGE[b] option, still under editable poly. Select natin yung two VERTICAL LINE
8.b using CONNECT tool add tyo ulit ng line
9. Ito medyo tricky at nakakalito, I hope ma-deliver ko at maintindihan nyo.
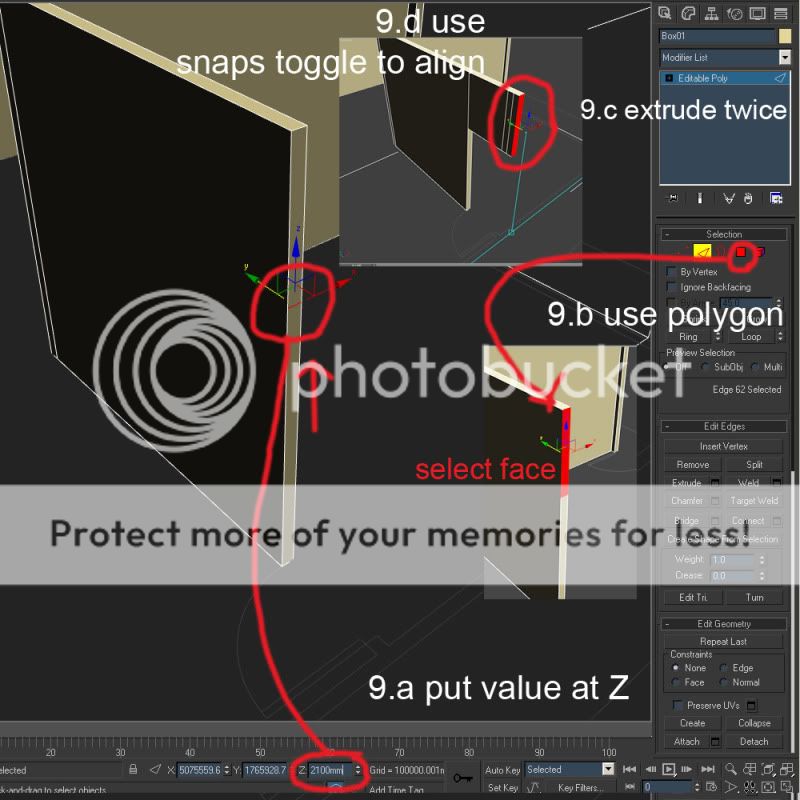
9.a once negkaroon na tyo ng cut sa two vertical lines we can add its height using the z-coordinates. Since our standard door is 2100 lagay ko yung value na yan. So we can assume na tama nga yung height natin
9.b balik tyo poly, click nating yung face above our door entrance. Saka tyo mag adjust according sa cad.
9.c EXTRUDE e tayo
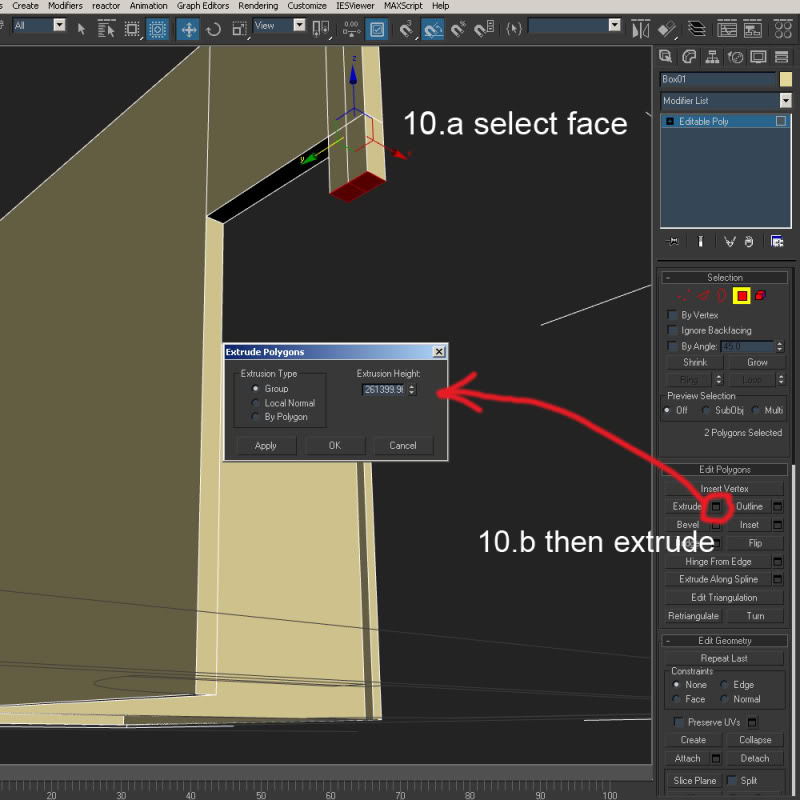
10.a Select FACE tayo yung nasa ilalim
10.b then saka tayo mag EXTRUDE pababa….
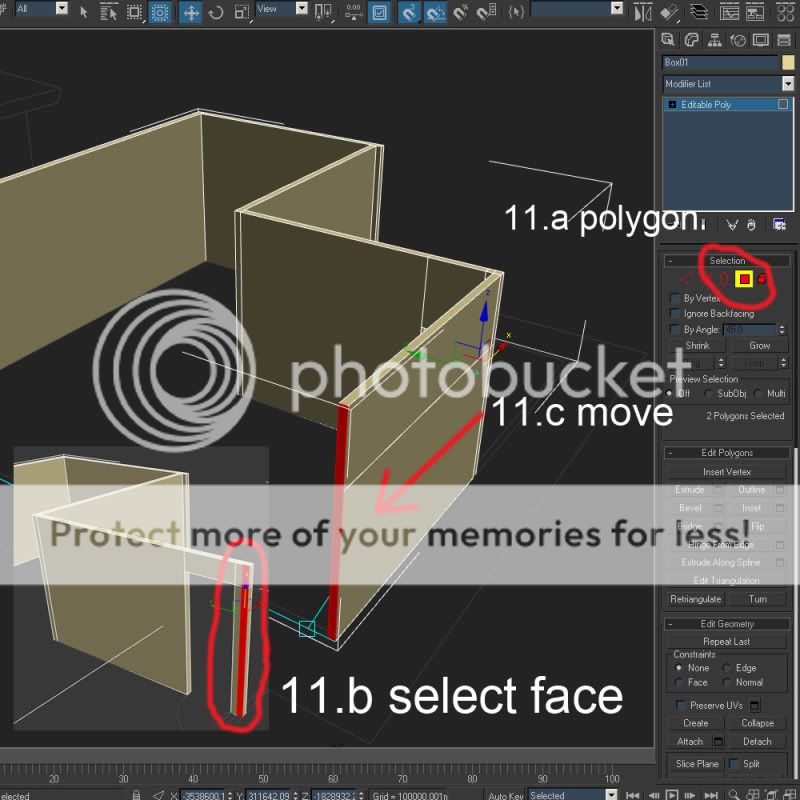
11.a still in POLYGON
11.b select natin yung FACE ulit sa sides, tpos saka tayo mag extrude
11.c saka tayo mag move ulit according sa cad file natin
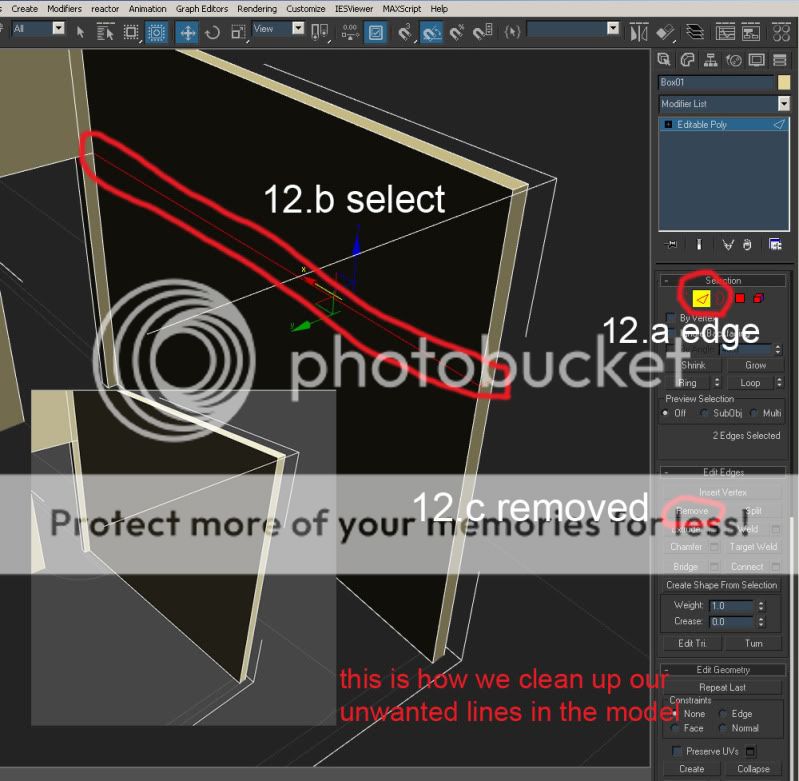
12.a go to EDGE
12.b ikot natin yung view from kabilang side may makikita tayo projected line sa center ng wall, kailangan natin burahin yan. SELECT natin yung line
12.c then press REMOVE button
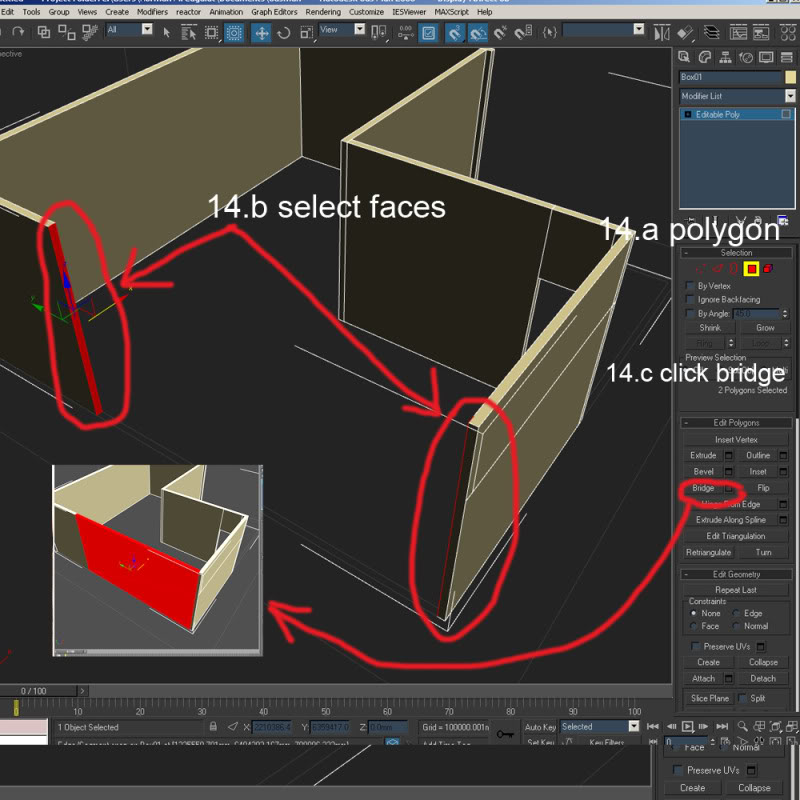
14. HEHE……nagkamali na ako sa numbering ng photo…kaya 14 na yung step, ignore na natin yung step 13.
14.a [b]POLYGON[b](I hope familiar na kayo sa mga icon, (VERTEX, EDGE, POLYGON, OBJECT)
14.b click natin both yung parehong ending ng wall (using CTRL+CLICK, multiple selection ang labas)
14.c tapos click BRIDGE

15. Dito tayo mag start ng ROOF
15.a go to CREATE TAB
15.b from TOP VIEW, gawa tayo ng box according sa cad file(naka freeze), pag nagawa natin convert natin ulit ng EDITABLE POLY
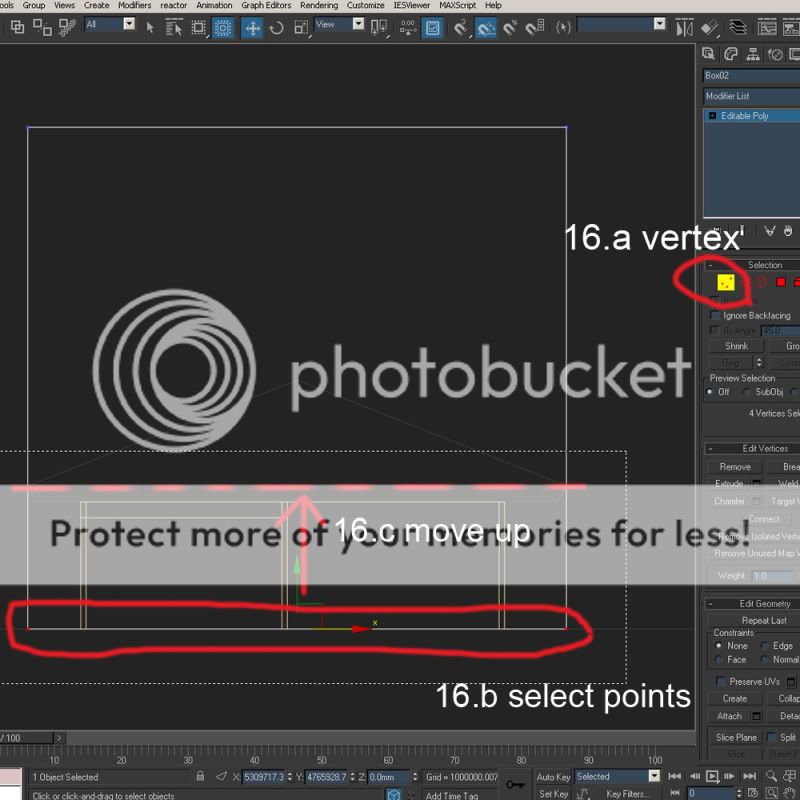
16.a from VERTEX
16.b from front view, SELECT natin yung [b]vertex points[b] sa baba.
16.c saka natin itaas.
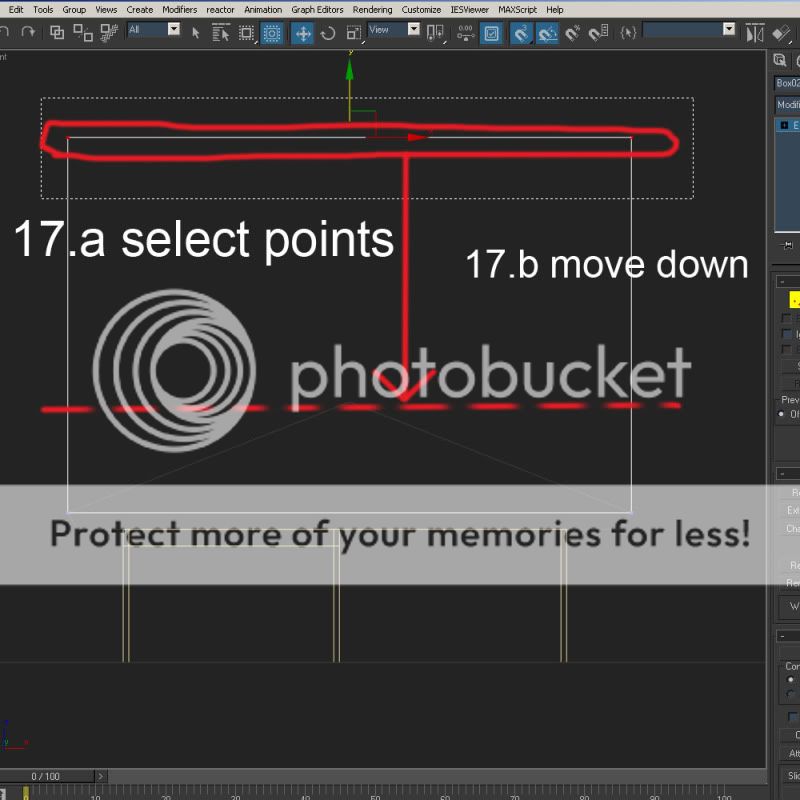
17. Still in FRONT VIEW
17.a SELECT natin yung upper VERTEX POINTS.
17.b saka natin ibaba according sa apex ng roof
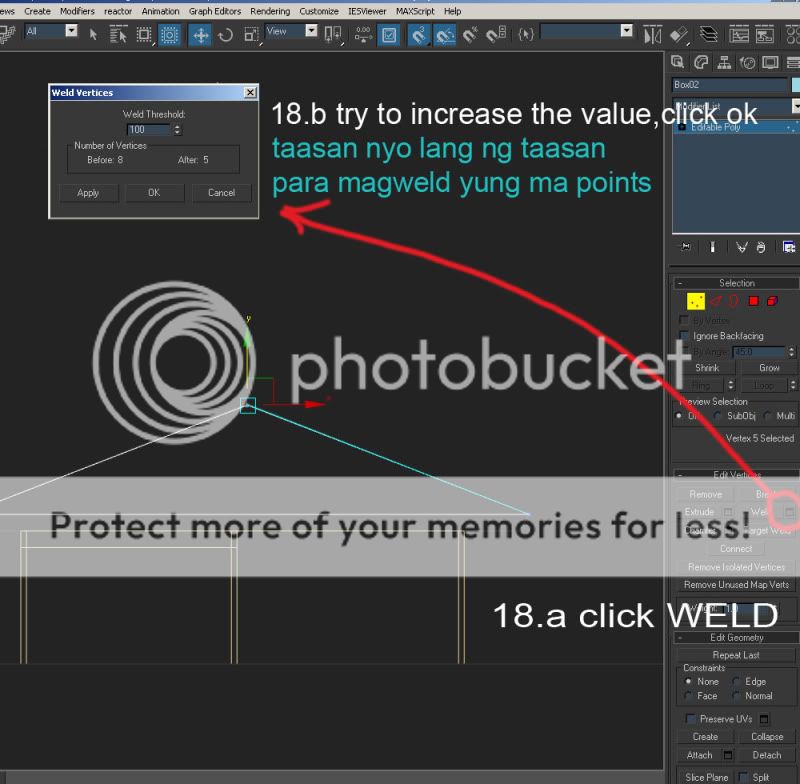
18. Isa pang tricky part from WELD tool
18.a click WELD
18.b saka nyo taasan yung value ng WELD THRESHOLS, it means yung each parameter ng VERTEXPOINTS lalaki since tinataasan nyo yung VALUE so mag we-weld yung mga sine-lect nyong VERTEX POINTS(I insist pag aralan nyo ito essential sya sa concept ng 3d modeling ng max
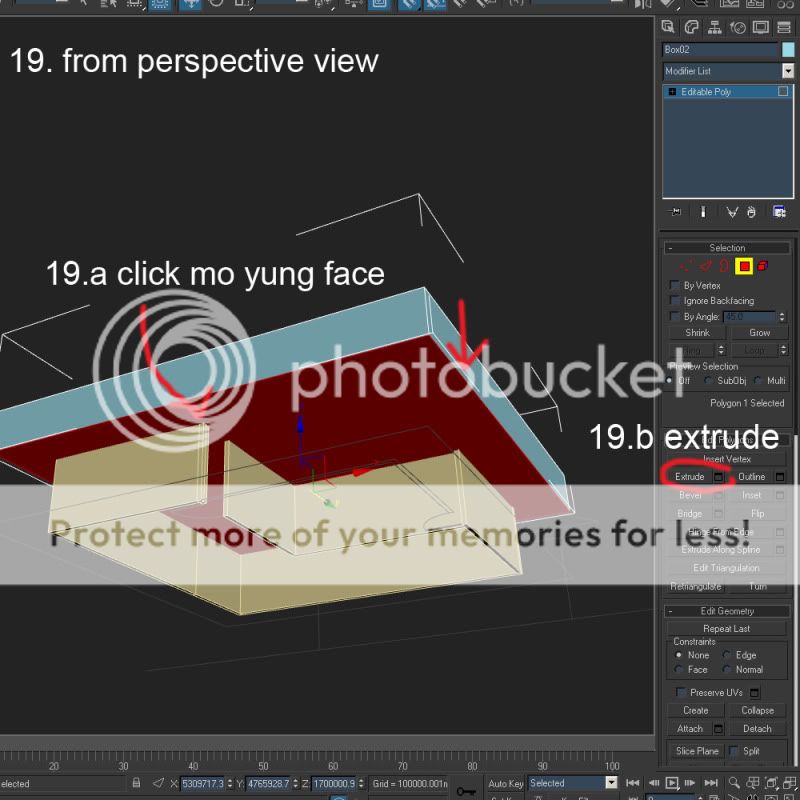
19. From perpective view punta tayo sa bottom view ng roof natin.
19.a from POLYGON, click natin yung face sa baba.
19.b EXTRUDE
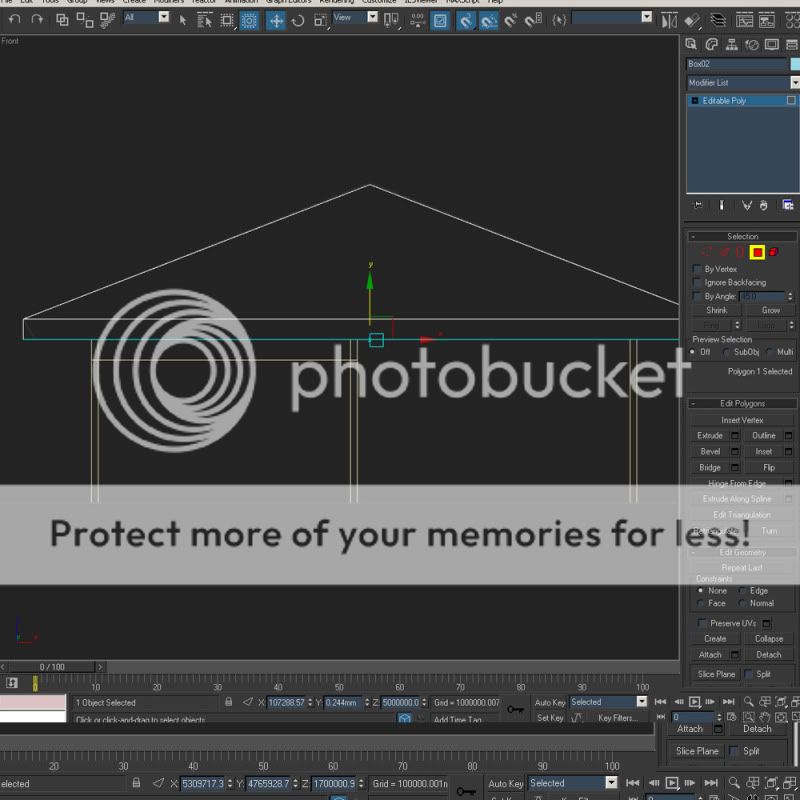
20. balik tyo FRONT VIEW, move natin pataas yung enex-trude nating face

21.a still in VERTEX
21.b SELECT natin yung vertex point ng latest extruded face natin
21.c using scale tool, try nyong e-adjust yung size ng vertex. ALRIGHT?

Simple modeling po……concept lang ito ng pag 3 3d sa max. you can start with these steps. Dito muna tayo sa basic….
Suggestion ko lang, pag nag import kayo ng anything these are the basic kung paano nyo e-modify yung mga object nyo SPECIALLY galing sa SU, from weld ng mga points, and pag REMOVED ng mga lines.
I hope makatulong po sa inyo…….GOOD Luck mga ka CGPIPs……kung may gusto po kayong linawing PM nyo lang po ako mga mam at sir..salamat po…
second share ko ng tips mga pips....para sa mga baguhan pong mag model I hope makatulong po sa inyo...first thing, mahirap pala gumawa ng modelling tutorial, pero try ko para sa inyo. and para kay sir erick,, request nya ito e. matagal na nya ako kinukulit.
isang diskarte palang ito sa max. pero syempre basic tyo lagi magsisimula, and pag nakuha nyo ito makukuha nyo na rin yung whole idea ng modelling sa max. eventually, kayo mismo makaka figure kung paano gagawin.....
check nyo rin yung http://www.cgpinoy.org/3d-studio-max-tutorials-f46/3d-max-modelling-tips-t3696.htm para sa dagdag pang kaalaman.......yung mga tinuturo nila is very much useful.
before we start remember you can use keyboard shortcuts [b]F2[b], [b]F3[b] and [b]F4[b] for [b]wire toggles[b] try nyo very useful yan sa modelling meron din ito sa SU.
1. First, import muna na tyo ng file; Ito po yung link, di ko na po tuturo hehe.....modelling na po tyo mag focus.
http://www.caddigest.com/subjects/autocad/tutorials/select/081803_parsai_import_max.htm
1.A ito yung sample ng F2, F3 and F4 for wire toggles
Note: make sure tama yung scale nyo from architectural and decimal…minsan malaki impact pag mali yng scale na ginamit nyo pag import sa max...
2. RIGHT CLICK>convert to editable poly
NOTE: e-freeze nyo yung cad file nyo para di magalaw: RIGHT CLICK>freeze selection.
3.a go to VERTEX under MODIFY TAB tab
3.b go to snaps toggles…same idea with osnaps sa autocad….Tutorial: http://animation.about.com/od/3danimationtutorials/ss/3dsmax_less1p4_4.htm
3.c TOPVIEW, select vertex
3.d then MOVE, since snaps toggle is on, maharanis nyo yung group of points nag aapply yung snaps sa autocad object nyo
Since you have a wall now. We can start to modify our block.
4.a go to EDGE
4.b SELECT nyo yung upper line ng wall and yung lower line, parallel to each other.
4.c click connect icon on the right side. Then may window na lalabas Kita nyo yung segment? Segment determines the CUT ng face. For now 1 lang ang kailangan natin(try nyo na ring paglaruan yung PINCH and SLIDE).
5. Top view ulit tyo.
5.a balik tyo sa VERTEX
5.b from TOP VIEW, select natin yung naging point dun sa ginawa nating cut from procedure 4.
5.c MOVE natin yung line according sa cad file na in import natin.
6.a Dun tyo sa POLYGON naman pumunta.
6.b select FACE then
6.c EXTRUDE: a new window will pop out.- you’ll see sa EXTRUSION HEIGHT PARAMETER lagyan nyo ng value.
7.a move natin yung FACE na in-extrude base sa cad file ulit.
7.b once done. Repeat natin yung procedure(from4 to 7) kung paano magdagdag ng line and mag extrude
8. Pagdating natin sa door ganito yung gagawin nating procedure
8.a from [b]EDGE[b] option, still under editable poly. Select natin yung two VERTICAL LINE
8.b using CONNECT tool add tyo ulit ng line
9. Ito medyo tricky at nakakalito, I hope ma-deliver ko at maintindihan nyo.
9.a once negkaroon na tyo ng cut sa two vertical lines we can add its height using the z-coordinates. Since our standard door is 2100 lagay ko yung value na yan. So we can assume na tama nga yung height natin
9.b balik tyo poly, click nating yung face above our door entrance. Saka tyo mag adjust according sa cad.
9.c EXTRUDE e tayo
10.a Select FACE tayo yung nasa ilalim
10.b then saka tayo mag EXTRUDE pababa….
11.a still in POLYGON
11.b select natin yung FACE ulit sa sides, tpos saka tayo mag extrude
11.c saka tayo mag move ulit according sa cad file natin
12.a go to EDGE
12.b ikot natin yung view from kabilang side may makikita tayo projected line sa center ng wall, kailangan natin burahin yan. SELECT natin yung line
12.c then press REMOVE button
14. HEHE……nagkamali na ako sa numbering ng photo…kaya 14 na yung step, ignore na natin yung step 13.
14.a [b]POLYGON[b](I hope familiar na kayo sa mga icon, (VERTEX, EDGE, POLYGON, OBJECT)
14.b click natin both yung parehong ending ng wall (using CTRL+CLICK, multiple selection ang labas)
14.c tapos click BRIDGE
15. Dito tayo mag start ng ROOF
15.a go to CREATE TAB
15.b from TOP VIEW, gawa tayo ng box according sa cad file(naka freeze), pag nagawa natin convert natin ulit ng EDITABLE POLY
16.a from VERTEX
16.b from front view, SELECT natin yung [b]vertex points[b] sa baba.
16.c saka natin itaas.
17. Still in FRONT VIEW
17.a SELECT natin yung upper VERTEX POINTS.
17.b saka natin ibaba according sa apex ng roof
18. Isa pang tricky part from WELD tool
18.a click WELD
18.b saka nyo taasan yung value ng WELD THRESHOLS, it means yung each parameter ng VERTEXPOINTS lalaki since tinataasan nyo yung VALUE so mag we-weld yung mga sine-lect nyong VERTEX POINTS(I insist pag aralan nyo ito essential sya sa concept ng 3d modeling ng max
19. From perpective view punta tayo sa bottom view ng roof natin.
19.a from POLYGON, click natin yung face sa baba.
19.b EXTRUDE
20. balik tyo FRONT VIEW, move natin pataas yung enex-trude nating face
21.a still in VERTEX
21.b SELECT natin yung vertex point ng latest extruded face natin
21.c using scale tool, try nyong e-adjust yung size ng vertex. ALRIGHT?
Simple modeling po……concept lang ito ng pag 3 3d sa max. you can start with these steps. Dito muna tayo sa basic….
Suggestion ko lang, pag nag import kayo ng anything these are the basic kung paano nyo e-modify yung mga object nyo SPECIALLY galing sa SU, from weld ng mga points, and pag REMOVED ng mga lines.
I hope makatulong po sa inyo…….GOOD Luck mga ka CGPIPs……kung may gusto po kayong linawing PM nyo lang po ako mga mam at sir..salamat po…

Norman- CGP Expert

- Number of posts : 3228
Registration date : 21/06/2009
Re: simple house modelling by f41
![]() by DragonBoi Thu Jul 22, 2010 4:06 am
by DragonBoi Thu Jul 22, 2010 4:06 am
Salamat po! very informative to...
DragonBoi- CGP Newbie

- Number of posts : 5
Registration date : 22/07/2010
Re: simple house modelling by f41
![]() by donskiekong Fri Jul 23, 2010 9:14 pm
by donskiekong Fri Jul 23, 2010 9:14 pm
hehe... thank God talaga for cgp!
thank you for this tutorial sir!! it will really help me a lot..
Mabuhay ang CGP!!!
God bless!
thank you for this tutorial sir!! it will really help me a lot..
Mabuhay ang CGP!!!
God bless!

donskiekong- CGP Newbie
- Number of posts : 191
Age : 33
Location : panabo city
Registration date : 27/08/2009
Re: simple house modelling by f41
![]() by Norman Fri Jul 23, 2010 10:15 pm
by Norman Fri Jul 23, 2010 10:15 pm
johnolive100 wrote:thanks for sharing its a big help for me as a newbie.
DragonBoi wrote:Salamat po! very informative to...
donskiekong wrote:hehe... thank God talaga for cgp!
thank you for this tutorial sir!! it will really help me a lot..
Mabuhay ang CGP!!!
God bless!
thanks mga pips....good luck!!!
Norman- CGP Expert
- Number of posts : 3228
Registration date : 21/06/2009
Re: simple house modelling by f41
![]() by jomztin13 Tue May 03, 2011 11:58 pm
by jomztin13 Tue May 03, 2011 11:58 pm
thanks po sa toturial... malaking bagay po to

jomztin13- CGP Newbie
- Number of posts : 6
Age : 39
Location : iloilo city
Registration date : 03/05/2011
Page 2 of 2 • 1, 2
Page 2 of 2
Permissions in this forum:
You cannot reply to topics in this forum|
|
|