Creating Simple Curtain 2
+21
jucasti
genesisg23
juan
lei23
LadiesMan217
richardglor58
darkbeauty
sniper
quicksilver21
Yhna
chupalok
stevenylanan
lolo_anno
v_wrangler
Smashing_78
francozizm
Butz_Arki
qui gon
archie.l
Stryker
render master
25 posters
Page 2 of 2
Page 2 of 2 •  1, 2
1, 2
 Creating Simple Curtain 2
First topic message reminder :

I would like to share my workflow here on how to make a curtain through simulation process
1. First is the creation of the nurb curve, enough for the width of one window.
Or you can use spline if you want to. Extrude it up, and apply FFD Modifier for compressing and
adjustment on the rod. Then i create a rod out of sphere, and make some ring holder from torus.
Then convert it to poly
]
2. The second one was a bit complicated hehehehhee.
Set my curtain on the rod, stretch, compressed and more.
I then go to space warps and take the wind spacewarps and put it just behind the curtain.
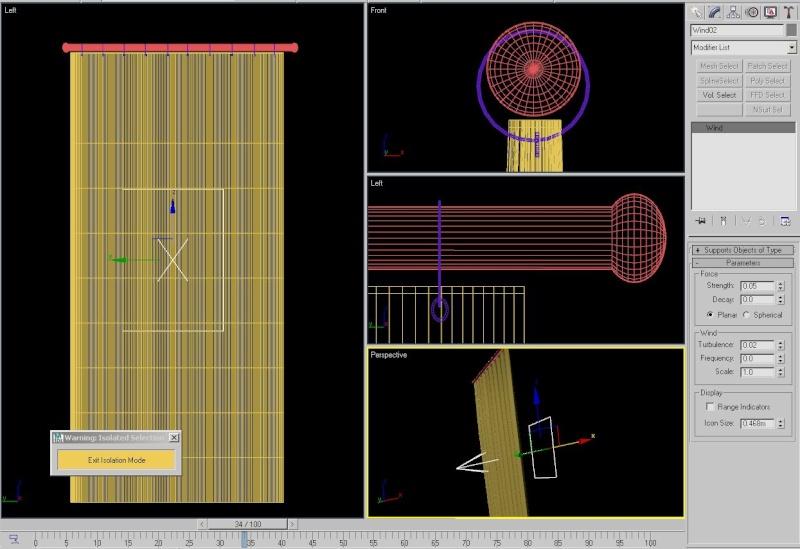
3. Select the extruded curve ( now a poly) and apply cloth modifier,
Then go to the stack area, press the positve sign to show the other properties.

4. Selecting the Goup on the stack area will highlight the vertex of the curtains.
Select the upper portion, those that will be attached to the rod, and make it one group say Node Group
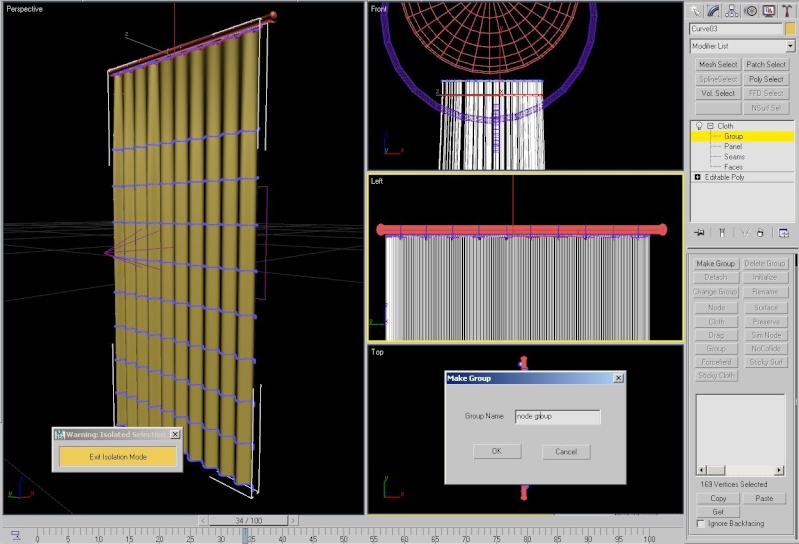
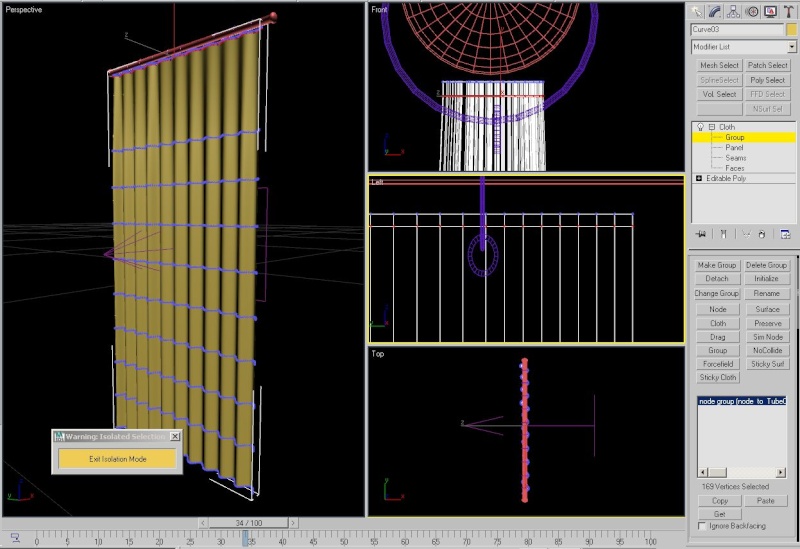
5. It will show up just a bit below on the list. Then press node on the parameters,
then select the button ring i created which will serves as the curtain hanger on the rod
( note: - i attached all this ring hanger in to one
so when i assign it to the node, they will be selected in just one time.
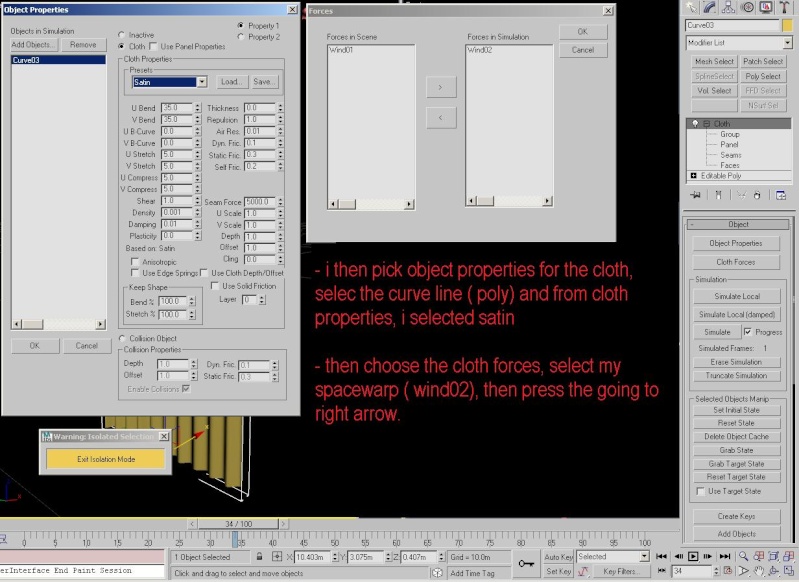
6. Select Object Properties on the list of the cloth modifier.
On object properties, select yor extruded curve ( curtain), then on cloth properties select the type of cloths you wish to assign.
(I did not tackle many things for this time on cloth properties. They are all available on my cloth tutorial ,
The Scarecrow - Cloth Tutorial Part 1, Clothes line - Cloth Tutorial part 2, and the last
was Dynamic Cloth--- heheheh advance announcement ). When your done press ok. T
hen the next thing is to simulate the wind. Press cloth forces, then on the list of the f
orces, select the wind then press the arrow going right then hit ok.
7. Now press simulate and watch the curtain as it moves.
Let them finish so you have a variety of choices for the shape of the curtains.
select which best suited to your scene.


Same procedure was done on this image, i just coppied it one by one, then assign diifirent forces amount on the wind spacewarps so they will have diifirent shape when simulated
image at frame 1

image at frame 25

image at frame 75

image at frame 100
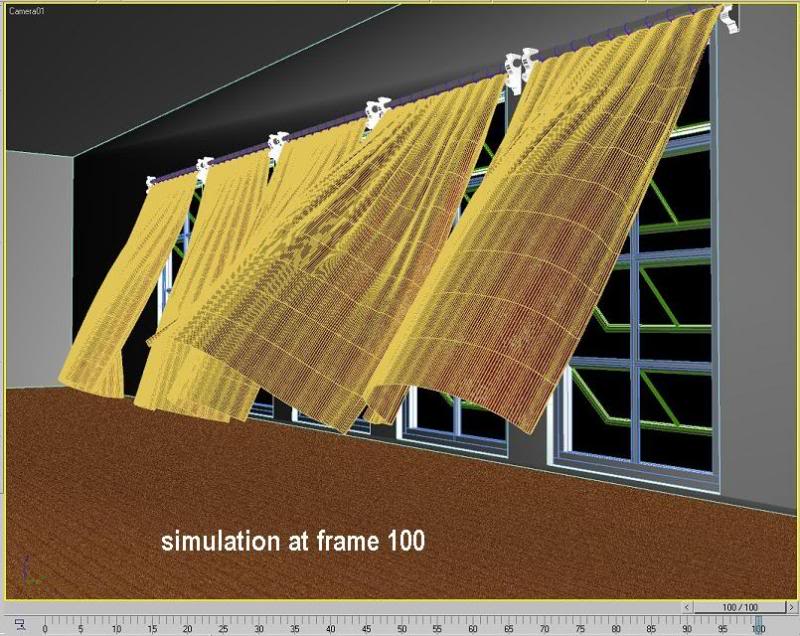
On simulation procedures, you can create a diffirent curtain shapes simulated by the wind, or even as if it falls on the floor naturally
final Image

Good luck and happy viewing. Hope it helps

I would like to share my workflow here on how to make a curtain through simulation process
1. First is the creation of the nurb curve, enough for the width of one window.
Or you can use spline if you want to. Extrude it up, and apply FFD Modifier for compressing and
adjustment on the rod. Then i create a rod out of sphere, and make some ring holder from torus.
Then convert it to poly
]

2. The second one was a bit complicated hehehehhee.
Set my curtain on the rod, stretch, compressed and more.
I then go to space warps and take the wind spacewarps and put it just behind the curtain.

3. Select the extruded curve ( now a poly) and apply cloth modifier,
Then go to the stack area, press the positve sign to show the other properties.

4. Selecting the Goup on the stack area will highlight the vertex of the curtains.
Select the upper portion, those that will be attached to the rod, and make it one group say Node Group

5. It will show up just a bit below on the list. Then press node on the parameters,
then select the button ring i created which will serves as the curtain hanger on the rod
( note: - i attached all this ring hanger in to one
so when i assign it to the node, they will be selected in just one time.

6. Select Object Properties on the list of the cloth modifier.
On object properties, select yor extruded curve ( curtain), then on cloth properties select the type of cloths you wish to assign.
(I did not tackle many things for this time on cloth properties. They are all available on my cloth tutorial ,
The Scarecrow - Cloth Tutorial Part 1, Clothes line - Cloth Tutorial part 2, and the last
was Dynamic Cloth--- heheheh advance announcement ). When your done press ok. T
hen the next thing is to simulate the wind. Press cloth forces, then on the list of the f
orces, select the wind then press the arrow going right then hit ok.

7. Now press simulate and watch the curtain as it moves.
Let them finish so you have a variety of choices for the shape of the curtains.
select which best suited to your scene.


Same procedure was done on this image, i just coppied it one by one, then assign diifirent forces amount on the wind spacewarps so they will have diifirent shape when simulated
image at frame 1

image at frame 25

image at frame 75

image at frame 100

On simulation procedures, you can create a diffirent curtain shapes simulated by the wind, or even as if it falls on the floor naturally
final Image

Good luck and happy viewing. Hope it helps

render master- Game Master

- Number of posts : 3274
Age : 104
Location : riyadh, saudi arabia
Registration date : 27/09/2008
 Re: Creating Simple Curtain 2
thanks sir masubukan nga mamaya.
genesisg23- CGP Newbie

- Number of posts : 164
Registration date : 06/01/2010
 Re: Creating Simple Curtain 2
thanks sir sa tutorial eksaktong may ginagawa ako model ng curtain try ko sir itong tutorial nyo 


jucasti- CGP Newbie

- Number of posts : 7
Age : 61
Location : riyadh, k.s.a
Registration date : 17/05/2010
 Re: Creating Simple Curtain 2
ang husay...!! kkabilib...
maninang- CGP Newbie

- Number of posts : 23
Age : 43
Location : dubai, uae
Registration date : 24/06/2010
 Re: Creating Simple Curtain 2
sir... nahihirapan ako mag map ng mga materials... may ipapayo ka ba para madalian ako?
maninang- CGP Newbie

- Number of posts : 23
Age : 43
Location : dubai, uae
Registration date : 24/06/2010
 Re: Creating Simple Curtain 2
not certain with your question. technically object / models ang nilalagyan ng maps and materials and di naman ganun kahirap maglagay ng maps and materials sa object. just drag and drop it to your object. if you need more info about the procedures - start to read your 3dmax help filesmaninang wrote:sir... nahihirapan ako mag map ng mga materials... may ipapayo ka ba para madalian ako?

render master- Game Master

- Number of posts : 3274
Age : 104
Location : riyadh, saudi arabia
Registration date : 27/09/2008
 Re: Creating Simple Curtain 2
nice work!salamat s tutorial!

enix- CGP Newbie

- Number of posts : 45
Age : 35
Location : manila,philippines
Registration date : 19/12/2009
 Re: Creating Simple Curtain 2
ok po to sir, malaking help..try ko po to i-practise
salamat...
salamat...
rowell- CGP Newbie

- Number of posts : 7
Age : 42
Location : riyadh k.s.a
Registration date : 18/07/2010
 Re: Creating Simple Curtain 2
can i request? gusto ko sana magpaturo kung pano gumawa ng higaan, ung bed sheet nya...

MANOLiTE- CGP Apprentice

- Number of posts : 257
Age : 47
Location : Cebu City
Registration date : 19/06/2010
 Re: Creating Simple Curtain 2
MANOLiTE wrote:can i request? gusto ko sana magpaturo kung pano gumawa ng higaan, ung bed sheet nya...
ok sir, soon to be here

render master- Game Master

- Number of posts : 3274
Age : 104
Location : riyadh, saudi arabia
Registration date : 27/09/2008
Page 2 of 2 •  1, 2
1, 2
 Similar topics
» CREATING SIMPLE CURTAIN
» Creating Simple Carpet in Vray
» Creating Simple Roof Tiles
» Curtain texture
» Curtain Problem
» Creating Simple Carpet in Vray
» Creating Simple Roof Tiles
» Curtain texture
» Curtain Problem
Page 2 of 2
Permissions in this forum:
You cannot reply to topics in this forum


