Creating Simple Roof Tiles
+13
v_wrangler
toddcz2006
alwin
jovanie_
firstrunnerup
gilbs
prim
bokkins
mokong
bongski
wesley14
wheay
render master
17 posters
Page 1 of 1
 Creating Simple Roof Tiles
Creating Simple Roof Tiles

1. On your top viewport, create a plain assumed to be the size of your roofing. Here i create about 10m x 20 m, with 1 segment each for lenght and width. Then on my fornt viewport rotate it for the roof given slope.

2. I then convert plane to poly, activate edge selection on modifyng panel. and select top and bottom edges. Down the the modifying panel on Edit edges select Connect and provide segments assuming the number of roof tiles on horizontal direction.

3. While it still selected, select extrude, and on the extrution dialog box, provide height for the roof tiles, in here i provide about 0.15m and a base height of 0.18m

4. After that click anywhere on your viewport to terminate selection, on your top or front viewport select all edges at the y axis ( vertical edges).
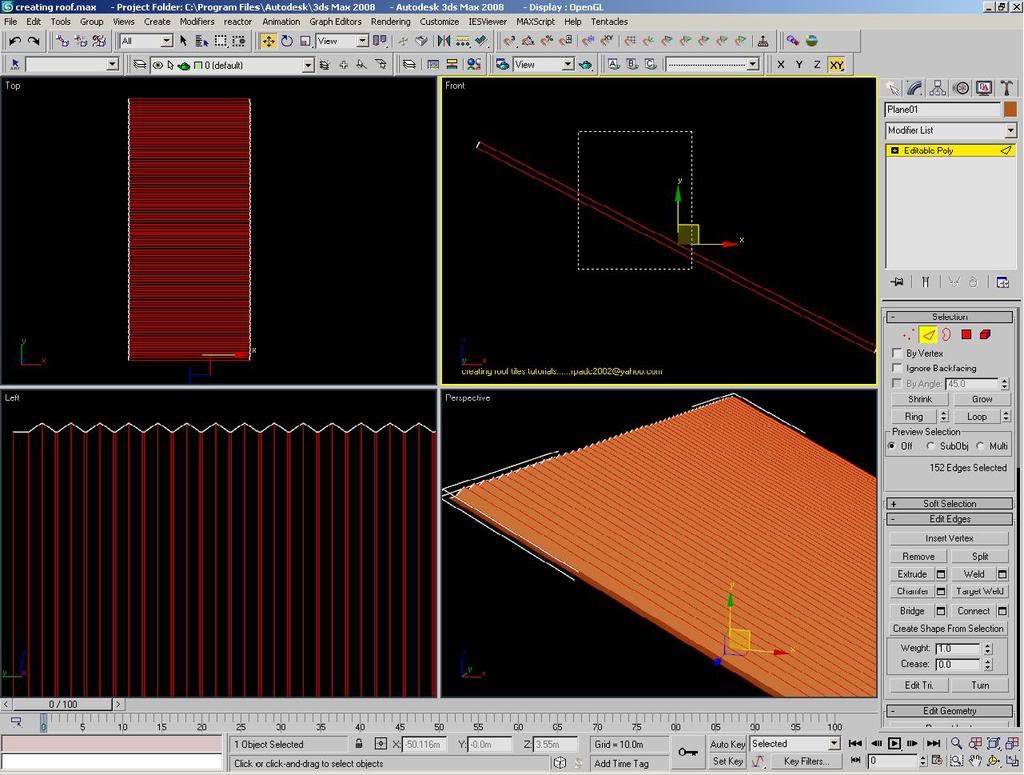
Then go again to modifying panel and select Connect. On dialog box that will appear, provide Segments Amount which is the number of roof tiles on vertical axis ( or slope direction) in here i provide 12 segments ( its just assumption for presentation purposed only to have a clear image of what i am doing). Now you cane see the segments number on the slope.

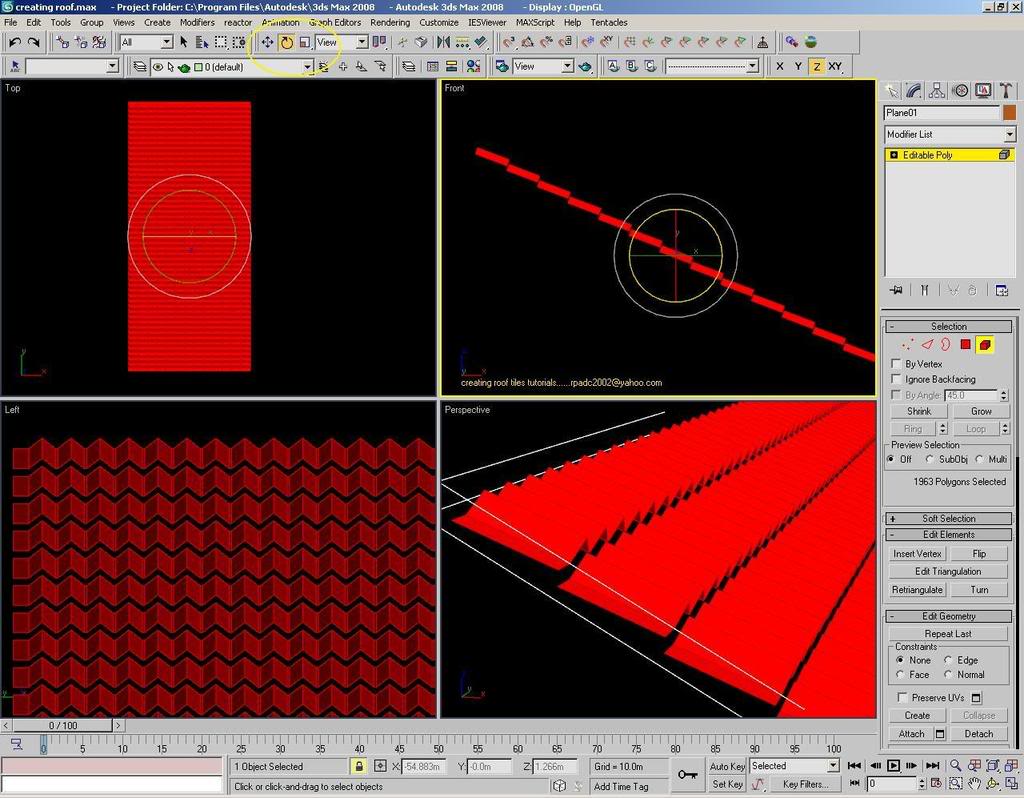
5. While it is still selected go to Chamfer. On chamfer dialog box provide at least 0.01 or .02 then tick the small box for open, soo all the segments for the on horizontal tiles will separate.

Then maximized your front viewport ( side view of the model) and click rotate. Rotate the elements just enough for the tiless to overlap each other.
part 2
6.While the element is still selected, go to main toolbar and select Scale, then scale the element just enough to overlap each tiles.
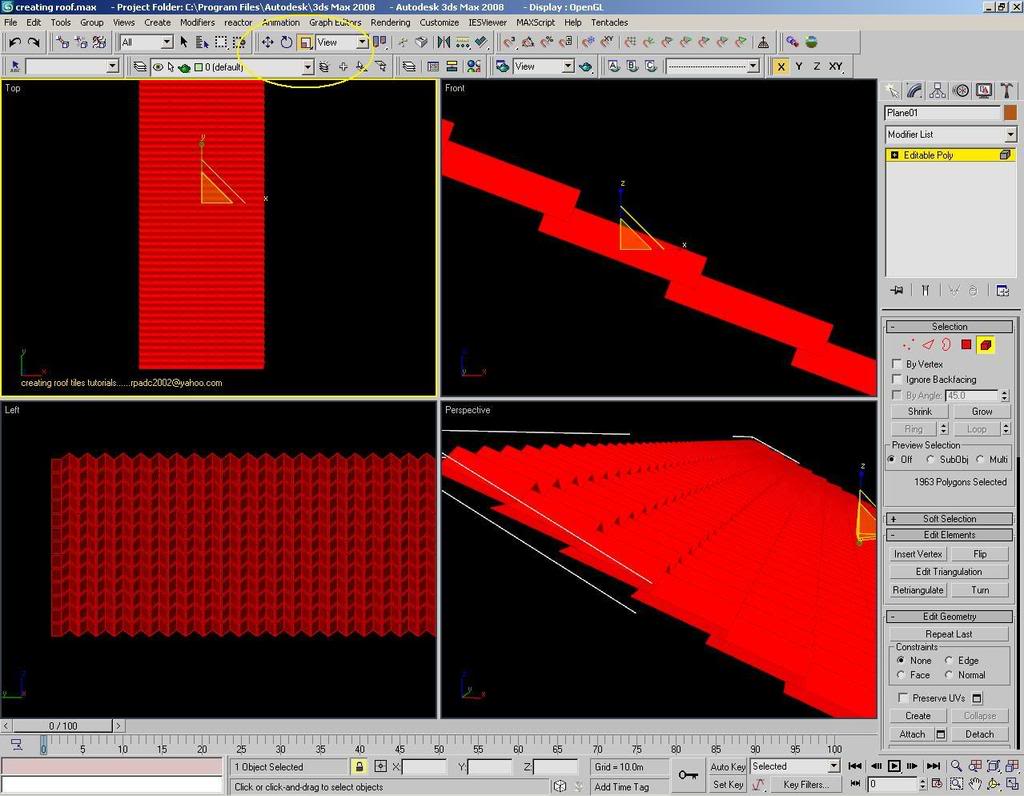
7. Thne click anywhere on the viewport to terminate the selection. Then select Shell modifier on modifier list, to give thickness to the tiles model
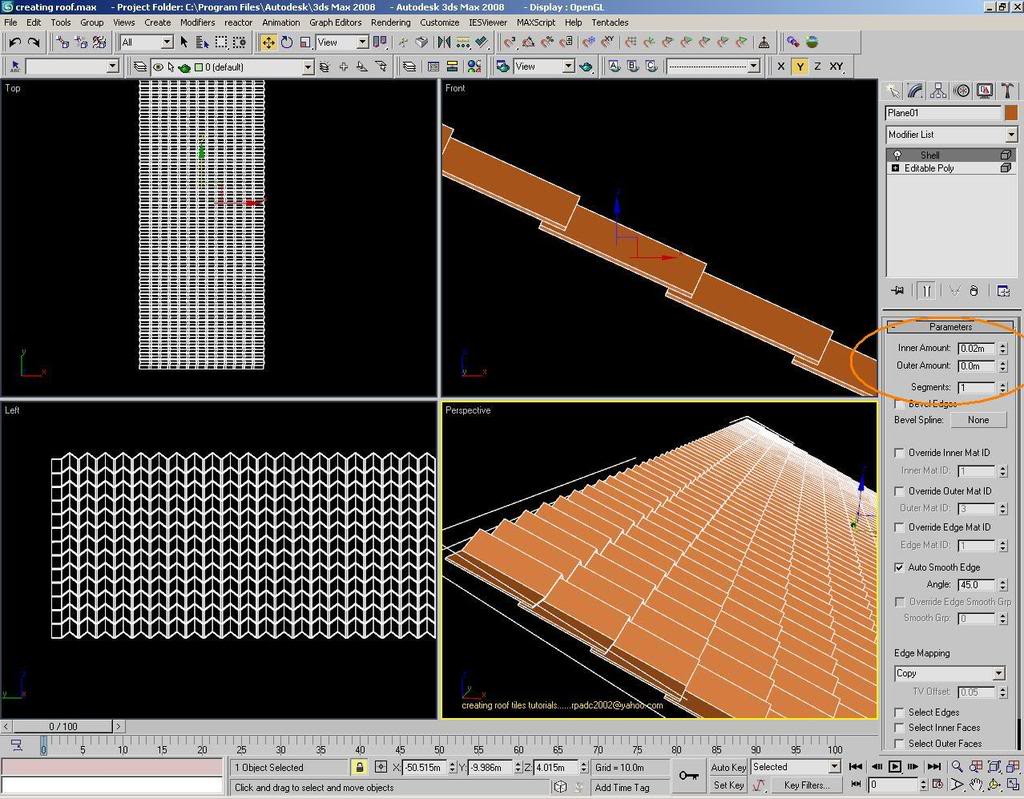
8. To finalized, for both side, you can use symetry od mirror instance. For capping and ridges, you can repeat the porcess but with a lower amount for the horizontal tiling or you may stip from the model you already created, ten rotate it too fit for the ridges.
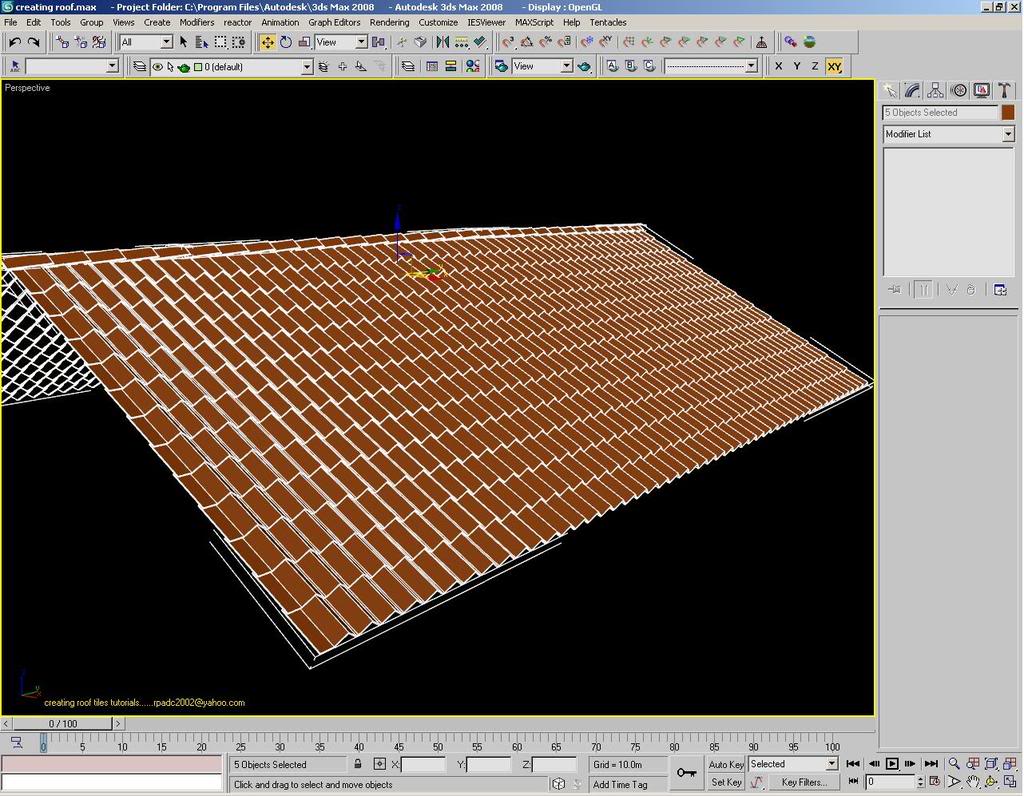
9. Sample images for the Roof Tiles Tutorials

Many thanks to Branco of 3DAllusions for the orginal guidelines and to where this tutorial was originated.
all right reserved
Creating Simple Roof Tiles
July 2008

1. On your top viewport, create a plain assumed to be the size of your roofing. Here i create about 10m x 20 m, with 1 segment each for lenght and width. Then on my fornt viewport rotate it for the roof given slope.

2. I then convert plane to poly, activate edge selection on modifyng panel. and select top and bottom edges. Down the the modifying panel on Edit edges select Connect and provide segments assuming the number of roof tiles on horizontal direction.

3. While it still selected, select extrude, and on the extrution dialog box, provide height for the roof tiles, in here i provide about 0.15m and a base height of 0.18m

4. After that click anywhere on your viewport to terminate selection, on your top or front viewport select all edges at the y axis ( vertical edges).

Then go again to modifying panel and select Connect. On dialog box that will appear, provide Segments Amount which is the number of roof tiles on vertical axis ( or slope direction) in here i provide 12 segments ( its just assumption for presentation purposed only to have a clear image of what i am doing). Now you cane see the segments number on the slope.

5. While it is still selected go to Chamfer. On chamfer dialog box provide at least 0.01 or .02 then tick the small box for open, soo all the segments for the on horizontal tiles will separate.

Then maximized your front viewport ( side view of the model) and click rotate. Rotate the elements just enough for the tiless to overlap each other.

part 2
6.While the element is still selected, go to main toolbar and select Scale, then scale the element just enough to overlap each tiles.

7. Thne click anywhere on the viewport to terminate the selection. Then select Shell modifier on modifier list, to give thickness to the tiles model

8. To finalized, for both side, you can use symetry od mirror instance. For capping and ridges, you can repeat the porcess but with a lower amount for the horizontal tiling or you may stip from the model you already created, ten rotate it too fit for the ridges.

9. Sample images for the Roof Tiles Tutorials

Many thanks to Branco of 3DAllusions for the orginal guidelines and to where this tutorial was originated.
all right reserved
Creating Simple Roof Tiles
July 2008

render master- Game Master

- Number of posts : 3274
Age : 104
Location : riyadh, saudi arabia
Registration date : 27/09/2008
 Re: Creating Simple Roof Tiles
sir salamat po dito. ang astig talga ng gawa nyo. keep posting more tutorials pls.
 Re: Creating Simple Roof Tiles
thanks po dito
wesley14- CGP Newbie

- Number of posts : 58
Age : 84
Location : las pinas
Registration date : 18/01/2009
 Re: Creating Simple Roof Tiles
sir maraming salamat po 

bongski- CGP Newbie

- Number of posts : 17
Age : 48
Location : dubai
Registration date : 25/01/2009
 batzal roof designer..
download na lng kau ng batzal roof designer.. mas madali gumawa ng roof tapos may mapipili ka pang designs.. ma download nyo yan sa mga torrent sites...

mokong- CGP Guru

- Number of posts : 1926
Age : 41
Location : Nagoya, Japan
Registration date : 02/03/2009
 Re: Creating Simple Roof Tiles
mokong wrote:download na lng kau ng batzal roof designer.. mas madali gumawa ng roof tapos may mapipili ka pang designs.. ma download nyo yan sa mga torrent sites...
bawal magdiscuss ng torrents bro, please read the rules.
 Re: Creating Simple Roof Tiles
mokong wrote:download na lng kau ng batzal roof designer.. mas madali gumawa ng roof tapos may mapipili ka pang designs.. ma download nyo yan sa mga torrent sites...
No offense ha. Paano kaya kung ala iyong Batzal roof designer na iyan.


render master- Game Master

- Number of posts : 3274
Age : 104
Location : riyadh, saudi arabia
Registration date : 27/09/2008
 Re: Creating Simple Roof Tiles
oo nga noh? pero an dyan na kac yan.. hehehe... 


mokong- CGP Guru

- Number of posts : 1926
Age : 41
Location : Nagoya, Japan
Registration date : 02/03/2009
 Re: Creating Simple Roof Tiles
Sir ang galing n'yo po.Nakatulogn po talaga ang tutorial mo.Detailed po ang pagkagawa..Galing talaga!!!! 


prim- CGP Newbie

- Number of posts : 34
Age : 45
Location : davao city
Registration date : 03/03/2009
 Re: Creating Simple Roof Tiles
Very good tutorial, thanks sir.

gilbs- CGP Apprentice

- Number of posts : 258
Age : 48
Location : dubai,uae
Registration date : 25/02/2009
 Re: Creating Simple Roof Tiles
sir thanks sa tutorials. paano po pala if hip ung roof ko. thanks in advance.

firstrunnerup- CGP Newbie

- Number of posts : 77
Age : 41
Location : Quezon City
Registration date : 19/10/2008
 Re: Creating Simple Roof Tiles
rotate mo lang then edit mo ang polys... you can remove each elements or slice them into the valley line of the hip rooffirstrunnerup wrote:sir thanks sa tutorials. paano po pala if hip ung roof ko. thanks in advance.

render master- Game Master

- Number of posts : 3274
Age : 104
Location : riyadh, saudi arabia
Registration date : 27/09/2008
 Re: Creating Simple Roof Tiles
advice lng po.. wak po keu mxado gumamit ng mga plug in na hnd built in..
ms mganda po ksi ang feeling na kaw mismo ang may gawa ng lahat ng object sa scene mo..
hnd ko nmn sinasabi na wag.. pro ms mganda feeling pag sariling gawa..
mganda po ang tute na to.. =)
ms mganda po ksi ang feeling na kaw mismo ang may gawa ng lahat ng object sa scene mo..
hnd ko nmn sinasabi na wag.. pro ms mganda feeling pag sariling gawa..
mganda po ang tute na to.. =)
 Re: Creating Simple Roof Tiles
nice po talaga ang tut na to kasi ito rin ginagawa ko hanggang ngayon!!!
more power to rendermaster!!!!
more power to rendermaster!!!!

alwin- CGP Expert

- Number of posts : 2176
Age : 51
Location : basurero sa cebu
Registration date : 22/01/2009
 Re: Creating Simple Roof Tiles
sir isa pa..xnxa na...pano po mag creat ng contour at rocks? tnx po 
toddcz2006- Number of posts : 2
Age : 45
Location : UAE
Registration date : 06/07/2009
 Re: Creating Simple Roof Tiles
Iba ang mask map sa opacity mapping rendermaster.
If you put a black and white image in the opacity slot - the black areas become transparent but the white areas become masked or made to remain opaque. We all know this as opacity mapping.
The process of filtering an image sa salitang tagalog, sinasala is what you call masking or in max, can be achieved by the mask map. This is separate from the concept of opacity mapping although they may seem similar.
You can use a mask map to combine the diffuse solid color of the material and a bitmap. A mask map in the diffuse will cutout the bitmap texture using the image in the mask slot. The colors of the filtered or cutout areas will be that of the material's diffuse color.
You can of course put the mask map in the opacity channel to make further adjustments to the opacity map using another image. Like opacity masking the opacity mask. Weird huh?
Going back to the original thread. The process mentioned by the tutorial is fine by modeling standards but I will not suggest this because it is not fool-proof.
What if you were asked to change the curve of the tile, or the shape, or length. You wouldn't want to model everything again, do you?
That is why - modeling is not just about being able to make something three dimensional, it is also about being able to make quick, efficient, constant edits to your models as the situation calls for them.
Use, instancing.
Model one or two bricks and instance array them to form the succession. Doing it this way, you can always make further edits to the original and the changes are reflected to its instances.
Last edited by v_wrangler on Sat Jul 11, 2009 8:33 am; edited 3 times in total
 Re: Creating Simple Roof Tiles
If you still want to model the same shape - while rendermaster's way is fine. A one-minute solution (I'm joking) would be to :
1. create a line,
2. divide the edges depending on the number of curves you want.
3. Go subobject mode vertex, select all make them beziers,
4. select every other vertex and raise them so you'll have the continous "S" like pattern
5. Go subobject spline, select spline, hit outline for thickness,
6. extrude to desired length.
7. Instance the same and position them so you have one set on top of another.
8. Repeat no. 7
 Re: Creating Simple Roof Tiles
awesome please post more tutorials........ 


nadzk3t09- CGP Newbie

- Number of posts : 22
Age : 45
Location : dubai
Registration date : 10/07/2009
 Re: Creating Simple Roof Tiles
very nice sir render master, kpag ikaw tlaga nagbibigay tutorials, madali intindihin. salamat sa mga insights at tuts sir 

 Re: Creating Simple Roof Tiles
u can try sir vertex suggestion too, easy to follow  u can easily edit...
 u can easily edit...
silvercrown- CGP Apprentice

- Number of posts : 981
Age : 49
Location : Toronto, Mandaue, Polomolok
Registration date : 05/11/2008
 Re: Creating Simple Roof Tiles
thanks for the other options sirs/masters  this makes the discussion more interesting..
 Re: Creating Simple Roof Tiles
thx sir ive been looking for this tutorials !

benj.arki- CGP Apprentice

- Number of posts : 810
Age : 35
Location : cavite
Registration date : 21/06/2009
 Similar topics
» Batzal Roof Setting for Roof Tiles & Ridges
» KAWARA Roof Tiles
» PLEASE SHOW ME HOW TO MAKE ROOF TILES
» Creating the roof
» CREATING SIMPLE CURTAIN
» KAWARA Roof Tiles
» PLEASE SHOW ME HOW TO MAKE ROOF TILES
» Creating the roof
» CREATING SIMPLE CURTAIN
Page 1 of 1
Permissions in this forum:
You cannot reply to topics in this forum


