


HDRI Environment, Reflection & BG Tutorial
+17
noahsalcan
Rheinfell
Ian 3D
Jay-Jay
Brew_ratz
ray_victor_benitez
mez
TheGreatIam
aesonck
Just
torvicz
KreativeKingdom
Popoy1980
jamesalbert
edosayla
brodger
jheteg
21 posters
Page 2 of 2
Page 2 of 2 •  1, 2
1, 2
HDRI Environment, Reflection & BG Tutorial
![]() by jheteg Mon Aug 06, 2012 4:08 am
by jheteg Mon Aug 06, 2012 4:08 am
First topic message reminder :


please note that all settings in this tutorial can be changed to your own liking. all these settings are my personal preferences and I may have different approach and understanding on them. feel free to correct me and/or comment if you think there is something wrong on how I do and/or explain them. anyways, if you follow all settings in this tutorial, you may have the same output as the sample above.
step1: units and gamma 2.2/linear workflow
units - go to customize/units setup. in this tutorial, I'm using millimeters.
gamma - set your gamma 2.2 settings. personally, I do my gamma 2.2 correction on 3dsmax and not on vray. go to customize/preferences/gamma and LUT. tick enable gamma/LUT correction and enter 2.2 on gamma, input gamma and output gamma. tick also affect color selectors and affect material editor so it will be a linear workflow.

step2: preparations
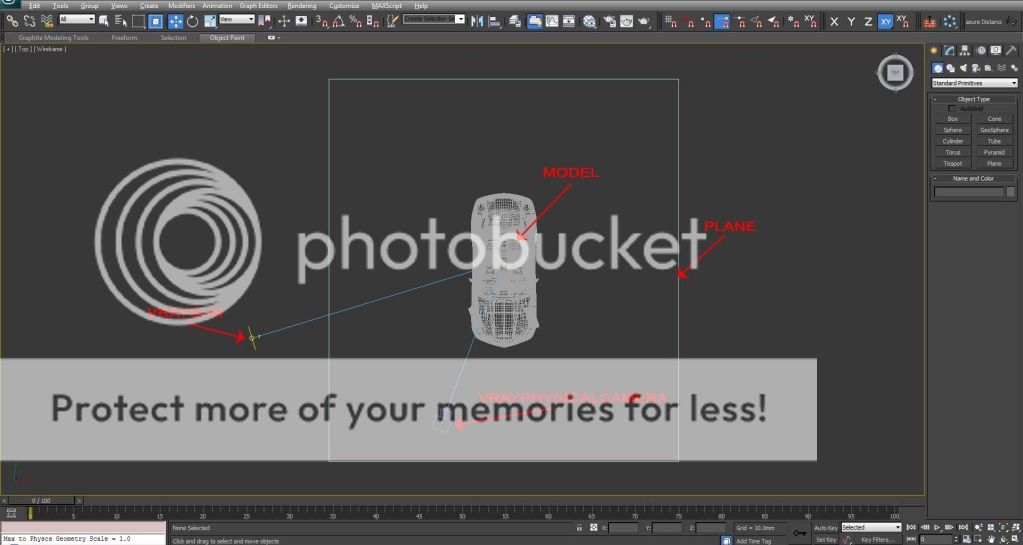
place model in the scene and put a plane under it. the plane will capture the shadows and lights that bounces on both model and the background. add a vraycamera and a vraysun. both in default settings.
step3: settings
we all have different technique and preferences when it comes to this one. this is how I set it. first, open render setup (pressF10) and assign renderer and active shade to vray.

common tab/common parameters - set resolution (note: small for quick renders and decent size for final renders).

vray tab/frame buffer - tick enable built-in frame buffer to use vray's instead of max's default.

vray tab/image sampling (antialiasing) - adaptive DMC/catmull rom or you may use your own settings to this one.(note: unchecked box for quick renders and checked box for final renders on antialiasing filter)

vray tab/environment - tick GI environment override box and put a vrayHDRI map on it. tick reflection/refraction environment override but this time drag and drop the vrayHDRI map from the GI environment override to the reflection/refraction environment override and choose instance. (note: skip this method if you're using vray dome light as an environment/reflection wherein you may achieve the same effect by using HDR image as a texture map. I'm not going to cover that method in this tutorial so just google it.)

vray tab/color mapping - choose your favorite type. personally, I like reinhard for outdoors and exponential for indoors. (note: you may change some value here but it really depends on how you set your gamma 2.2. others they set it here, others on max gamma and LUT settings, others on saving the final rendered image. google gamma 2.2 or linear workflow for more info.)

indirect illumination tab/GI - primary bounces/irradiance map. secondary bounces/light cache. or you may choose your own favorite method.

indirect illumination tab/irradiance map - tick show calculation phase and choose your preset. (note: very low=fast renders. preset medium = final renders.)

indirect illumination tab/light cache - tick show calculation phase and enter subdivs. (note: 100-200 for fast renders. 800-1000 final renders.)

settings tab/DMC - default values are good but if you want for fast renders, try to increase noise threshold. (note: the higher the value on noise threshold the faster the render but low quality. 0.01=high quality. 1.00=low quality).

settings tab/system - I only change the dynamic memory limit here. it is dependent on your rig. there is a post here about on how to calculate it. here http://www.cgpinoy.org/t22366-vray-dynamic-memory-limit-calculator?highlight=dynamic+compute . you may adjust the render region division to change the render size bucket.

step4: assigning HDRimage as EV, RF and BG
in this tutorial, I'm using a single HDRimage for environment, reflection and background. open environment and effects (press 8). now open again the vray render setup (press F10) and go to vray tab/environment. drag either one of the two maps(vrayHDRI) and drop it to the background:environment map on environment and effects window and choose instance. next, open material editor (press M). again, drag any of the maps(vrayHDRI) either on environment, reflection or background and drop it to the material editor and again choose instance. on the material editor, select the newly created VRayHDRI and click browse and navigate to your HDRimage and change Mapping to Spherical. leave other settings to default for now. there are plenty of site that offers free HDRimage. get some free samples here: http://www.hdri-hub.com/free-samples.

step5: viewport
let make some changes on 3ds max default 4way viewport. from top, front, left and perspective, change it to front, active shade, left and vrayphysicalcamera001. to do this, click the [Front] on the top-left corner of the front viewport, go to extended viewports and choose active shade. next, click the [Perspective] on the top-left corner of the perspective viewport choose vrayphysicalcamera001 from cameras. (note1: you may change the top and left viewport to other views. the important is keep the active shade and vrayphysicalcamera.)(note2: if the active shade viewport is too dark, check on step6 on how to adjust it.)

step6: HDRimage and plane settings
HDRimage - press M to open material editor. select VrayHDRI material and increase on overall multiply to adjust brightness. check that the Mapping type is in Spherical.
plane - we need to set it that in the active shade and final render it will only show the shadow and light bounces. there are some other ways to do this. you may use standard matte/shadow material or VrayMtlWrapper. i won't cover on how those material works, so just google them. but in this tutorial, let's use the simplest way to do it. select and right-click on the plane and go to v-ray properties. on Matte properties, tick on Matte object box, -1.0 on Alpha contribution and enable shadows and affect alpha on Direct light. next, we need to put material on the plane so that the light bounces from the plane to the model, it will match the color of the background where it stand. simply use a vraymtl or standard material and just try to match the diffuse color to the background.

step7: sun, background, camera and model position
sun - we need to match the shadow of the background to the model's shadow. position you vraysun target and vrayphysicalcamera target to the center of the model. from the vrayphysicalcamera001 viewport, click on orbit camera and locate the background(hdr image) sun. move your vraysun to position using top and left viewport. hide the model and plane to clear the view in active shade. so basically, we're aligning the vraysun, model and vrayphysicalcamera.
background/camera - since we're using HDRimage as background, we can rotate it in any angle we want. again use the vrayphysicalcamera to rotate the background. it is important that we use the vraycamera to rotate the background and not on the VrayHDRI material horizontal and vertical rotation parameters since we already position the vraysun to the background.
model - rotate the model to the angle your want. (tips: use truck, dolly and roll camera for better angle.)

that's it! we're ready to render. i hope this tutorial has been helpful and informative.
i would like to thanks CGPinoy community for the support. more power!
happy rendering!
faq's:
Q: why this tutorial?
A: this is my first time to write a tutorial. i made this one because i would like to share what i've learned so far in making a realistic 3d rendering. it's like giving thanks to all other people out there sharing the same way by posting free tutorial in the web to help others.
Q: why in english?
A: although cgpinoy.org is a filipino web community, writing a tutorial in English is an act of unselfishness. many cgp members cannot read or understand tagalog.
Q: can you do a sketch up version?
A: unfortunately I'm not really good in sketch up. sorry.
Q: do i have to follow all these settings to have the same output quality?
A: No. there are other workaround to achieve the same or even better output. there are a lot of tutorials in the web. check the tutorial section here in cgpinoy.
Q: Why didn't you use vray dome light for the environment instead?
A: As i mentioned in the tutorial, you may use vray dome light but by using that method, you're adding more variables to the scene lighting since vraydomelight has its own parameter to adjust the lighting.
Q: I've already adjusted the overall multiply on the vrayHDRI material. why is my final output is too dark/bright comparing to active shade and render window when i save it?
A: if you're using gamma 2.2 or linear workflow on 3ds max system. just click on the sRGB button located at the bottom-left corner of the vray frame buffer window. this is the how the brightness of your output when you save it.
Q: why is my models shadow's too sharp comparing to the background shadow?
A: the background shadow is an image. we cannot do anything about that but we can soften the shadow of the model by increasing the vraysun size multiplier in modify panel.
Q: I'm also working in riyadh. do you think we can meet and teach me on how to do this in actual?
A: If i'm not busy, why not. just pm me.
Q: i have another question. where or how can i ask you?
A: ask here. just leave a post or pm me.
please note that all settings in this tutorial can be changed to your own liking. all these settings are my personal preferences and I may have different approach and understanding on them. feel free to correct me and/or comment if you think there is something wrong on how I do and/or explain them. anyways, if you follow all settings in this tutorial, you may have the same output as the sample above.
step1: units and gamma 2.2/linear workflow
units - go to customize/units setup. in this tutorial, I'm using millimeters.
gamma - set your gamma 2.2 settings. personally, I do my gamma 2.2 correction on 3dsmax and not on vray. go to customize/preferences/gamma and LUT. tick enable gamma/LUT correction and enter 2.2 on gamma, input gamma and output gamma. tick also affect color selectors and affect material editor so it will be a linear workflow.
step2: preparations
place model in the scene and put a plane under it. the plane will capture the shadows and lights that bounces on both model and the background. add a vraycamera and a vraysun. both in default settings.
step3: settings
we all have different technique and preferences when it comes to this one. this is how I set it. first, open render setup (pressF10) and assign renderer and active shade to vray.
common tab/common parameters - set resolution (note: small for quick renders and decent size for final renders).
vray tab/frame buffer - tick enable built-in frame buffer to use vray's instead of max's default.
vray tab/image sampling (antialiasing) - adaptive DMC/catmull rom or you may use your own settings to this one.(note: unchecked box for quick renders and checked box for final renders on antialiasing filter)
vray tab/environment - tick GI environment override box and put a vrayHDRI map on it. tick reflection/refraction environment override but this time drag and drop the vrayHDRI map from the GI environment override to the reflection/refraction environment override and choose instance. (note: skip this method if you're using vray dome light as an environment/reflection wherein you may achieve the same effect by using HDR image as a texture map. I'm not going to cover that method in this tutorial so just google it.)
vray tab/color mapping - choose your favorite type. personally, I like reinhard for outdoors and exponential for indoors. (note: you may change some value here but it really depends on how you set your gamma 2.2. others they set it here, others on max gamma and LUT settings, others on saving the final rendered image. google gamma 2.2 or linear workflow for more info.)
indirect illumination tab/GI - primary bounces/irradiance map. secondary bounces/light cache. or you may choose your own favorite method.
indirect illumination tab/irradiance map - tick show calculation phase and choose your preset. (note: very low=fast renders. preset medium = final renders.)
indirect illumination tab/light cache - tick show calculation phase and enter subdivs. (note: 100-200 for fast renders. 800-1000 final renders.)
settings tab/DMC - default values are good but if you want for fast renders, try to increase noise threshold. (note: the higher the value on noise threshold the faster the render but low quality. 0.01=high quality. 1.00=low quality).
settings tab/system - I only change the dynamic memory limit here. it is dependent on your rig. there is a post here about on how to calculate it. here http://www.cgpinoy.org/t22366-vray-dynamic-memory-limit-calculator?highlight=dynamic+compute . you may adjust the render region division to change the render size bucket.
step4: assigning HDRimage as EV, RF and BG
in this tutorial, I'm using a single HDRimage for environment, reflection and background. open environment and effects (press 8). now open again the vray render setup (press F10) and go to vray tab/environment. drag either one of the two maps(vrayHDRI) and drop it to the background:environment map on environment and effects window and choose instance. next, open material editor (press M). again, drag any of the maps(vrayHDRI) either on environment, reflection or background and drop it to the material editor and again choose instance. on the material editor, select the newly created VRayHDRI and click browse and navigate to your HDRimage and change Mapping to Spherical. leave other settings to default for now. there are plenty of site that offers free HDRimage. get some free samples here: http://www.hdri-hub.com/free-samples.
step5: viewport
let make some changes on 3ds max default 4way viewport. from top, front, left and perspective, change it to front, active shade, left and vrayphysicalcamera001. to do this, click the [Front] on the top-left corner of the front viewport, go to extended viewports and choose active shade. next, click the [Perspective] on the top-left corner of the perspective viewport choose vrayphysicalcamera001 from cameras. (note1: you may change the top and left viewport to other views. the important is keep the active shade and vrayphysicalcamera.)(note2: if the active shade viewport is too dark, check on step6 on how to adjust it.)
step6: HDRimage and plane settings
HDRimage - press M to open material editor. select VrayHDRI material and increase on overall multiply to adjust brightness. check that the Mapping type is in Spherical.
plane - we need to set it that in the active shade and final render it will only show the shadow and light bounces. there are some other ways to do this. you may use standard matte/shadow material or VrayMtlWrapper. i won't cover on how those material works, so just google them. but in this tutorial, let's use the simplest way to do it. select and right-click on the plane and go to v-ray properties. on Matte properties, tick on Matte object box, -1.0 on Alpha contribution and enable shadows and affect alpha on Direct light. next, we need to put material on the plane so that the light bounces from the plane to the model, it will match the color of the background where it stand. simply use a vraymtl or standard material and just try to match the diffuse color to the background.
step7: sun, background, camera and model position
sun - we need to match the shadow of the background to the model's shadow. position you vraysun target and vrayphysicalcamera target to the center of the model. from the vrayphysicalcamera001 viewport, click on orbit camera and locate the background(hdr image) sun. move your vraysun to position using top and left viewport. hide the model and plane to clear the view in active shade. so basically, we're aligning the vraysun, model and vrayphysicalcamera.
background/camera - since we're using HDRimage as background, we can rotate it in any angle we want. again use the vrayphysicalcamera to rotate the background. it is important that we use the vraycamera to rotate the background and not on the VrayHDRI material horizontal and vertical rotation parameters since we already position the vraysun to the background.
model - rotate the model to the angle your want. (tips: use truck, dolly and roll camera for better angle.)
that's it! we're ready to render. i hope this tutorial has been helpful and informative.
i would like to thanks CGPinoy community for the support. more power!
happy rendering!
faq's:
Q: why this tutorial?
A: this is my first time to write a tutorial. i made this one because i would like to share what i've learned so far in making a realistic 3d rendering. it's like giving thanks to all other people out there sharing the same way by posting free tutorial in the web to help others.
Q: why in english?
A: although cgpinoy.org is a filipino web community, writing a tutorial in English is an act of unselfishness. many cgp members cannot read or understand tagalog.
Q: can you do a sketch up version?
A: unfortunately I'm not really good in sketch up. sorry.
Q: do i have to follow all these settings to have the same output quality?
A: No. there are other workaround to achieve the same or even better output. there are a lot of tutorials in the web. check the tutorial section here in cgpinoy.
Q: Why didn't you use vray dome light for the environment instead?
A: As i mentioned in the tutorial, you may use vray dome light but by using that method, you're adding more variables to the scene lighting since vraydomelight has its own parameter to adjust the lighting.
Q: I've already adjusted the overall multiply on the vrayHDRI material. why is my final output is too dark/bright comparing to active shade and render window when i save it?
A: if you're using gamma 2.2 or linear workflow on 3ds max system. just click on the sRGB button located at the bottom-left corner of the vray frame buffer window. this is the how the brightness of your output when you save it.
Q: why is my models shadow's too sharp comparing to the background shadow?
A: the background shadow is an image. we cannot do anything about that but we can soften the shadow of the model by increasing the vraysun size multiplier in modify panel.
Q: I'm also working in riyadh. do you think we can meet and teach me on how to do this in actual?
A: If i'm not busy, why not. just pm me.
Q: i have another question. where or how can i ask you?
A: ask here. just leave a post or pm me.
Last edited by jheteg on Tue Aug 07, 2012 6:35 am; edited 8 times in total

jheteg- CGP Apprentice

- Number of posts : 916
Age : 46
Location : Pampanga, Riyadh KSA
Registration date : 14/05/2010 -

Re: HDRI Environment, Reflection & BG Tutorial
![]() by noahsalcan Wed Sep 12, 2012 1:18 pm
by noahsalcan Wed Sep 12, 2012 1:18 pm
hayos sir jheteg mausay ka tlaga
noahsalcan- CGP Newbie

- Number of posts : 5
Registration date : 05/11/2010
Re: HDRI Environment, Reflection & BG Tutorial
![]() by archshade02 Thu Sep 13, 2012 7:58 am
by archshade02 Thu Sep 13, 2012 7:58 am
galing sir TFS

archshade02- CGP Guru

- Number of posts : 1160
Age : 43
Location : kuwait
Registration date : 07/09/2010
Re: HDRI Environment, Reflection & BG Tutorial
![]() by ar_eds15 Wed Sep 02, 2015 11:03 am
by ar_eds15 Wed Sep 02, 2015 11:03 am
thanks master..ill try this after i've finished my sideline... 
ar_eds15- Number of posts : 3
Age : 40
Location : Calamba
Registration date : 28/08/2015
Re: HDRI Environment, Reflection & BG Tutorial
![]() by v_wrangler Tue Sep 08, 2015 11:09 am
by v_wrangler Tue Sep 08, 2015 11:09 am
The only problem I see with this procedure is that you are not actually getting true integration. The HDRI is taken in generally as a GI contributor and as an environment (which is not wrong). But since the HDRI is wrapped spherically - you only get an approximation of its reflection on the surfaces of the car. There's actually more you can do with it. Take note that the ground's reflection on the car surface is not visible. Which is a takeaway.
You can improve this procedure, attain much more level of realism by actually modeling the basic shapes of the environment and have those reflect (by projection camera mapping).
Imagine you want to integrate a cg object into a photograph. Or maybe a cg facade to a unfinished photo of a construction site. Those are some of the probable uses of the technique I mentioned above..
I'll probably expand on those ideas in the coming days.

v_wrangler- CGP Loverboy

- Number of posts : 1994
Age : 54
Location : Northern Mountains
Registration date : 29/03/2009 -
Re: HDRI Environment, Reflection & BG Tutorial
![]() by jheteg Tue Nov 10, 2015 1:35 am
by jheteg Tue Nov 10, 2015 1:35 am
archshade02 wrote:galing sir TFS
ar_eds15 wrote:thanks master..ill try this after i've finished my sideline...
v_wrangler wrote:The only problem I see with this procedure is that you are not actually getting true integration. The HDRI is taken in generally as a GI contributor and as an environment (which is not wrong). But since the HDRI is wrapped spherically - you only get an approximation of its reflection on the surfaces of the car. There's actually more you can do with it. Take note that the ground's reflection on the car surface is not visible. Which is a takeaway.
You can improve this procedure, attain much more level of realism by actually modeling the basic shapes of the environment and have those reflect (by projection camera mapping).
Imagine you want to integrate a cg object into a photograph. Or maybe a cg facade to a unfinished photo of a construction site. Those are some of the probable uses of the technique I mentioned above..
I'll probably expand on those ideas in the coming days.
thank you guys.
@v_wrangler, thank you sir for the great tips. you're right, there's a lot of room for improvement. anyways, this are old procedures. since then i made a lot of changes in settings. but of coarse, the basics are still the same.
jheteg- CGP Apprentice
- Number of posts : 916
Age : 46
Location : Pampanga, Riyadh KSA
Registration date : 14/05/2010 -
Re: HDRI Environment, Reflection & BG Tutorial
![]() by kewi Thu Nov 12, 2015 4:51 am
by kewi Thu Nov 12, 2015 4:51 am
good job sir! I'm sure napakalaking tulong ito sa amin. Thanks!

kewi- CGP Newbie
- Number of posts : 74
Age : 37
Location : Albay
Registration date : 06/02/2015
Page 2 of 2 • 1, 2
» My try using HDRI Environment (updated)
» 2nd: Two Storey Building in HDRI environment
» UPDATED 2 STOREY RESIDENCE USING HDRI ENVIRONMENT
» hdri reflection problem
» Modern House(update with setting, post pro tutorial,grass scatter tutorial)
» 2nd: Two Storey Building in HDRI environment
» UPDATED 2 STOREY RESIDENCE USING HDRI ENVIRONMENT
» hdri reflection problem
» Modern House(update with setting, post pro tutorial,grass scatter tutorial)
Page 2 of 2
Permissions in this forum:
You cannot reply to topics in this forum|
|
|