


howl
:: 3d Gallery :: Character
Page 1 of 2 • 1, 2 ![]()

howl
![]() by Guest Sun Apr 04, 2010 5:32 am
by Guest Sun Apr 04, 2010 5:32 am
photoshop cs4
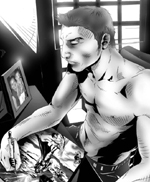
Shave and a Haircut 5.1
maya 2010
hindi na kaya ng pc kaya ganito na lang muna siya,
gumawa din ako ng shader dummy para pang test sa pagaaral ko ng SSS skin sa mga susunod na project ko,
ngayon naghahanap na ko ng mga tutorials.
baby napili kong pang dummy.


Last edited by pressure on Mon Apr 05, 2010 4:28 am; edited 6 times in total
Guest- Guest
Re: howl
![]() by jon2 Sun Apr 04, 2010 5:41 am
by jon2 Sun Apr 04, 2010 5:41 am


jon2- CGP Newbie

- Number of posts : 167
Age : 47
Location : BAHRAIN/PHILIPPINES/TUGUEGARAO
Registration date : 21/02/2010 -

Re: howl
![]() by reyknow Sun Apr 04, 2010 6:20 am
by reyknow Sun Apr 04, 2010 6:20 am

reyknow- CGP Apprentice

- Number of posts : 673
Age : 38
Location : Paranaque. Philippines
Registration date : 16/02/2009 -

nahumreigh- CGP Apprentice
- Number of posts : 638
Age : 41
Location : Australia/Baguio/Quezon City
Registration date : 04/04/2009 -
Re: howl
![]() by Guest Mon Apr 05, 2010 1:51 am
by Guest Mon Apr 05, 2010 1:51 am
jon2 wrote:OK BRO.ANG GANDA. GANITO YONG GUSTO KONG SETTING NG LIGHT SA MAYA PERO HIRAP TALAGA ME NG LIGTHING SA MAYA.....
salamat sir, message ka sakin sa ym x_blacksaint_x@yahoo.com bigay ko sayo set up ng lighting at render na ganito.
Guest- Guest
Re: howl
![]() by Guest Mon Apr 05, 2010 1:56 am
by Guest Mon Apr 05, 2010 1:56 am
reyknow wrote:naks tapos na pala sya. pano ginawa yung buhok? maya hair?
thank you sir, di pa din to tapos. pag may malakas na kong pc tutuloy ko to,
Guest- Guest
Re: howl
![]() by Guest Mon Apr 05, 2010 1:57 am
by Guest Mon Apr 05, 2010 1:57 am
nahumreigh wrote:adek ka master... astiiiig
thank you master.
Guest- Guest
Re: howl
![]() by reyknow Sun May 09, 2010 2:51 pm
by reyknow Sun May 09, 2010 2:51 pm
dun sa WIP thread mo sabi mo gumamit ka ng normal map jan, pano mo nirender sa maya? maya software, hardware, o mental ray?
reyknow- CGP Apprentice
- Number of posts : 673
Age : 38
Location : Paranaque. Philippines
Registration date : 16/02/2009 -
Re: howl
![]() by Guest Sun May 09, 2010 8:39 pm
by Guest Sun May 09, 2010 8:39 pm
reyknow wrote:tol may tanong pala ko sa pag render mo dito,
dun sa WIP thread mo sabi mo gumamit ka ng normal map jan, pano mo nirender sa maya? maya software, hardware, o mental ray?
mental ray bro, pero render by region, nagkacrash kasi pag nirender ng buo. mahina ang pc.
Guest- Guest
Re: howl
![]() by reyknow Mon May 10, 2010 6:00 am
by reyknow Mon May 10, 2010 6:00 am

reyknow- CGP Apprentice
- Number of posts : 673
Age : 38
Location : Paranaque. Philippines
Registration date : 16/02/2009 -
Re: howl
![]() by houdini Mon May 10, 2010 3:18 pm
by houdini Mon May 10, 2010 3:18 pm
Try working on the levels of the chacter's face muscles, even yung hagod nung brushes mo, specially sa ganitong character. random but well placed brushe strokes makes a difference. I know malakas kumain ang zbrush ng memory specially when you want to subdivide more to add details
pero try adding fine details around the eye socket and lips, you got it going on your biceps.(bumps maybe?)
Pansin ko lang usually sa clavicle is a solid bone. sa model mo may bumps cya.
nice work on the body hairs, joeAlters shave and a haircut is a memory hog pero ideally you'd want to have a random pero kumpol-kumpol na sets of hairs na mas nakahiga sya compared to perpendicular sa skin;
about rendering issues with maya; i'm not sure if youve tried this but this is how I set it to avoid crashes when rendering single frames using mental ray. go to your Rendering hotbox and the click on Render tabs a Mntel ray rendering options will pop-up by default the verbosity level is set to warning messages change it to progress message, then tick off render on network machines and auto memory limit. then press calculate. may lalabas na number dyan its the the current available memory that your computer has. from there mental ray will try rendering the image with out going over that limit, thus, you avoid crashes) then try rendering I hope this works
cheers


houdini- CGP Newbie
- Number of posts : 87
Age : 48
Location : panabo/canada
Registration date : 19/12/2008 -
Re: howl
![]() by Guest Mon May 10, 2010 5:27 pm
by Guest Mon May 10, 2010 5:27 pm
saka ko nalang problemahin ang mga nasabi mo, ang totoo madaming details to mula sa zbrush at alam ko ding aware ka na mahirap magcapture ng lahat details ng normals o displament maps mula sa zbrush papunta sa 3d app.
una, kelangan mong makapag set ng accurate na settings at hindi pa din 100% ng details ng sculpt mo sa zbrush eh lilitaw siguro maswerte ka na kung makuha mo yung 85%,yung details sa biceps fake lang yun sa texturing.meron din yan sa lips sa close up render lang siya nakikita.
pangalawa , napakaraming test renders para makakuha ka siguro ng medyo magugutuhan mong result at sa rendering ako nagkakaprob,yung nasabi mo sir sa rendering naka set na yung maya ko dun namamatay talaga siya.
256mb yung vid card ko
2 gig yung ram. masyado talagang mababa yung specs hindi naman siya excuse para makagawa ng maayos na quality pero ganun talaga.tiyaga muna sa kaya lang ng pc.
yung sa hair naman napakaunti lang nailagay ko at aware kang mabigat yung hairs sobrang masakit sa ulo magayos ng buhok hintay ka ng halos minutong lag para makita mo yung update ng tweaking.kaya mahirap magtiyagang magayos at magdagdag.kung papahigain ko yung kahit unti lang ng hairs na naandiyan parang wala ng hairs,so pinatayo ko sila para magmukhang makapal.
sinubukan ko na din magrender sa command prompt pero humihinto siya mas tipid yun sa memory para iwas talaga sa crash,pero humihinto siya sa kalahati,ang naging solusyon ko lang talaga sa rendering eh render by region tapos pagtatagpiin ko nalang kung sakali mang magcrash,
umabot lang ako sa level 6 sa subdivision sa zbrush ,mga detail siguro ng level 4 yung nakuha sa render sa maya ,nasa image sa baba, yung sa clavicle naman aware naman ako dun.pero part siya ng design ng muscle na gusto ko kaya hindi issue yun sa akin,ganyan din yung design sa likod.hindi ko na din napalabas yung details sa texturing lalo na yung mga veins dahil rendering nanaman yun, masakit sa ulo.
ang pangatlo, masosolusyunan ko lang lahat ng prob kapag may desente na kong computer.
cheers
thanks ulit sir.

Guest- Guest
Re: howl
![]() by Guest Mon May 10, 2010 5:30 pm
by Guest Mon May 10, 2010 5:30 pm
reyknow wrote:tnx tol! ngayon ko lang nalaman na nagrerender na pala ng normals ang mental ray sa maya 2010!btw awesome work ulit, tska good luck dun sa baby
yes sir mula ng autodesk na yung maya.salamat.
Guest- Guest
Re: howl
![]() by marcelinoiii Mon May 10, 2010 8:43 pm
by marcelinoiii Mon May 10, 2010 8:43 pm
marcelinoiii- CGP Guru

- Number of posts : 1125
Age : 41
Location : Singapore
Registration date : 29/07/2009

lobsang rampa- CGP Apprentice
- Number of posts : 405
Age : 47
Location : Hostile Jungles of Mindanao
Registration date : 13/09/2009 -
Re: howl
![]() by houdini Mon May 10, 2010 9:12 pm
by houdini Mon May 10, 2010 9:12 pm
I'm not sure about computer specs being the problem but when zbrush 1.55 came out around year 2002( circa maya 6.5 ?) it was already churning out hyper-realistic models and we were just using p4, a 1GB ram and 256mb video card was already a luxury. what I'm saying is, since gumagamit kanang mental ray, unless it's not your'e preference, but kung gusto mong makuha yung details from level 6 I dont think normal maps alone can do it. why not combine displacement maps, normal maps and bump maps?
With mental ray can be a bit disappointing specially with regards to computer crashing, maybe tweaking those hidden settings and bit of patience, who know you might be able to tame the beast.
houdini- CGP Newbie
- Number of posts : 87
Age : 48
Location : panabo/canada
Registration date : 19/12/2008 -
Re: howl
![]() by Canadium Mon May 10, 2010 9:27 pm
by Canadium Mon May 10, 2010 9:27 pm

Canadium- CGP Apprentice
- Number of posts : 574
Age : 101
Location : Lubao, Cainta, Toronto
Registration date : 13/10/2009 -
Re: howl
![]() by Guest Tue May 11, 2010 12:27 am
by Guest Tue May 11, 2010 12:27 am
marcelinoiii wrote:bro galing nito!!! comment lang ako sa ribs and abdomen... yun anatomy sa part na ito alam ko mahirap talaga, but then let me just share some points for our improvement. Just correct me if I'm wrong. The things I'm about to say is based on how I draw/illustrate anatomy. The abs are quite ok, although still a bit too large for me, that's one reason the ribs became even bigger, or out of a few details... and by the size of the character, you should be able to see the muscles behind the underarms... sorry not sure what muscle part it's called... sa thigh, konti na lang perfect na!!! pero overall, hehe the best, di pa ko nakakagawa nyan ganyan kagalengcongrats pre!!!
@ marcelinoiii- thank you sir, kelangan ko pa talagang magpractice sa anatomy, noted lahat ng nasabi mo sir. hindi nga nakita yung palikpik no yung muscle sa underarm. ayusin ko to sir pag may pc na ko,thank you ulit.
Guest- Guest
Re: howl
![]() by Guest Tue May 11, 2010 12:27 am
by Guest Tue May 11, 2010 12:27 am
lobsang rampa wrote:paano yung buhok nito? shave and a haircut?
yes sir, try mo yun, yun ang ginagamit sa hollywood.
Guest- Guest
Re: howl
![]() by Guest Tue May 11, 2010 12:30 am
by Guest Tue May 11, 2010 12:30 am
houdini wrote:@pressure:
I'm not sure about computer specs being the problem but when zbrush 1.55 came out around year 2002( circa maya 6.5 ?) it was already churning out hyper-realistic models and we were just using p4, a 1GB ram and 256mb video card was already a luxury. what I'm saying is, since gumagamit kanang mental ray, unless it's not your'e preference, but kung gusto mong makuha yung details from level 6 I dont think normal maps alone can do it. why not combine displacement maps, normal maps and bump maps?
With mental ray can be a bit disappointing specially with regards to computer crashing, maybe tweaking those hidden settings and bit of patience, who know you might be able to tame the beast.
salamat sir, combination na yan ng normal at displacement map. kulang na nga lang siguro ng bump.thanks sa tip.
may alam ka bang settings ng disp aprox diyan sir na ok sa mental ray?
Guest- Guest
Re: howl
![]() by Guest Tue May 11, 2010 12:31 am
by Guest Tue May 11, 2010 12:31 am
Canadium wrote:Pang Hollywood na ito Sir! Sa tingin ko hindi na mahuhuli sa mga gawa ni Giovanni Nakpil (Pinoy Hollywood CG artist) http://www.gionakpil.com/about.htm
idol ko yun si gio nakpil sir, mukhang madami pa kong kakaining bigas bago ko maabot yung level ng gawa niya.salamat sir.
Guest- Guest
Re: howl
![]() by reyknow Tue May 11, 2010 1:21 am
by reyknow Tue May 11, 2010 1:21 am
tska isa pang tip, yung diba pag nilagyan mo ng texture map na yung color channel, automatic yung quadratic diffusion(?) basta quadratic, palitan mo nalang ng "off"
reyknow- CGP Apprentice
- Number of posts : 673
Age : 38
Location : Paranaque. Philippines
Registration date : 16/02/2009 -
Re: howl
![]() by marcelinoiii Tue May 11, 2010 1:22 am
by marcelinoiii Tue May 11, 2010 1:22 am
pressure wrote:marcelinoiii wrote:bro galing nito!!! comment lang ako sa ribs and abdomen... yun anatomy sa part na ito alam ko mahirap talaga, but then let me just share some points for our improvement. Just correct me if I'm wrong. The things I'm about to say is based on how I draw/illustrate anatomy. The abs are quite ok, although still a bit too large for me, that's one reason the ribs became even bigger, or out of a few details... and by the size of the character, you should be able to see the muscles behind the underarms... sorry not sure what muscle part it's called... sa thigh, konti na lang perfect na!!! pero overall, hehe the best, di pa ko nakakagawa nyan ganyan kagaleng
@ marcelinoiii- thank you sir, kelangan ko pa talagang magpractice sa anatomy, noted lahat ng nasabi mo sir. hindi nga nakita yung palikpik no yung muscle sa underarm. ayusin ko to sir pag may pc na ko,thank you ulit.
hehe ok na ok ka na pre, kung tutuusin, you're already a pro, kulang lang natin reference dyan... ako noon nagstart palang ako sa illustration, medyo mapride ako kumuha ng reference, but actually, all artists started out from it... reference is our main tool, even the greatest artists from hollywood animations are using reference, we as artists need to learn to live with it.
check mo na din to bro (natawa pa ko sa laki ng MUSCLES nung isa hehe) http://www.google.com.sg/imglanding?q=muscles&imgurl=http://outhouserag.typepad.com/photos/uncategorized/huge_muscles.jpg&imgrefurl=http://www.sodahead.com/entertainment/do-you-find-huge-and-i-mean-huge-muscles-attractive/question-817897/&usg=__HDG21gqF7kn6L9okageK7ris8zE=&h=378&w=640&sz=56&hl=en&itbs=1&tbnid=AuUZGlOPu9_yrM:&tbnh=81&tbnw=137&prev=/images%3Fq%3Dmuscles%26hl%3Den%26gbv%3D2%26tbs%3Disch:1&gbv=2&tbs=isch:1&start=0
marcelinoiii- CGP Guru
- Number of posts : 1125
Age : 41
Location : Singapore
Registration date : 29/07/2009
Re: howl
![]() by houdini Tue May 11, 2010 7:30 am
by houdini Tue May 11, 2010 7:30 am
pressure wrote:houdini wrote:@pressure:
I'm not sure about computer specs being the problem but when zbrush 1.55 came out around year 2002( circa maya 6.5 ?) it was already churning out hyper-realistic models and we were just using p4, a 1GB ram and 256mb video card was already a luxury. what I'm saying is, since gumagamit kanang mental ray, unless it's not your'e preference, but kung gusto mong makuha yung details from level 6 I dont think normal maps alone can do it. why not combine displacement maps, normal maps and bump maps?
With mental ray can be a bit disappointing specially with regards to computer crashing, maybe tweaking those hidden settings and bit of patience, who know you might be able to tame the beast.
salamat sir, combination na yan ng normal at displacement map. kulang na nga lang siguro ng bump.thanks sa tip.
may alam ka bang settings ng disp aprox diyan sir na ok sa mental ray?
dude! wag na sir napag halatang matanda na ako hehehe
Usually I do this before exporting to Zbrush: try setting your UV's beyond maya's 0 - 1 uv grid, like dun sa character's face place it on one quadrant then the rest on other quadrants mas lalong mamaximize mo yung texture resolution mo since you have the whole quadrant for the the face alone, zbrush will recognize that, then you could play around polygroups in zbrush.
also I could cut off the the face down to the neck kasi di nakikita yung neck (or dayain mong maglagay ng fold sa neck para dun mo padaain yung cut) from there you have all the 6 levels of subdis for the face alone.
houdini- CGP Newbie
- Number of posts : 87
Age : 48
Location : panabo/canada
Registration date : 19/12/2008 -
HentaiChrist- Number of posts : 3
Age : 37
Location : Baguio
Registration date : 10/05/2010
Page 1 of 2 • 1, 2 ![]()
:: 3d Gallery :: Character
|
|
|