Setting up 3d Modeling References in Photoshop...
5 posters
:: Tutorials :: Photoshop Tutorials
Page 1 of 1
 Setting up 3d Modeling References in Photoshop...
... hello...
... to start... eto ay lesson focusing on some of the important "3d aiding functions" ng Photoshop...
... we will learn on how to set up a "reference" in Photoshop, tapos... gagamitin natin sa 3ds max...
... ok... lets start...
1st... punta kayo sa site na to... http://www.the-blueprints.com/
... pwede kayo mag download via right click and save...

... suggestion:
... yung na DOWNLOAD nyo via save...
... Print nyo... then...
... Scan nyo ng 300dpi...
... para lumaki at mag improve yung quality...
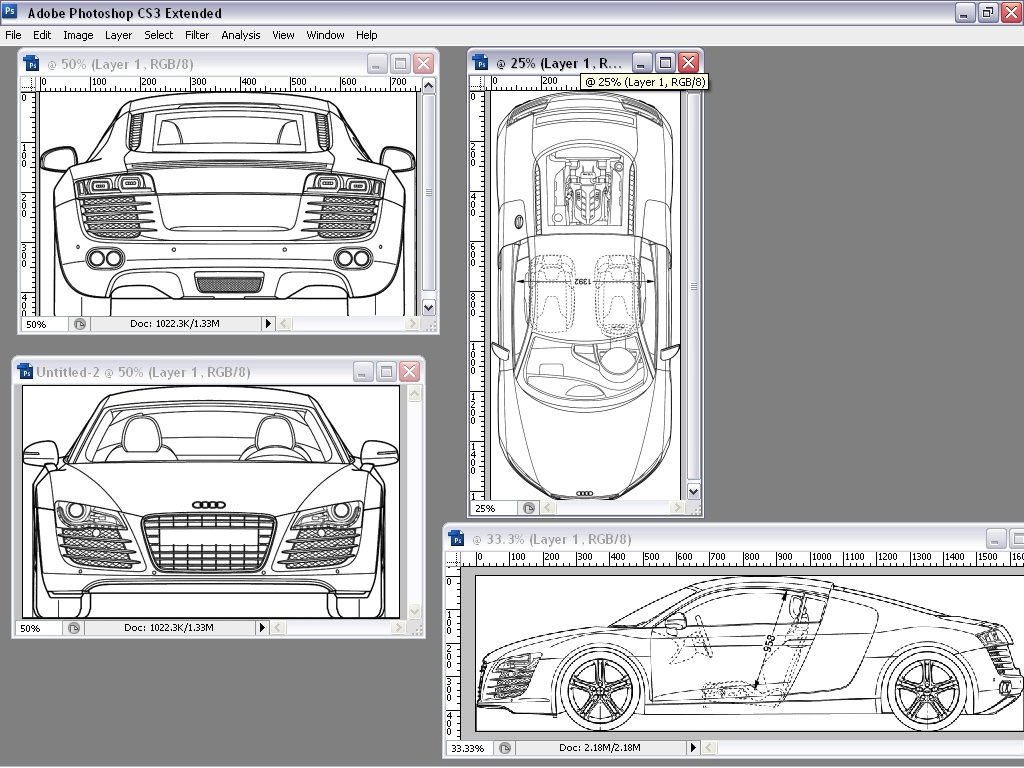
... buksan natin sa Photoshop ung 4 view Image...

... for better viewing...
... press "TAB" (para m-Hide ang mga Tools and Panels... di naman natin kasi gagmitin lahat yun...)
... CTRL "0" zero ha!... para mag fit screen ang view according dun sa size ng image natin...
... next step...
... CTRL R... para lumabas ang RULERS...

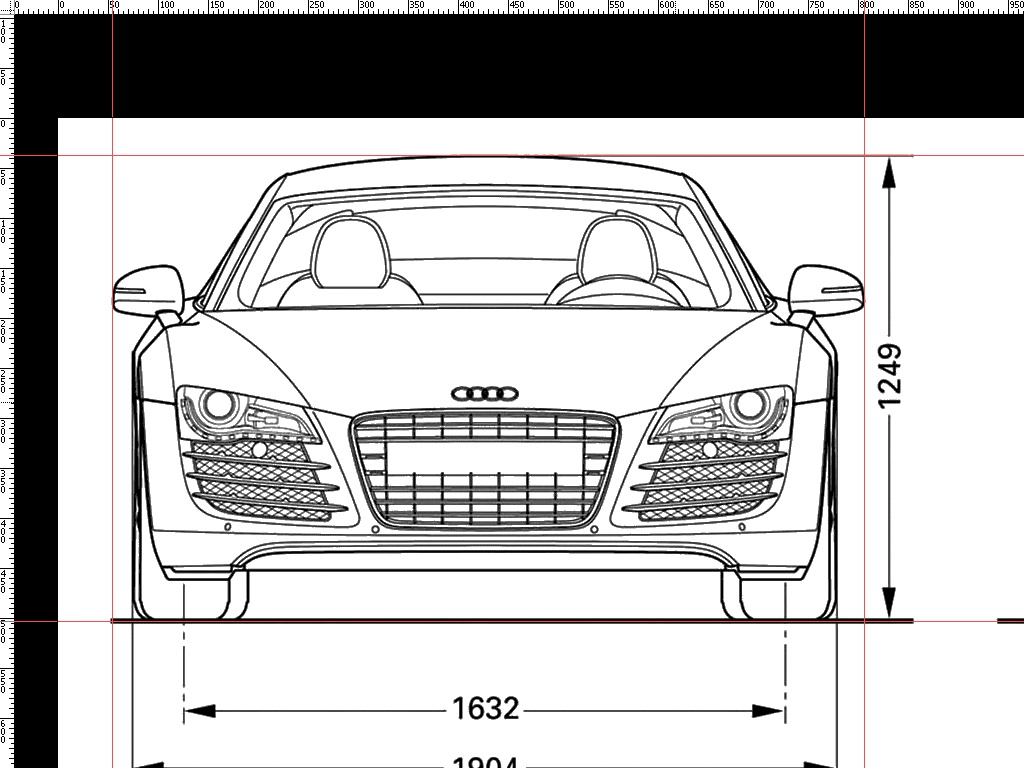
... from the RULERS... makakuha kayo ng mga GUIDES... via... CLICK and DRAG...
... lagay nyo yung mga guides na yun dulo or edges ng image natin per view...

... palibutan nyo ng mga Guides ang EDGE ng bawat VIEW...

... using the Rectangular Marquee...
... CLICK nyo yung tool na ito...

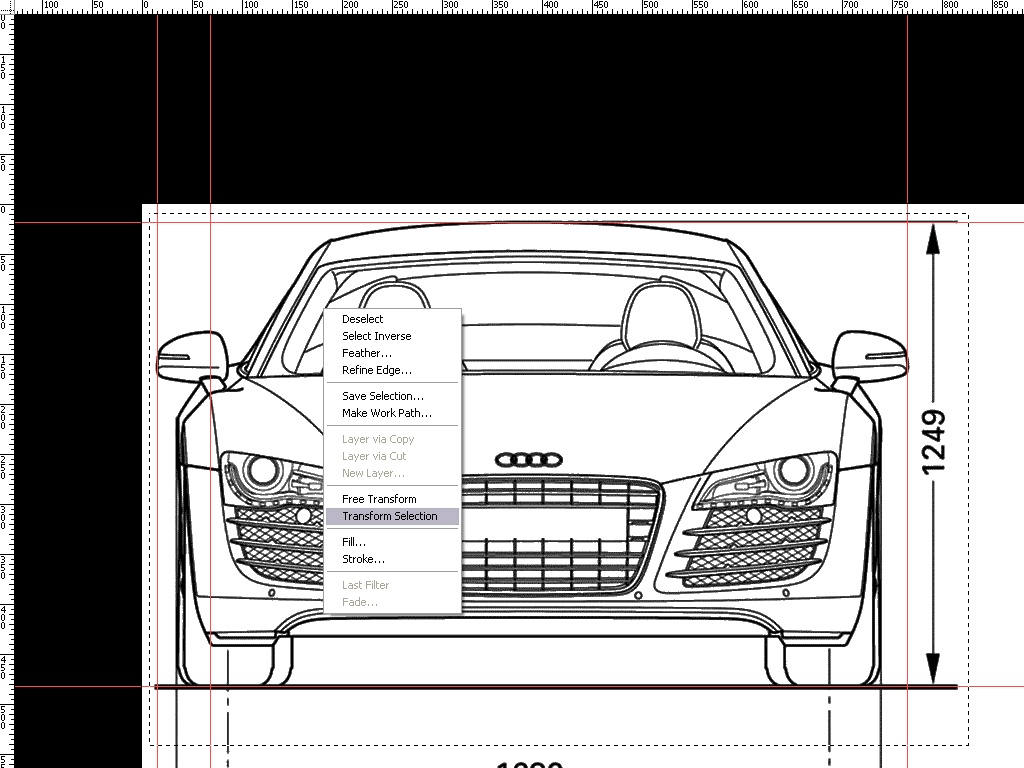
... CLICK and DRAG on the IMAGE... (wag nyong pilitin i-iksakto sa GUIDES... mas OK kapag SUMOBRA...)

... pag EDIT ng Selection...
... RIGHT CLICK... TRANSFORM SELECTION...

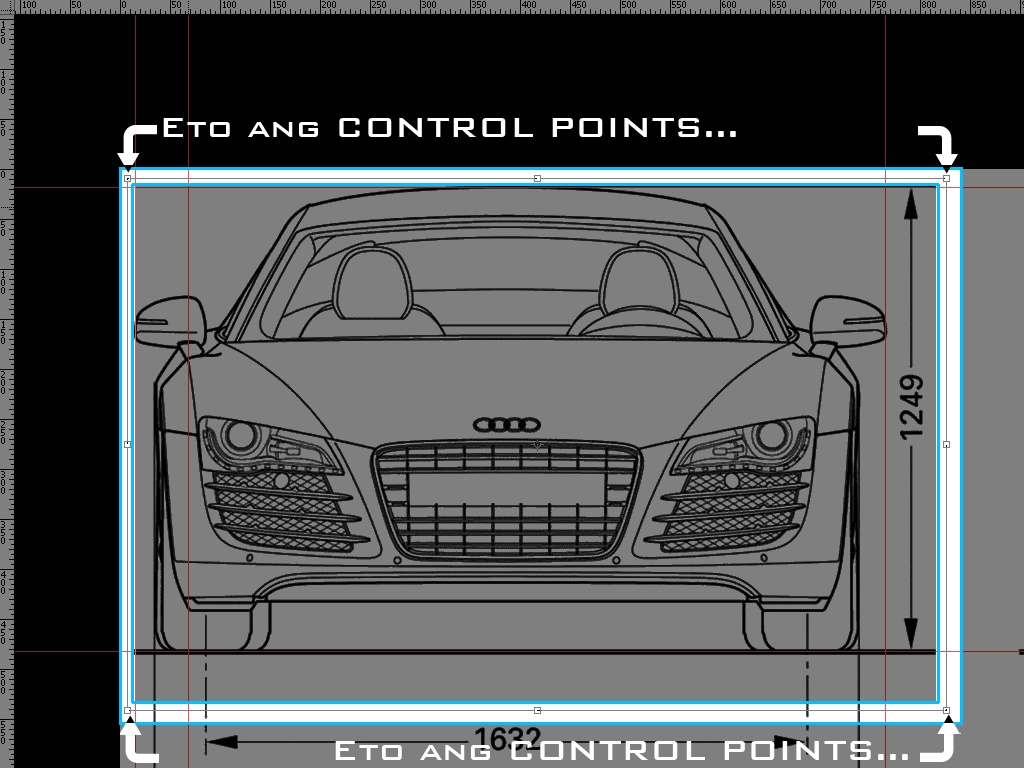
... Lalabas ang "Transform Box"... gamitin nyo para ma resize "precisely" yung selection!!

Gamitin nyo yung mga CONTROL POINTS ng TRANSFORM SELECTION pra ma-FIT sa GUIDES yung SELECTION mismo...

... Using BASIC COMMANDS...
... kapag fit na sa Guides natin...
... Go to EDIT - COPY...
... then...
... Go to FILE - NEW ... OK... (mag cre-Create ang Photoshop ng File ayon sa SUKAT ng COPIED pixels nyo...)
... Press ENTER
... Go to EDIT - PASTE
... SAVE AS Jpeg or Tiff yung new file...
... Ulitin nyo lang yung mga steps na yun dun sa iba pang VIEWS...
... hanggang sa makagawa kayo ng 4 files na hiwa-hiwalay na views...

... recap:
...1) Gamitin ang MARQUEE Tool...
mag click and drag sa isang VIEW
...2) Right Click - Transform Selection...
gamitin ang mga Ctrl Pts ng Transform Box para i-fit sa Image ang Selection
...3) Press Enter kapag fit na...
...4) Go to EDIT - COPY
...5) Go to FILE - NEW... Press ENTER
Gagawa ng file ang Photoshop ng ayon sa Size ng Copied Pixels nyo...
...6) Go to EDIT - PASTE
...7) Go to FILE - SAVE AS
Save it as Jpeg or TIFF file...
... making sure...
... check nyo yung mga dimensions ng Image Files nyo...
... Go to... IMAGE - IMAGE SIZE...
... HINTS and TIPS...
... Pareho ng DIMENSIONS ang FRONT at BACK views...
... Pareho ng HEIGHT ang FRONT, SIDE, at BACK views...
... Pareho ng WIDTH ang FRONT, SIDE, at TOP view...
... Pareho ng LENGTH ang SIDE at TOP views
... yung SIDE view... FLIP HORIZONTAL nyo sya...
... it is better na FACING RIGHT ang SIDE...
... Makikita nyo yun kapag nasa LEFT VIEW PORT na yung REFERENCE PLANE nyo...
... gamitin nyo ang IMAGE SIZE table para ma resize...
... tapos nyan... ready na kayo sa PART 2...
... Setting up ...REFERENCE PLANES sa 3DS MAX
... SEE 'YA... hehehe...
... to start... eto ay lesson focusing on some of the important "3d aiding functions" ng Photoshop...
... we will learn on how to set up a "reference" in Photoshop, tapos... gagamitin natin sa 3ds max...
... ok... lets start...
1st... punta kayo sa site na to... http://www.the-blueprints.com/
... pwede kayo mag download via right click and save...

... suggestion:
... yung na DOWNLOAD nyo via save...
... Print nyo... then...
... Scan nyo ng 300dpi...
... para lumaki at mag improve yung quality...
... buksan natin sa Photoshop ung 4 view Image...

... for better viewing...
... press "TAB" (para m-Hide ang mga Tools and Panels... di naman natin kasi gagmitin lahat yun...)
... CTRL "0" zero ha!... para mag fit screen ang view according dun sa size ng image natin...
... next step...
... CTRL R... para lumabas ang RULERS...

... from the RULERS... makakuha kayo ng mga GUIDES... via... CLICK and DRAG...
... lagay nyo yung mga guides na yun dulo or edges ng image natin per view...

... palibutan nyo ng mga Guides ang EDGE ng bawat VIEW...

... using the Rectangular Marquee...
... CLICK nyo yung tool na ito...

... CLICK and DRAG on the IMAGE... (wag nyong pilitin i-iksakto sa GUIDES... mas OK kapag SUMOBRA...)

... pag EDIT ng Selection...
... RIGHT CLICK... TRANSFORM SELECTION...

... Lalabas ang "Transform Box"... gamitin nyo para ma resize "precisely" yung selection!!

Gamitin nyo yung mga CONTROL POINTS ng TRANSFORM SELECTION pra ma-FIT sa GUIDES yung SELECTION mismo...

... Using BASIC COMMANDS...
... kapag fit na sa Guides natin...
... Go to EDIT - COPY...
... then...
... Go to FILE - NEW ... OK... (mag cre-Create ang Photoshop ng File ayon sa SUKAT ng COPIED pixels nyo...)
... Press ENTER
... Go to EDIT - PASTE
... SAVE AS Jpeg or Tiff yung new file...
... Ulitin nyo lang yung mga steps na yun dun sa iba pang VIEWS...
... hanggang sa makagawa kayo ng 4 files na hiwa-hiwalay na views...

... recap:
...1) Gamitin ang MARQUEE Tool...
mag click and drag sa isang VIEW
...2) Right Click - Transform Selection...
gamitin ang mga Ctrl Pts ng Transform Box para i-fit sa Image ang Selection
...3) Press Enter kapag fit na...
...4) Go to EDIT - COPY
...5) Go to FILE - NEW... Press ENTER
Gagawa ng file ang Photoshop ng ayon sa Size ng Copied Pixels nyo...
...6) Go to EDIT - PASTE
...7) Go to FILE - SAVE AS
Save it as Jpeg or TIFF file...
... making sure...
... check nyo yung mga dimensions ng Image Files nyo...
... Go to... IMAGE - IMAGE SIZE...
... HINTS and TIPS...
... Pareho ng DIMENSIONS ang FRONT at BACK views...
... Pareho ng HEIGHT ang FRONT, SIDE, at BACK views...
... Pareho ng WIDTH ang FRONT, SIDE, at TOP view...
... Pareho ng LENGTH ang SIDE at TOP views
... yung SIDE view... FLIP HORIZONTAL nyo sya...
... it is better na FACING RIGHT ang SIDE...
... Makikita nyo yun kapag nasa LEFT VIEW PORT na yung REFERENCE PLANE nyo...
... gamitin nyo ang IMAGE SIZE table para ma resize...
... tapos nyan... ready na kayo sa PART 2...
... Setting up ...REFERENCE PLANES sa 3DS MAX
... SEE 'YA... hehehe...
Last edited by kunito on Fri May 14, 2010 2:49 am; edited 2 times in total (Reason for editing : additional tips...)

kunito- CGP Newbie

- Number of posts : 37
Age : 46
Location : Dubai, UAE
Registration date : 10/07/2009
 Re: Setting up 3d Modeling References in Photoshop...
ok to ser, mgagamit. malaking tulong. wait ko yun part 2.....

micolangot- CGP Newbie

- Number of posts : 69
Age : 50
Location : Dubai, UAE
Registration date : 04/02/2010
 Re: Setting up 3d Modeling References in Photoshop...
THANKS! SENSEI.......iM LOOKING FORWARD SEE THE PART 2 OF OF THIS TUTORIAL.....HEHEHEHEHE

wyntallo- CGP Newbie

- Number of posts : 63
Age : 38
Location : Philippines / Iloilo
Registration date : 16/12/2009
 Re: Setting up 3d Modeling References in Photoshop...
... hey... the SEQUEL to this lesson is FINISHED...
... try it out now...!!!
Setting up 3d Modeling References Part 2
... enjoy!!!
... try it out now...!!!
Setting up 3d Modeling References Part 2
... enjoy!!!

kunito- CGP Newbie

- Number of posts : 37
Age : 46
Location : Dubai, UAE
Registration date : 10/07/2009
Bertzskie- Number of posts : 2
Age : 50
Location : Dubai,UAE
Registration date : 27/05/2010
 Re: Setting up 3d Modeling References in Photoshop...
nice tutorial sir this will help us a lot!!! 


kira_01- CGP Newbie

- Number of posts : 111
Age : 36
Location : san manuel, isabela
Registration date : 21/10/2009
 Similar topics
» Setting Up 3d Modeling References Part 2...
» "Basic" Character (Humanoid) modeling tutorial (BOX MODELING)
» mat setting
» glass setting
» try "Exterior" setting
» "Basic" Character (Humanoid) modeling tutorial (BOX MODELING)
» mat setting
» glass setting
» try "Exterior" setting
:: Tutorials :: Photoshop Tutorials
Page 1 of 1
Permissions in this forum:
You cannot reply to topics in this forum


