


Setting Up 3d Modeling References Part 2...
4 posters
Page 1 of 1

Setting Up 3d Modeling References Part 2...
![]() by kunito Fri May 14, 2010 2:46 am
by kunito Fri May 14, 2010 2:46 am
... hello...
... sorry for the long gap... hehehe...
... but i hope it'll be worth the wait...
... ok... so this is the follow up to my lesson in PHOTOSHOP...
... Setting
up 3d Modeling References in PHOTOSHOP...
... just to recap or to those who'd like to learn the PREQUEL i suggest you check out that link...
... now to start...
first of... lets divide this topic into 2 SUB LESSONS to learn or discover...
... 1st CREATING MATERIAL and ASSIGN / APPLYING MATERIALS
... 2nd CREATING REFERENCE PLANES and POSITIONING
... ok lets start:
Obviously... kung anu ginawa nyo sa
PHOTOSHOP
... ay gagawin at i-lalagay natin as MATERIALS sa 3DS MAX...
Creating Materials
1. In 3DS Max go to...
RENDERING---------MATERIALS ...
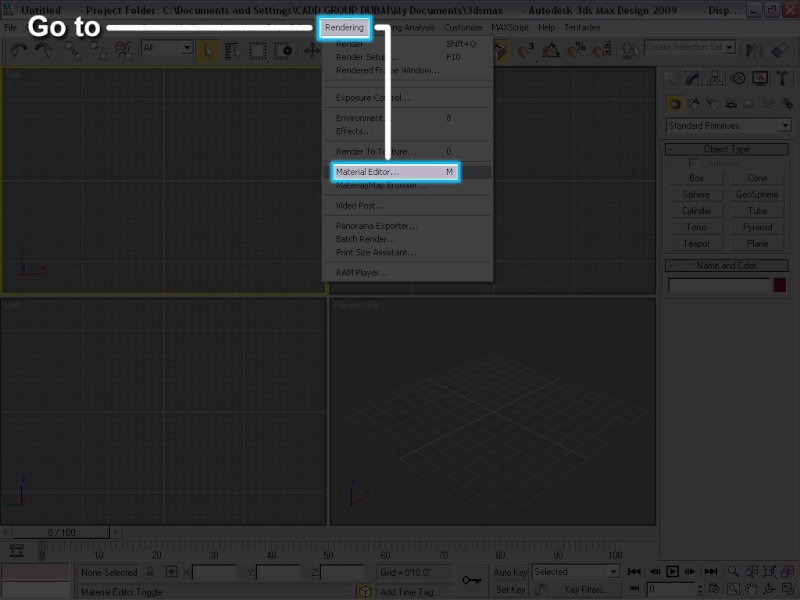
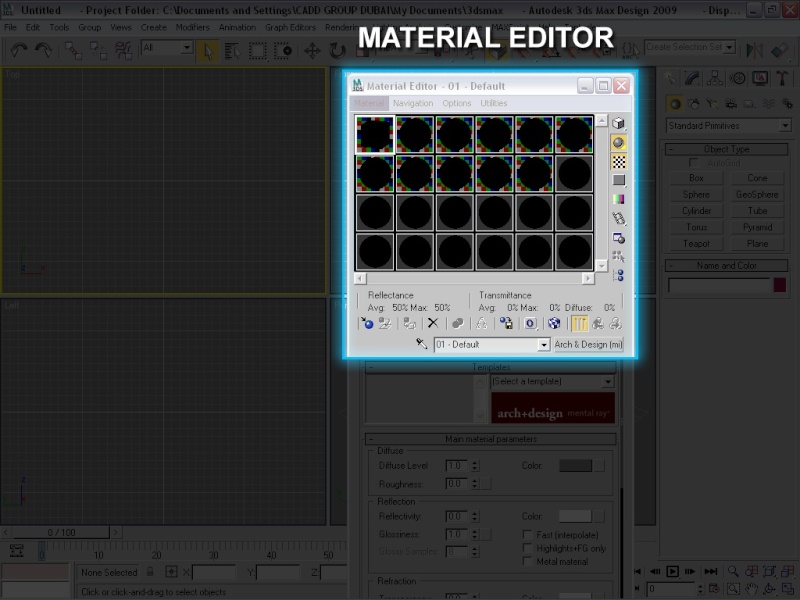
this will bring out your...
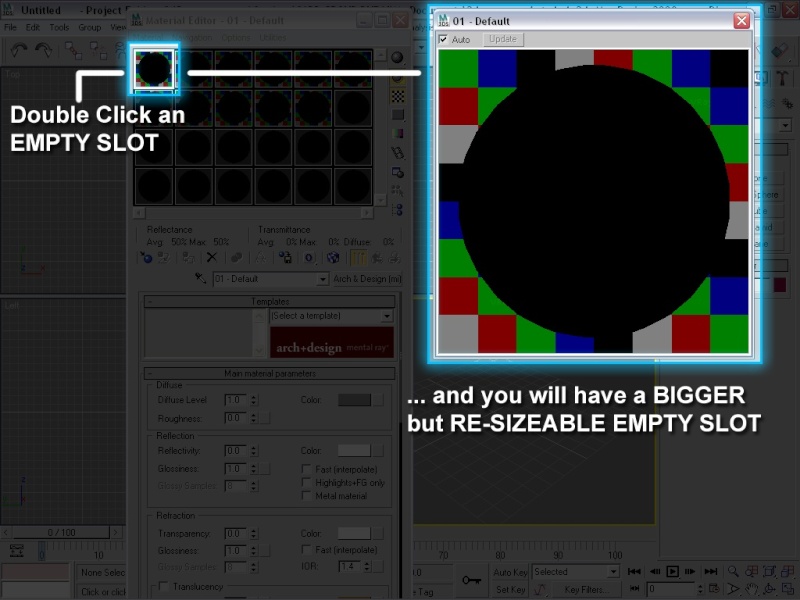
2. Double Click an EMPTY SLOT
... and you will have a BIGGER or RE-SIZABLE Sample Slot
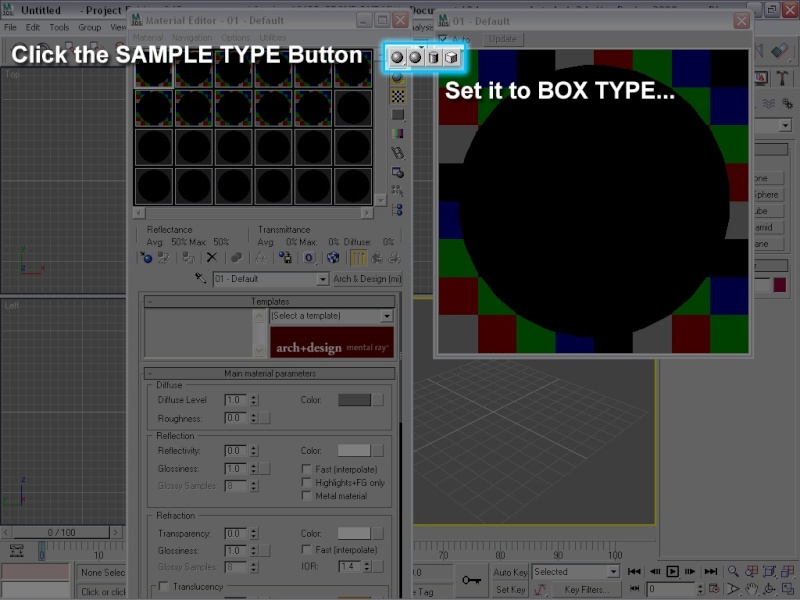
3. CLICK and SET the SAMPLE TYPE to BOX
... this will switch your SAMPLE TYPE from SPHERE to BOX
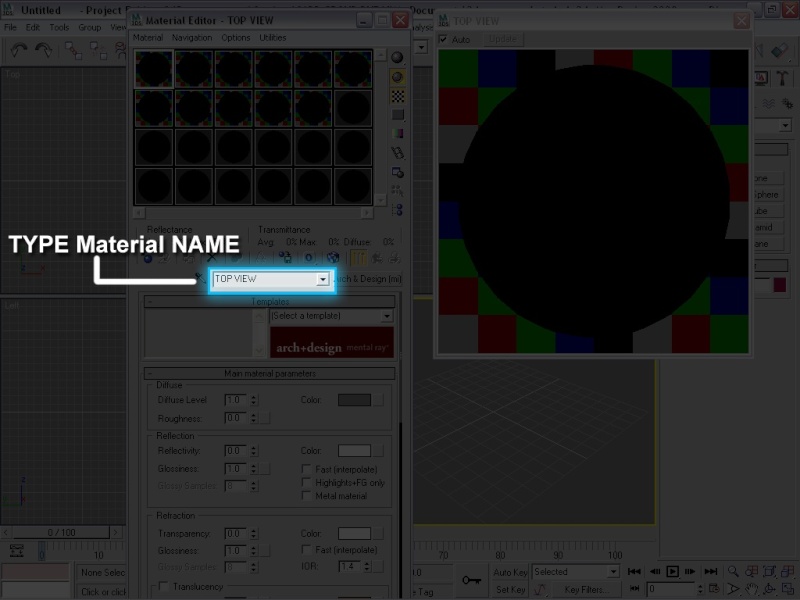
4. NAME the MATERIAL
- TOP VIEW Reference (or something like it...)
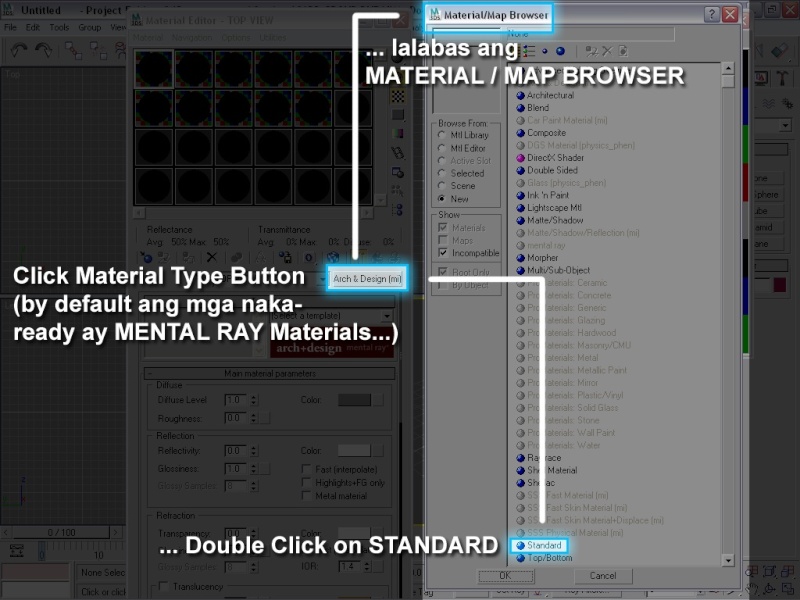
5. Set the MATERIAL TYPE to STANDARD
- by default kasi ang nakalabas ay MENTAL RAY Materials
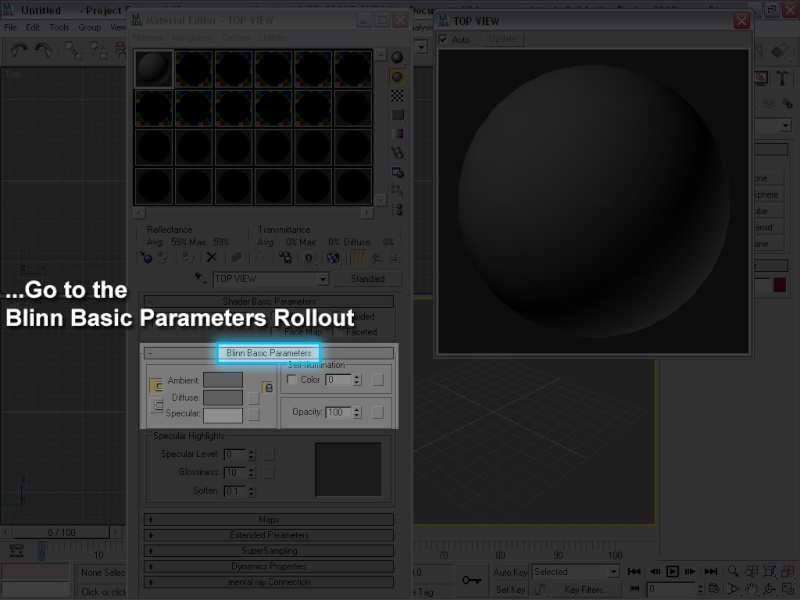
6. Go to the Blinn Basic Parameters Rollout
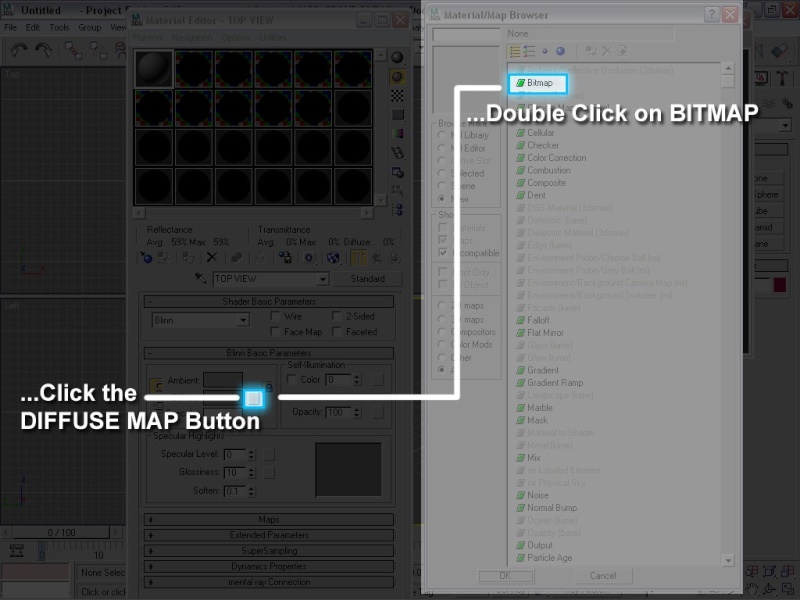
7. Click the DIFFUSE MAP Button
... it will bring out your MAP BROWSER
... Double Click the BITMAP
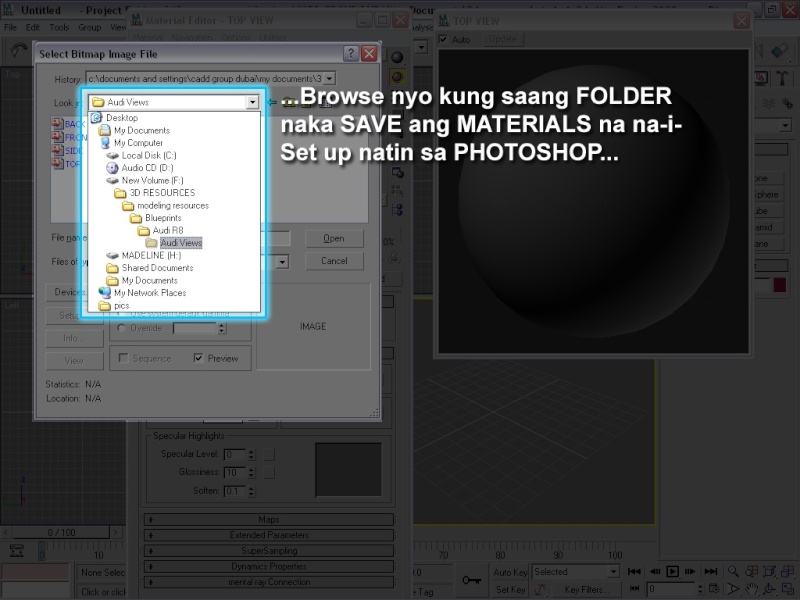
8. BROWSE nyo kung saan nyo na-i-SAVE yung Material na inayos nyo sa PHOTOSHOP
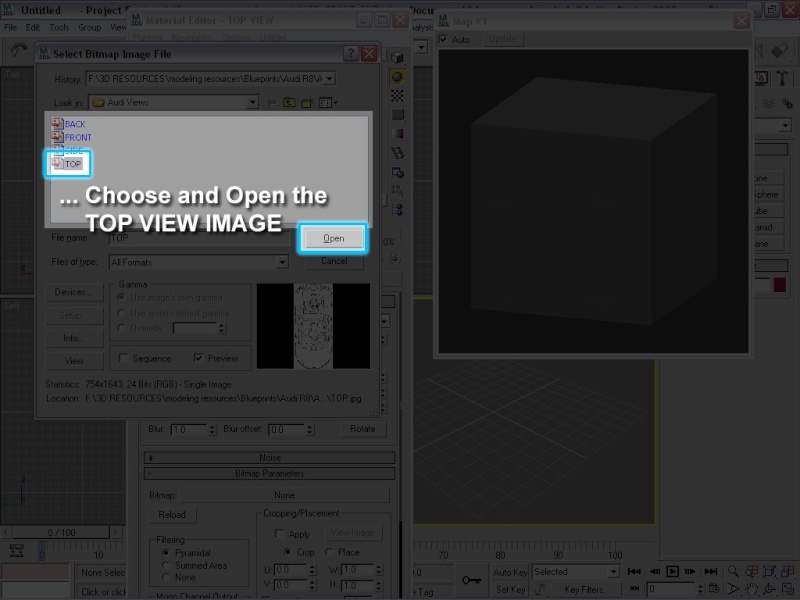
9. Choose the TOP VIEW Image...
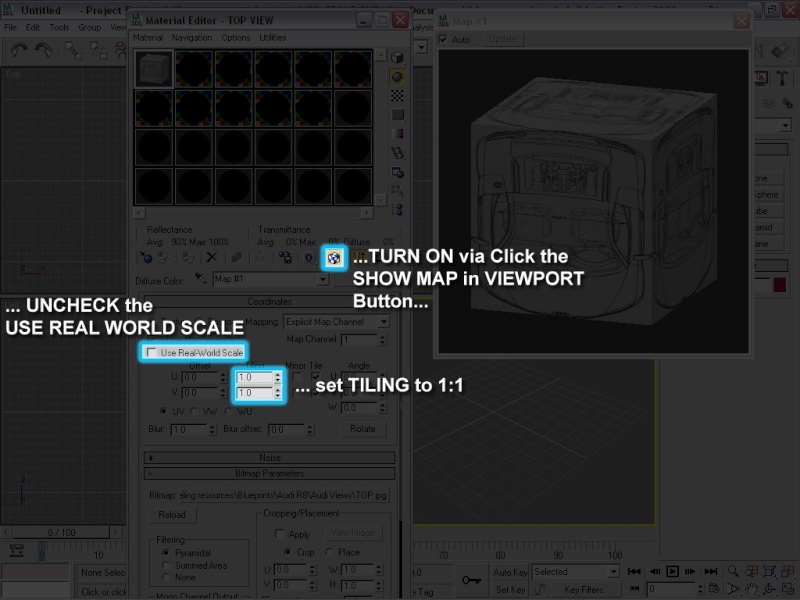
10. Go to the Coordinates Rollout
... Uncheck nyo yung REAL WORLD SETTINGS
... set nyo ang SIZE to: Width 1 and Height 1
... Click nyo yung VIEW MAP IN VIEWPORT Button
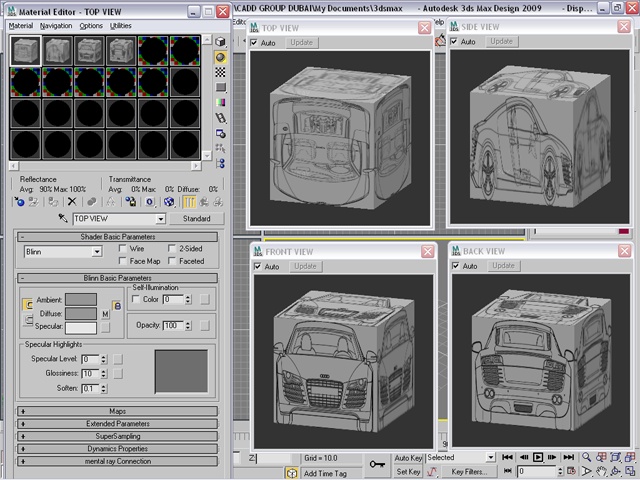
11. REPEAT all the STEPS para sa mga SUSUNOD na VIEW IMAGES:
- SIDE - FRONT - BACK
... Now that we have the Materials ready...
... yung mga PLANES na Paglalagyan naman ang gagawin natin...
... ok... let's START...
1. Go to Customize - Units Set Up
- Choose "GENERIC UNITS"
- OK
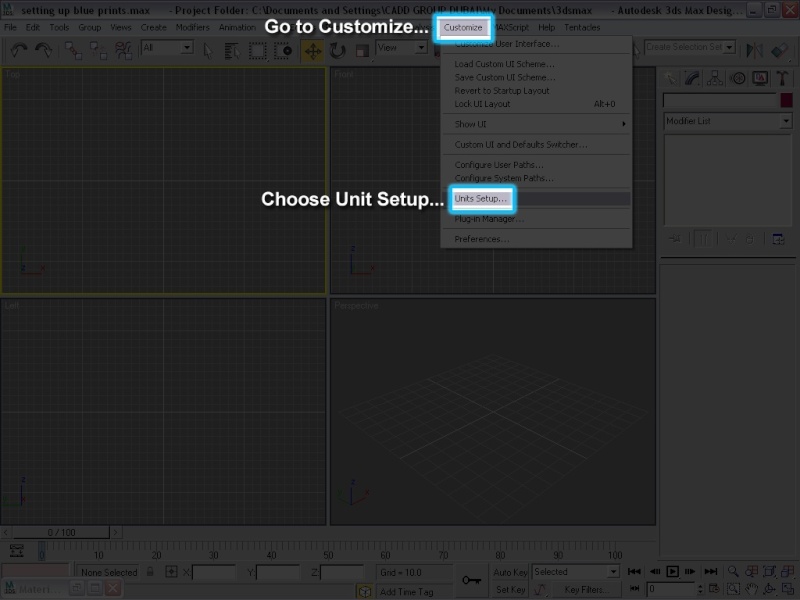
(mag pixel units lang muna tayo just to set aside for now the burden of the metric or other measurement systems)
... hindi ko kasi kabisado yun eh.. hehehe...
... HEP HEP HEP... hindi tayo mag click and drag...
... in Creating the Planes, gagmitin natin ang measurement ng mga Image Materials natin...
... so this time... we will be creating via KEYBOARD ENTRY...
1. Right Click on the TOP VIEWPORT
2. Press M to bring out the Material Editor
- Click the TOP VIEW Material Slot
- Go to the Bitmap Parameters Rollout
- Click the VIEW IMAGE Button
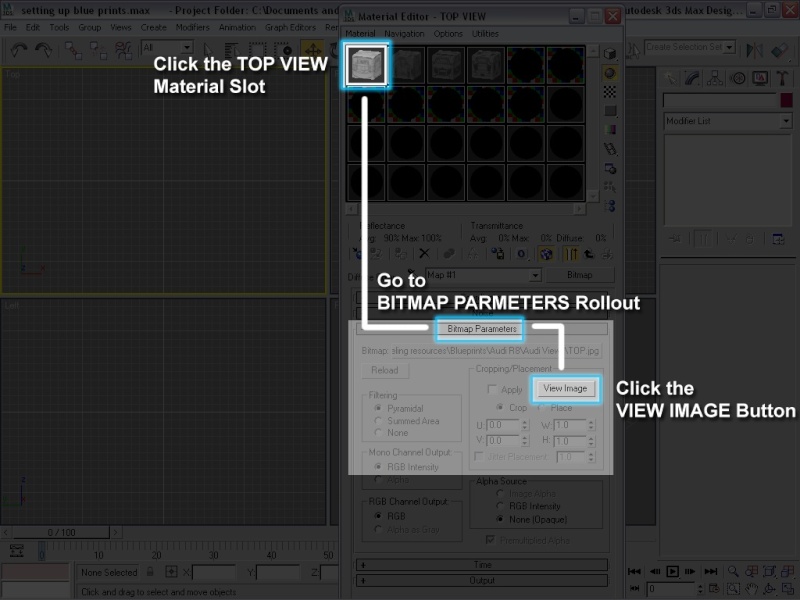
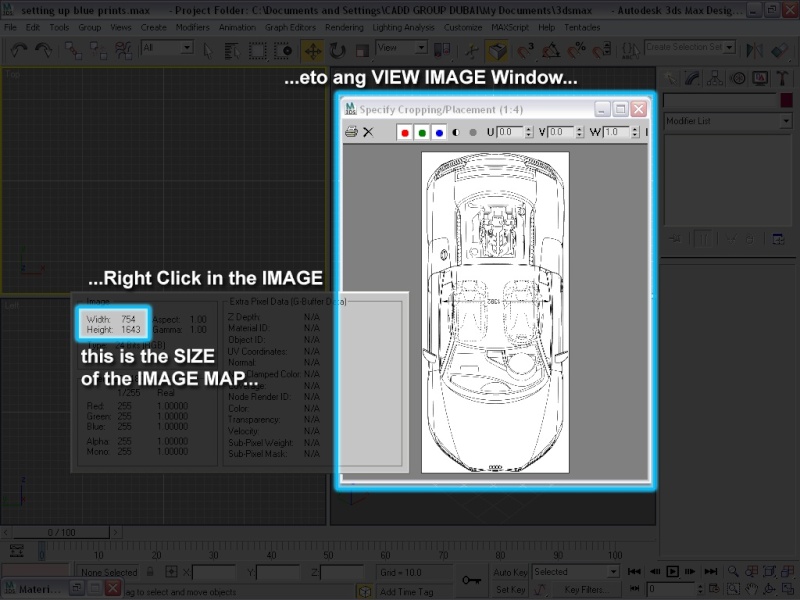
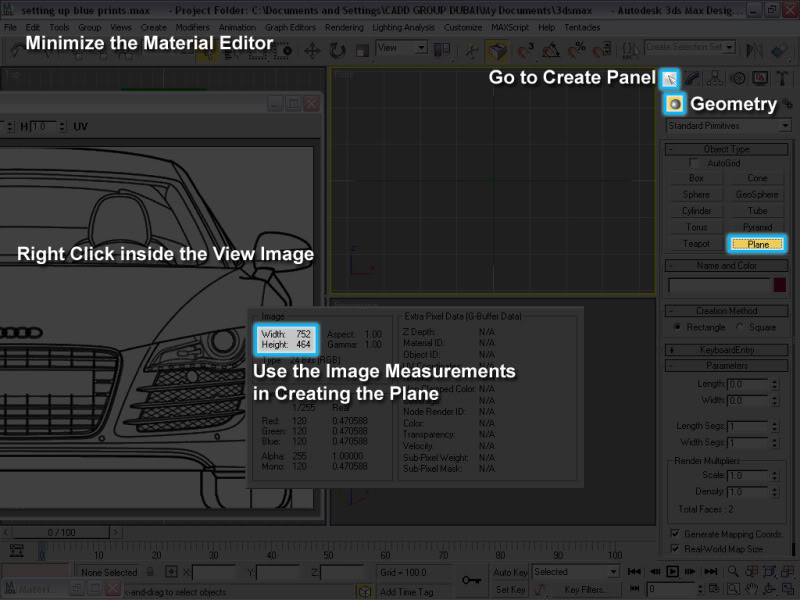
3. Minimize the Material Editor
- Right Click and HOLD on the Image
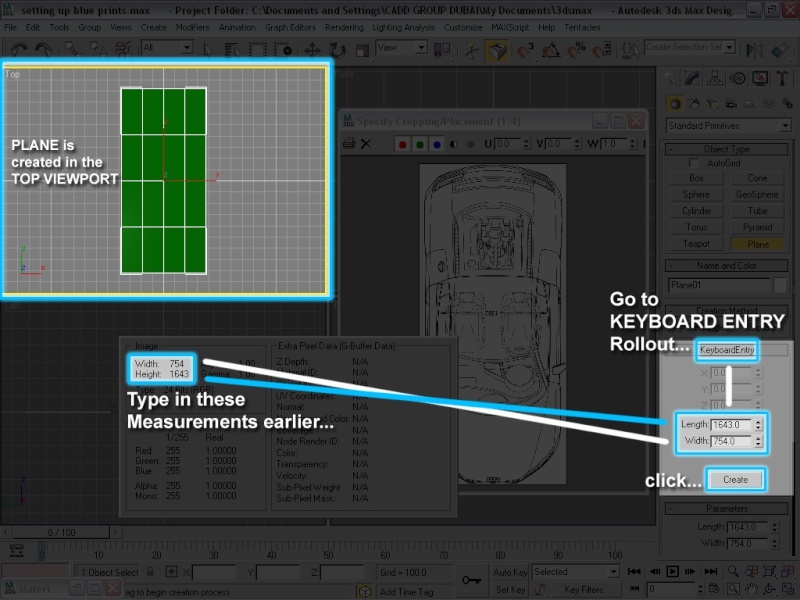
- As you can see... the IMAGE MEASUREMENT appears
4. Go to...
- Create - Geometry - Plane
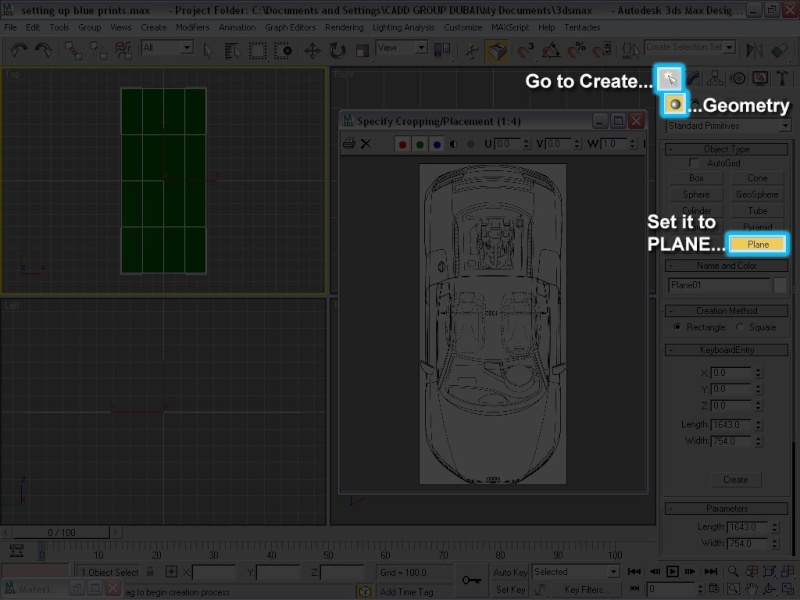
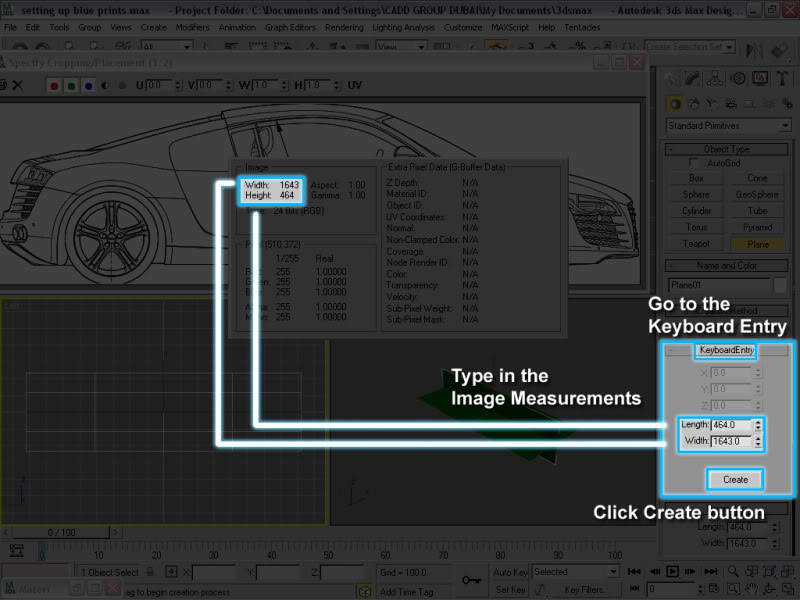
5. Go to...
- KEYBOARD ENTRY Rollout
- Type in the Measurements of the PLANE
- Click the Create Button
- Close the View Image Window
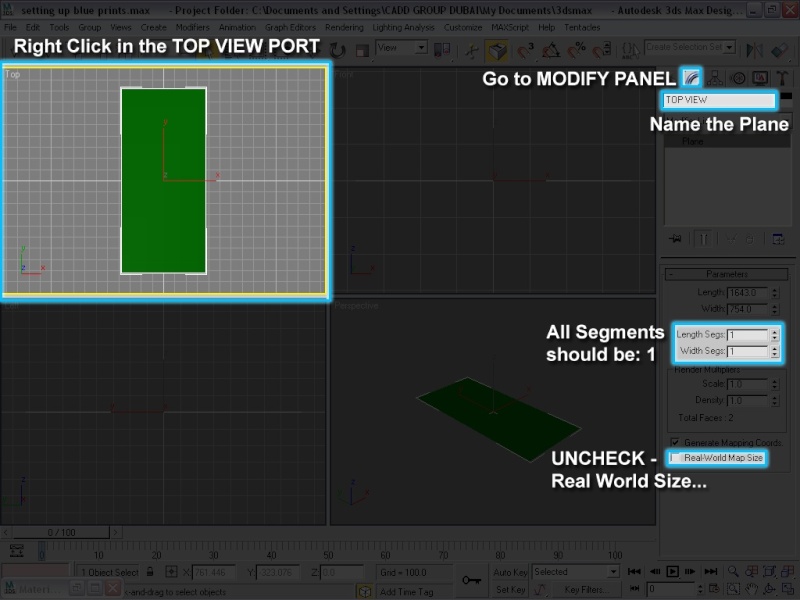
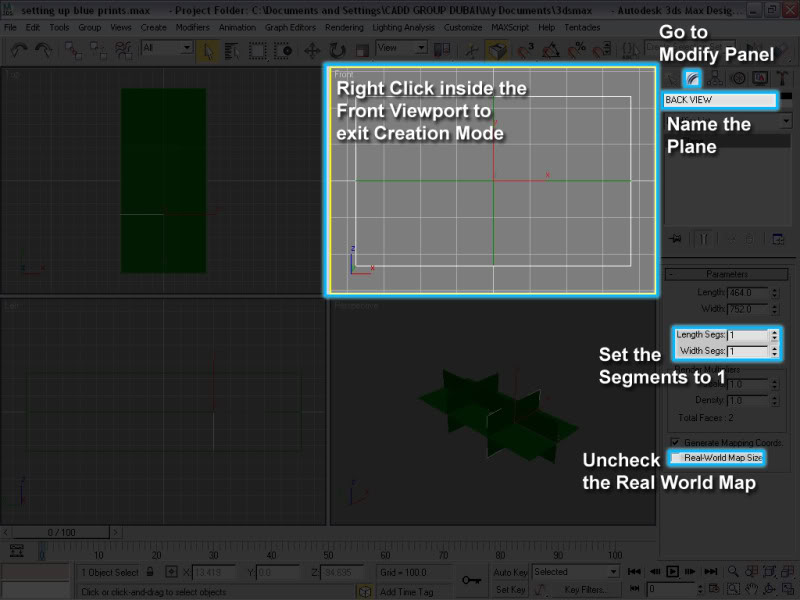
6. RIGHT CLICK in the TOP VIEWPORT to EXIT Creation Mode
- Modify the Newly Created Plane
- Go to MODIFY Panel
- Name the Plane: TOP VIEW
- Set the ALL SEGMENTS to : 1
- UNCHECK REAL WORLD MAP SIZE
For the SIDE VIEW
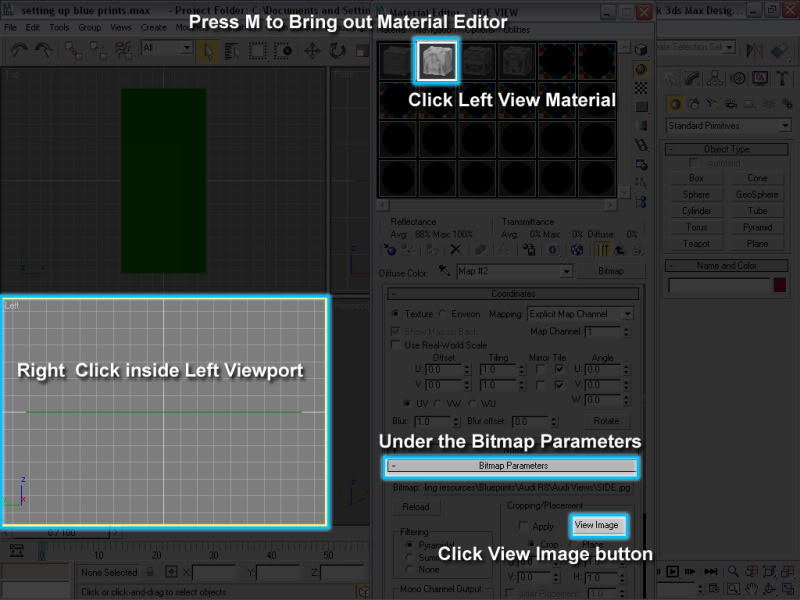
1. Right Click on the LEFT VIEWPORT
2. Press M to bring out the Material Editor
- Click the SIDE VIEW Material Slot
- Go to the Bitmap Parameters Rollout
- Click the VIEW IMAGE Button
3. Minimize the Material Editor
- Right Click and HOLD on the Image
- As you can see... the IMAGE MEASUREMENT appears

4. Go to...
- Create - Geometry - Plane

5. Go to...
- KEYBOARD ENTRY Rollout
- Type in the Measurements of the PLANE
- Click the Create Button
- Close the View Image Window

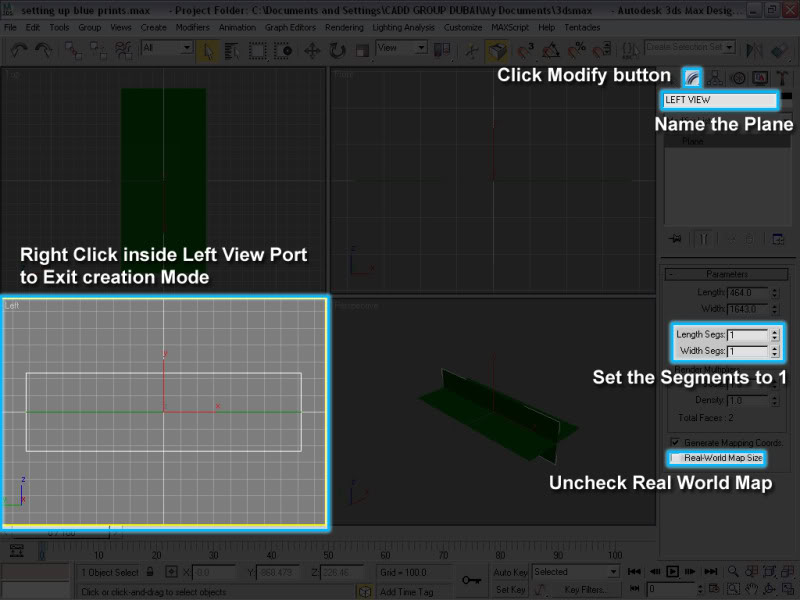
6. RIGHT CLICK in the LEFT VIEWPORT to EXIT Creation Mode
- Modify the Newly Created Plane
- Go to MODIFY Panel
- Name the Plane: Left View
- Set the ALL SEGMENTS to : 1
- UNCHECK REAL WORLD MAP SIZE
For the FRONT VIEW
1. Right Click on the FRONT VIEWPORT
2. Press M to bring out the Material Editor
- Click the FRONT VIEW Material Slot
- Go to the Bitmap Parameters Rollout
- Click the VIEW IMAGE Button

3. Minimize the Material Editor
- Right Click and HOLD on the Image
- As you can see... the IMAGE MEASUREMENT appears
4. Go to...
- Create - Geometry - Plane
5. Go to...
- KEYBOARD ENTRY Rollout
- Type in the XYZ Coordinates Measurements of the PLANE
- X: 0 Click the Create Button
- Y: 0 Close the View Image Window
- Z: -300
6. RIGHT CLICK in the FRONT VIEWPORT to EXIT Creation Mode
- Modify the Newly Created Plane
- Go to MODIFY Panel
- Name the Plane: FRONT VIEW
- Set the ALL SEGMENTS to : 1
- UNCHECK REAL WORLD MAP SIZE

For the BACK VIEW
1. Right Click on the FRONT VIEWPORT
2. Press M to bring out the Material Editor
- Click the BACK VIEW Material Slot
- Go to the Bitmap Parameters Rollout
- Click the VIEW IMAGE Button
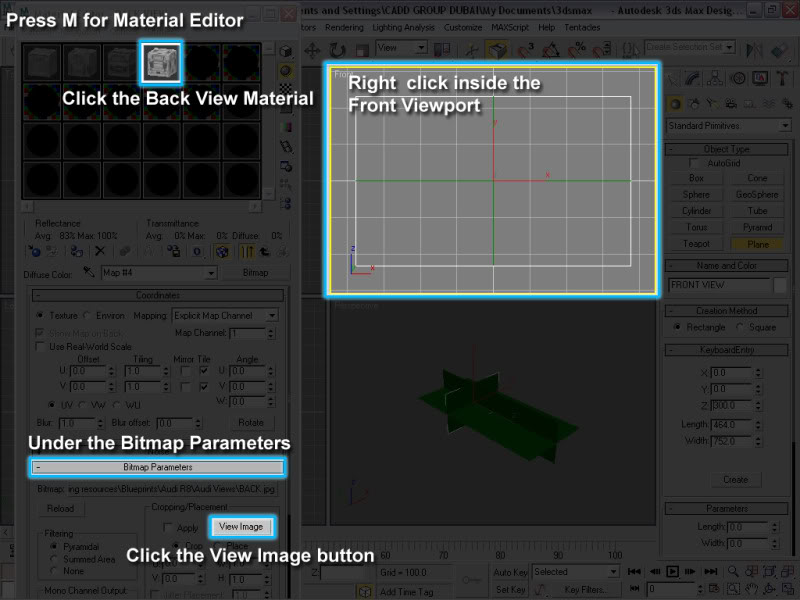
3. Minimize the Material Editor
- Right Click and HOLD on the Image
- As you can see... the IMAGE MEASUREMENT appears
4. Go to...
- Create - Geometry - Plane

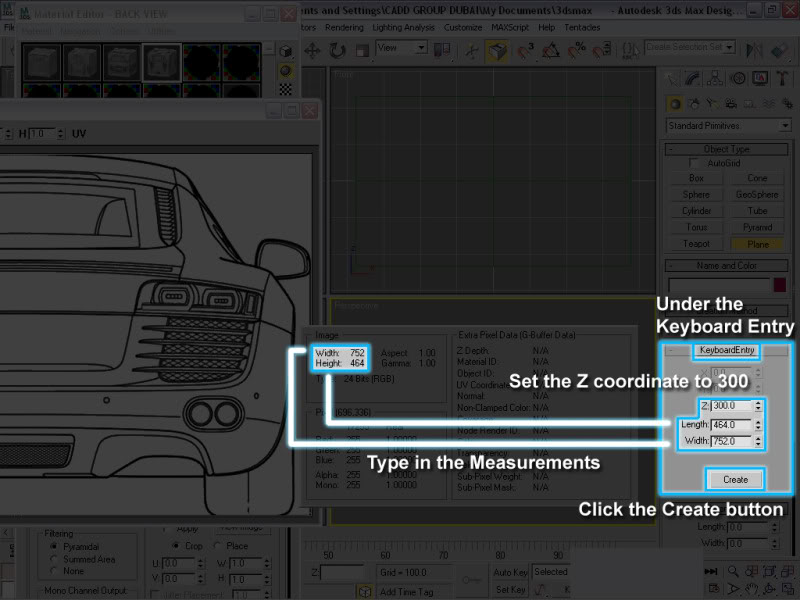
5. Go to...
- KEYBOARD ENTRY Rollout
- Type in the XYZ Coordinates Measurements of the PLANE
- X: 0 Click the Create Button
- Y: 0 Close the View Image Window
- Z: +300
6. RIGHT CLICK in the FRONT VIEWPORT to EXIT Creation Mode
- Modify the Newly Created Plane
- Go to MODIFY Panel
- Name the Plane: BACK VIEW
- Set the ALL SEGMENTS to : 1
- UNCHECK REAL WORLD MAP SIZE
... Now it's time to apply the MATERIALS to their respective PLANES...
1. Maximize the PERSPECTIVE VIEWPORT

2. Bring out the MATERIAL EDITOR via "M"

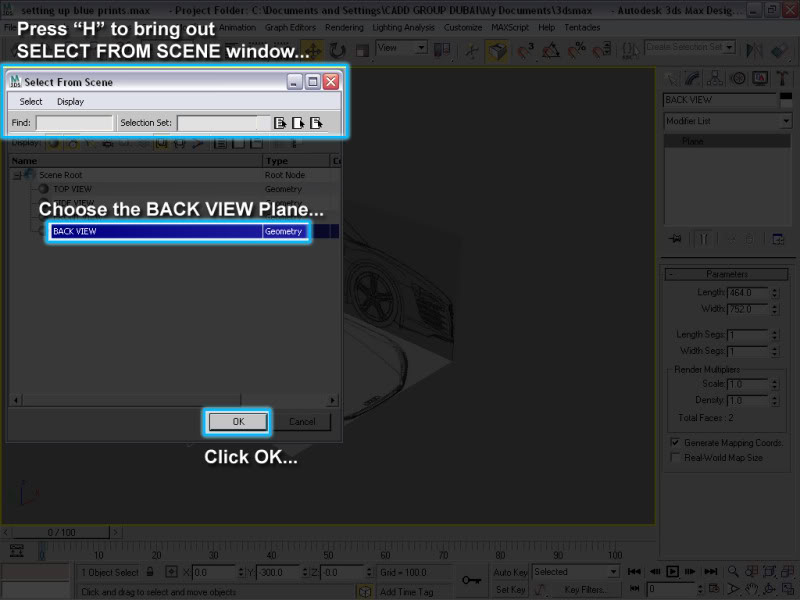
3. Press H to bring out your SELECT FROM SCENE Menu
4. Choose the TOP VIEW Plane and click OK or Double Click it
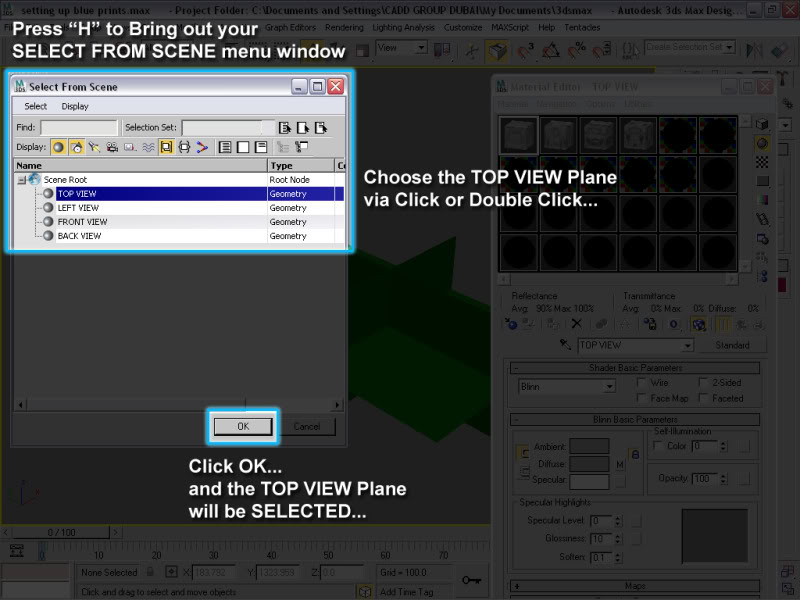
- In the MATERIAL EDITOR
5. Click the TOP VIEW MATERIAL slot
6. Click the ASSIGN MATERIAL to SELECTION button

7. Repeat the Steps until all the PLANES are applied with their respective Materials

... ALIGNING the PLANES for Better viewing...
... to Align objects we will use the ALIGN TOOL or "ALT A"...
... ang pag gamit ng ALIGN Tool...
1st: SELECT ang OBJECT na i-a-ALIGN...
2nd: SELECT kung SAANG OBJECT i-a-ALIGN... (Reference Object)
3rd: CHOOSE kung PAANO ang magiging ALIGNMENT...
... in this Lesson... ang Reference Object natin ay yung TOP VIEW Plane
Aligning the SIDE VIEW
1. Press H to bring out your SELECT FROM SCENE Menu
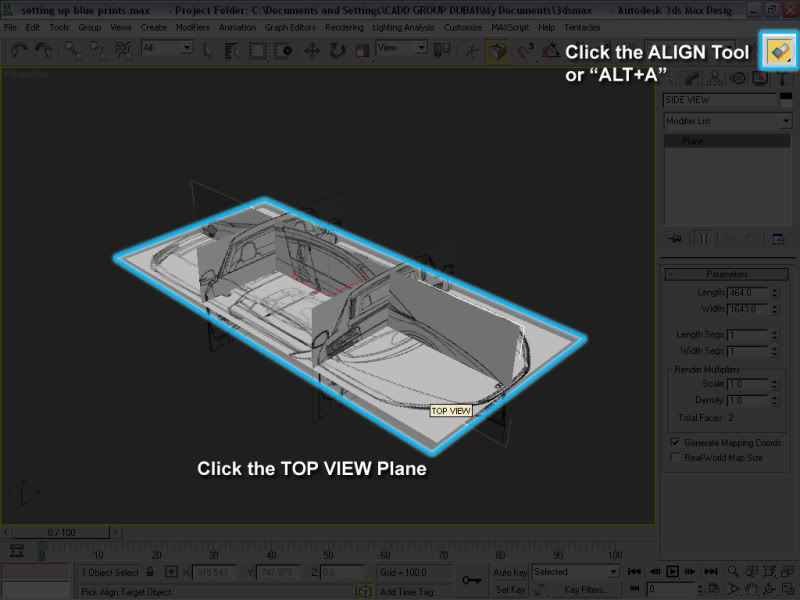
2. Select the SIDE VIEW Plane

3. Press ALT A or click the ALIGN TOOL
4. Select / Click the TOP VIEW Plane
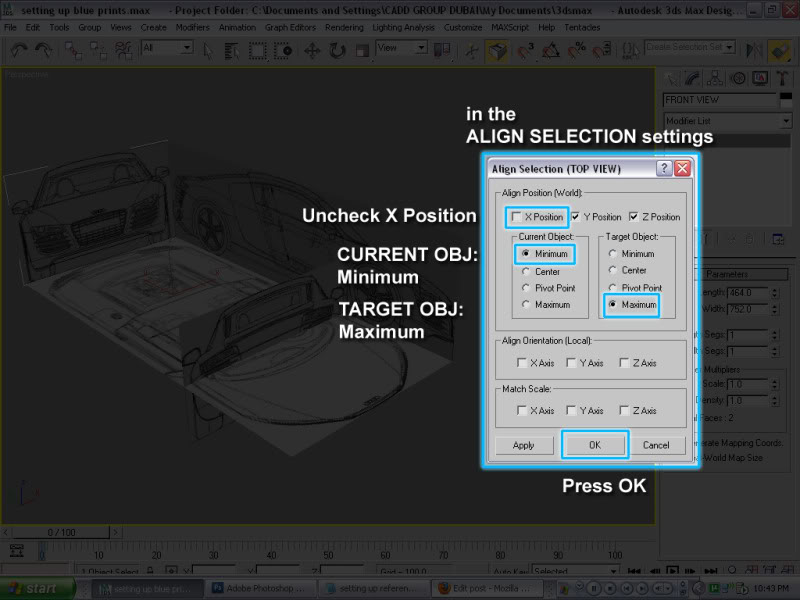
5. In the ALIGN SELECTION Settings...
- UNCHECK: "X" Position
- Current Object: MINIMUM
- Target Object: MAXIMUM
- Press OK

Aligning the FRONT VIEW
1. Press H to bring out your SELECT FROM SCENE Menu
2. Select the FRONT VIEW Plane

3. Press ALT A or click the ALIGN TOOL
4. Select / Click the TOP VIEW Plane
5. In the ALIGN SELECTION Settings...
- UNCHECK: "Y" Position
- Current Object: MINIMUM
- Target Object: MAXIMUM
- Press OK
Aligning the BACK VIEW
1. Press H to bring out your SELECT FROM SCENE Menu
2. Select the BACK VIEW Plane
3. Press ALT A or click the ALIGN TOOL
4. Select / Click the TOP VIEW Plane
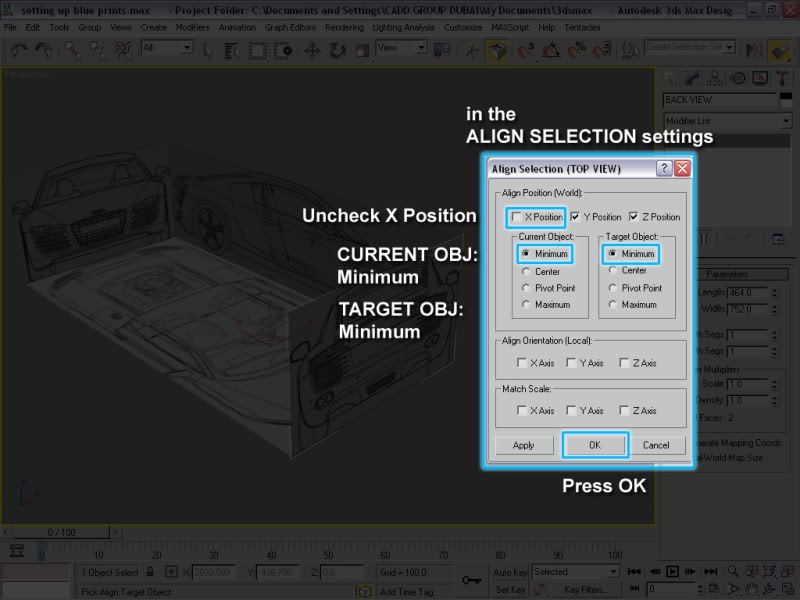
5. In the ALIGN SELECTION Settings...
- UNCHECK: "X" Position
- Current Object: MINIMUM
- Target Object: MINIMUM
- Press OK
6. ... and FINALLY...

... now for the FINISHING TOUCHES...
... you may ask...
... Bakit nasa LIKOD ang FRONT VIEW Plane at nasa HARAP ang BACK VIEW...
... well... you will see the reason later...
... mas OK kung kayo ang makakdiscover...
... for now... ayusin natin ang BACK VIEW Plane...
1. Press H to bring out your SELECT FROM SCENE Menu
2. Select the BACK VIEW Plane
3. click the MIRROR TOOL
- In the MIRROR AXIS choose "Y"
- In the CLONE SELECTION choose "No Clone"
- Press OK

... Remember... you will be modeling in the MIDDLE Space between
the PLANES...
... Try nyo mag VIEW ROTATE via CTRL + R...
... as you can see... YOU CAN'T SEE... hehehe...
... you can't see the MIDDLE Space with in the aligned planes,
from which we will be modeling...
... so... ayusin natin ngayon via OBJECT PROPETIES...
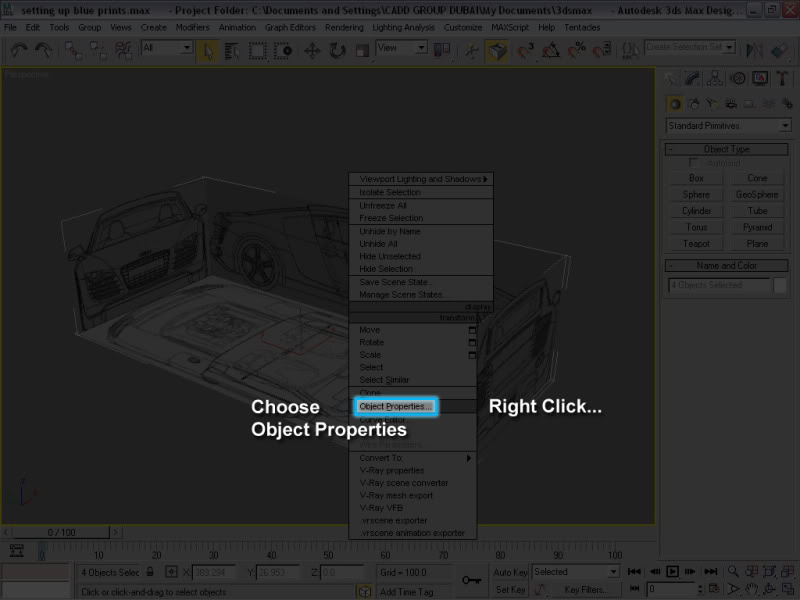
1. "CTRL + A" to Select All the PLanes
2. Right Click and choose OBJECT PROPERTIES
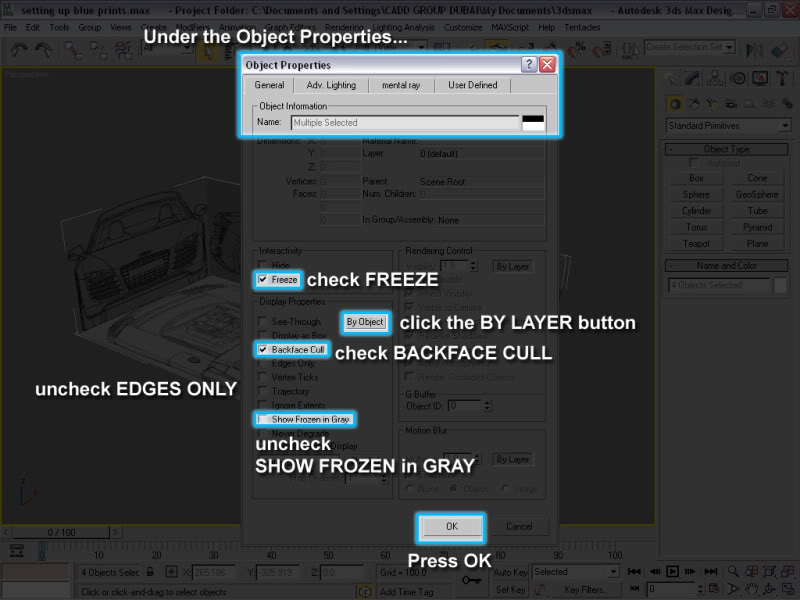
In the OBJECT PROPERTIES settings...
3. CLICK By Layer button to Switch into By Object
- CHECK = Back Facecull
- UNCHECK = Show Frozen in Gray
- CHECK = Freeze
PRESS OK
... Try nyo mag VIEW ROTATE via CTRL + R...
... Now you can see through... BEHIND the Planes...
... naka FREEZE na din sila... so ... HINDI na sila ma-se-SELECT or CLICK
... so... what are you waiting for... MODEL NA!!! hehehe
... sorry for the long gap... hehehe...
... but i hope it'll be worth the wait...
... ok... so this is the follow up to my lesson in PHOTOSHOP...
... Setting
up 3d Modeling References in PHOTOSHOP...
... just to recap or to those who'd like to learn the PREQUEL i suggest you check out that link...
... now to start...
first of... lets divide this topic into 2 SUB LESSONS to learn or discover...
... 1st CREATING MATERIAL and ASSIGN / APPLYING MATERIALS
... 2nd CREATING REFERENCE PLANES and POSITIONING
... ok lets start:
Obviously... kung anu ginawa nyo sa
PHOTOSHOP
... ay gagawin at i-lalagay natin as MATERIALS sa 3DS MAX...
Creating Materials
1. In 3DS Max go to...
RENDERING---------MATERIALS ...
this will bring out your...
2. Double Click an EMPTY SLOT
... and you will have a BIGGER or RE-SIZABLE Sample Slot
3. CLICK and SET the SAMPLE TYPE to BOX
... this will switch your SAMPLE TYPE from SPHERE to BOX
4. NAME the MATERIAL
- TOP VIEW Reference (or something like it...)
5. Set the MATERIAL TYPE to STANDARD
- by default kasi ang nakalabas ay MENTAL RAY Materials
6. Go to the Blinn Basic Parameters Rollout
7. Click the DIFFUSE MAP Button
... it will bring out your MAP BROWSER
... Double Click the BITMAP
8. BROWSE nyo kung saan nyo na-i-SAVE yung Material na inayos nyo sa PHOTOSHOP
9. Choose the TOP VIEW Image...
10. Go to the Coordinates Rollout
... Uncheck nyo yung REAL WORLD SETTINGS
... set nyo ang SIZE to: Width 1 and Height 1
... Click nyo yung VIEW MAP IN VIEWPORT Button
11. REPEAT all the STEPS para sa mga SUSUNOD na VIEW IMAGES:
- SIDE - FRONT - BACK
... Now that we have the Materials ready...
... yung mga PLANES na Paglalagyan naman ang gagawin natin...
... ok... let's START...
1. Go to Customize - Units Set Up
- Choose "GENERIC UNITS"
- OK
(mag pixel units lang muna tayo just to set aside for now the burden of the metric or other measurement systems)
... hindi ko kasi kabisado yun eh.. hehehe...
... HEP HEP HEP... hindi tayo mag click and drag...
... in Creating the Planes, gagmitin natin ang measurement ng mga Image Materials natin...
... so this time... we will be creating via KEYBOARD ENTRY...
1. Right Click on the TOP VIEWPORT
2. Press M to bring out the Material Editor
- Click the TOP VIEW Material Slot
- Go to the Bitmap Parameters Rollout
- Click the VIEW IMAGE Button
3. Minimize the Material Editor
- Right Click and HOLD on the Image
- As you can see... the IMAGE MEASUREMENT appears
4. Go to...
- Create - Geometry - Plane
5. Go to...
- KEYBOARD ENTRY Rollout
- Type in the Measurements of the PLANE
- Click the Create Button
- Close the View Image Window
6. RIGHT CLICK in the TOP VIEWPORT to EXIT Creation Mode
- Modify the Newly Created Plane
- Go to MODIFY Panel
- Name the Plane: TOP VIEW
- Set the ALL SEGMENTS to : 1
- UNCHECK REAL WORLD MAP SIZE
For the SIDE VIEW
1. Right Click on the LEFT VIEWPORT
2. Press M to bring out the Material Editor
- Click the SIDE VIEW Material Slot
- Go to the Bitmap Parameters Rollout
- Click the VIEW IMAGE Button
3. Minimize the Material Editor
- Right Click and HOLD on the Image
- As you can see... the IMAGE MEASUREMENT appears
4. Go to...
- Create - Geometry - Plane
5. Go to...
- KEYBOARD ENTRY Rollout
- Type in the Measurements of the PLANE
- Click the Create Button
- Close the View Image Window
6. RIGHT CLICK in the LEFT VIEWPORT to EXIT Creation Mode
- Modify the Newly Created Plane
- Go to MODIFY Panel
- Name the Plane: Left View
- Set the ALL SEGMENTS to : 1
- UNCHECK REAL WORLD MAP SIZE
For the FRONT VIEW
1. Right Click on the FRONT VIEWPORT
2. Press M to bring out the Material Editor
- Click the FRONT VIEW Material Slot
- Go to the Bitmap Parameters Rollout
- Click the VIEW IMAGE Button
3. Minimize the Material Editor
- Right Click and HOLD on the Image
- As you can see... the IMAGE MEASUREMENT appears
4. Go to...
- Create - Geometry - Plane
5. Go to...
- KEYBOARD ENTRY Rollout
- Type in the XYZ Coordinates Measurements of the PLANE
- X: 0 Click the Create Button
- Y: 0 Close the View Image Window
- Z: -300
6. RIGHT CLICK in the FRONT VIEWPORT to EXIT Creation Mode
- Modify the Newly Created Plane
- Go to MODIFY Panel
- Name the Plane: FRONT VIEW
- Set the ALL SEGMENTS to : 1
- UNCHECK REAL WORLD MAP SIZE
For the BACK VIEW
1. Right Click on the FRONT VIEWPORT
2. Press M to bring out the Material Editor
- Click the BACK VIEW Material Slot
- Go to the Bitmap Parameters Rollout
- Click the VIEW IMAGE Button
3. Minimize the Material Editor
- Right Click and HOLD on the Image
- As you can see... the IMAGE MEASUREMENT appears
4. Go to...
- Create - Geometry - Plane
5. Go to...
- KEYBOARD ENTRY Rollout
- Type in the XYZ Coordinates Measurements of the PLANE
- X: 0 Click the Create Button
- Y: 0 Close the View Image Window
- Z: +300
6. RIGHT CLICK in the FRONT VIEWPORT to EXIT Creation Mode
- Modify the Newly Created Plane
- Go to MODIFY Panel
- Name the Plane: BACK VIEW
- Set the ALL SEGMENTS to : 1
- UNCHECK REAL WORLD MAP SIZE
... Now it's time to apply the MATERIALS to their respective PLANES...
1. Maximize the PERSPECTIVE VIEWPORT
2. Bring out the MATERIAL EDITOR via "M"
3. Press H to bring out your SELECT FROM SCENE Menu
4. Choose the TOP VIEW Plane and click OK or Double Click it
- In the MATERIAL EDITOR
5. Click the TOP VIEW MATERIAL slot
6. Click the ASSIGN MATERIAL to SELECTION button
7. Repeat the Steps until all the PLANES are applied with their respective Materials
... ALIGNING the PLANES for Better viewing...
... to Align objects we will use the ALIGN TOOL or "ALT A"...
... ang pag gamit ng ALIGN Tool...
1st: SELECT ang OBJECT na i-a-ALIGN...
2nd: SELECT kung SAANG OBJECT i-a-ALIGN... (Reference Object)
3rd: CHOOSE kung PAANO ang magiging ALIGNMENT...
... in this Lesson... ang Reference Object natin ay yung TOP VIEW Plane
Aligning the SIDE VIEW
1. Press H to bring out your SELECT FROM SCENE Menu
2. Select the SIDE VIEW Plane
3. Press ALT A or click the ALIGN TOOL
4. Select / Click the TOP VIEW Plane
5. In the ALIGN SELECTION Settings...
- UNCHECK: "X" Position
- Current Object: MINIMUM
- Target Object: MAXIMUM
- Press OK
Aligning the FRONT VIEW
1. Press H to bring out your SELECT FROM SCENE Menu
2. Select the FRONT VIEW Plane
3. Press ALT A or click the ALIGN TOOL
4. Select / Click the TOP VIEW Plane
5. In the ALIGN SELECTION Settings...
- UNCHECK: "Y" Position
- Current Object: MINIMUM
- Target Object: MAXIMUM
- Press OK
Aligning the BACK VIEW
1. Press H to bring out your SELECT FROM SCENE Menu
2. Select the BACK VIEW Plane
3. Press ALT A or click the ALIGN TOOL
4. Select / Click the TOP VIEW Plane
5. In the ALIGN SELECTION Settings...
- UNCHECK: "X" Position
- Current Object: MINIMUM
- Target Object: MINIMUM
- Press OK
6. ... and FINALLY...
... now for the FINISHING TOUCHES...
... you may ask...
... Bakit nasa LIKOD ang FRONT VIEW Plane at nasa HARAP ang BACK VIEW...
... well... you will see the reason later...
... mas OK kung kayo ang makakdiscover...
... for now... ayusin natin ang BACK VIEW Plane...
1. Press H to bring out your SELECT FROM SCENE Menu
2. Select the BACK VIEW Plane
3. click the MIRROR TOOL
- In the MIRROR AXIS choose "Y"
- In the CLONE SELECTION choose "No Clone"
- Press OK
... Remember... you will be modeling in the MIDDLE Space between
the PLANES...
... Try nyo mag VIEW ROTATE via CTRL + R...
... as you can see... YOU CAN'T SEE... hehehe...
... you can't see the MIDDLE Space with in the aligned planes,
from which we will be modeling...
... so... ayusin natin ngayon via OBJECT PROPETIES...
1. "CTRL + A" to Select All the PLanes
2. Right Click and choose OBJECT PROPERTIES
In the OBJECT PROPERTIES settings...
3. CLICK By Layer button to Switch into By Object
- CHECK = Back Facecull
- UNCHECK = Show Frozen in Gray
- CHECK = Freeze
PRESS OK
... Try nyo mag VIEW ROTATE via CTRL + R...
... Now you can see through... BEHIND the Planes...
... naka FREEZE na din sila... so ... HINDI na sila ma-se-SELECT or CLICK
... so... what are you waiting for... MODEL NA!!! hehehe

kunito- CGP Newbie

- Number of posts : 37
Age : 46
Location : Dubai, UAE
Registration date : 10/07/2009
Re: Setting Up 3d Modeling References Part 2...
![]() by kunito Wed May 26, 2010 1:13 pm
by kunito Wed May 26, 2010 1:13 pm
... hey friends...
so sorry for the slow drag of this lesson...
... encountered a lot of problems on the image hosting part...
... buti na lang... nag PHOTOBUCKET na ako... hehehe!!!
... ok i hope this one helps!!!
... POLYPOWER!!!
so sorry for the slow drag of this lesson...
... encountered a lot of problems on the image hosting part...
... buti na lang... nag PHOTOBUCKET na ako... hehehe!!!
... ok i hope this one helps!!!
... POLYPOWER!!!
kunito- CGP Newbie
- Number of posts : 37
Age : 46
Location : Dubai, UAE
Registration date : 10/07/2009
Re: Setting Up 3d Modeling References Part 2...
![]() by edosayla Wed May 26, 2010 1:18 pm
by edosayla Wed May 26, 2010 1:18 pm
Galing Master Kunito .. thanks sa share .. hope to see pa ibang tutorials mo ... thanks again ...

edosayla- The Teacher

- Number of posts : 1367
Age : 47
Location : Cadiz, Talisay, Dubai
Registration date : 06/10/2008 -

Re: Setting Up 3d Modeling References Part 2...
![]() by kunito Thu May 27, 2010 8:09 am
by kunito Thu May 27, 2010 8:09 am
... thanks sir... 
... pwede bang mag guest instructor sa Pinoy CAD?...
... mala 1-shot deal... hehehe
... pwede bang mag guest instructor sa Pinoy CAD?...
... mala 1-shot deal... hehehe
kunito- CGP Newbie
- Number of posts : 37
Age : 46
Location : Dubai, UAE
Registration date : 10/07/2009
Re: Setting Up 3d Modeling References Part 2...
![]() by edosayla Thu May 27, 2010 2:39 pm
by edosayla Thu May 27, 2010 2:39 pm
Sure .. no probs Sir Kunito .. just drop by anytime sa friday .. 2-5 ang class ng 3dsmax ... ngayon kasi basic palng ang mga student cguro pag advance na after 2 weeks ..
ano ba gusto mong e turo?
ano ba gusto mong e turo?
edosayla- The Teacher
- Number of posts : 1367
Age : 47
Location : Cadiz, Talisay, Dubai
Registration date : 06/10/2008 -
Re: Setting Up 3d Modeling References Part 2...
![]() by jhondave Sat May 29, 2010 7:36 pm
by jhondave Sat May 29, 2010 7:36 pm
love It! More Power sayo Master!
jhondave- CGP Newbie
- Number of posts : 6
Age : 41
Location : dubai
Registration date : 03/09/2009
Re: Setting Up 3d Modeling References Part 2...
![]() by lilouch0141 Thu Aug 12, 2010 5:59 am
by lilouch0141 Thu Aug 12, 2010 5:59 am
sirs yan po ba ung start ng modeling ndi kc ako marunong tlga mag model ng mga cars and characters...
all i know is archi.... all boxes thats all please.... tell me how to start modelling
thanks for advance)
all i know is archi.... all boxes thats all please.... tell me how to start modelling
thanks for advance

lilouch0141- Number of posts : 2
Age : 35
Location : Manila
Registration date : 12/08/2010
» Setting up 3d Modeling References in Photoshop...
» "Basic" Character (Humanoid) modeling tutorial (BOX MODELING)
» Bldg 2 Pearl Qatar w/ short animation (Kitchen,study room,T&B) Tut part I.Part II(updated 8/2011)
» mat setting
» AutoCAD Setting
» "Basic" Character (Humanoid) modeling tutorial (BOX MODELING)
» Bldg 2 Pearl Qatar w/ short animation (Kitchen,study room,T&B) Tut part I.Part II(updated 8/2011)
» mat setting
» AutoCAD Setting
Page 1 of 1
Permissions in this forum:
You cannot reply to topics in this forum