


Creating Waterfalls Tutorials
+5
mammoo_03
nomeradona
kawpaitek
leeeeeeeee
render master
9 posters
Page 1 of 1

Creating Waterfalls Tutorials
![]() by render master Sun Nov 09, 2008 9:46 pm
by render master Sun Nov 09, 2008 9:46 pm
Creating Water Falls

I want to share my work on how to create a Waterfalls from 3D Max Particle System.
Scene Preparation
1. To start with, set units to meters, and renderer to default scanline renderer.
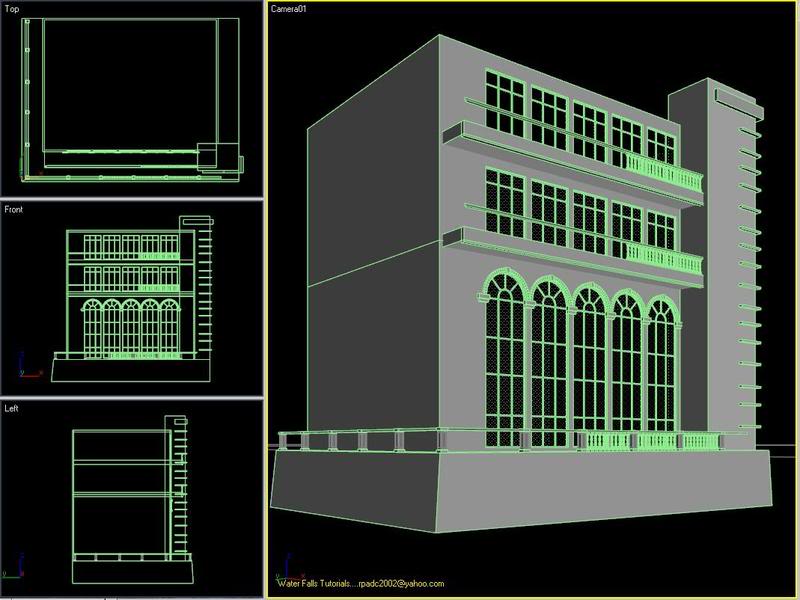
You can download my raw model for the building located on the following link.
raw model scenet(3dmax 8 and above)
rawmodelscene.zip
Raw image should look like the image below
2.Modelling the accessories.
To model the riverbed..
Create a plain lenght = 20m, width 25m, segments = 8 x 8
Applied with Noise Modifier : scale=0, strenght x=1.7, y=1.5, z=.25
Positioned it and leveled with the building bottom
To model the water surface
Create a plain lenght = 20m, width 16m, segments = 8 x 8
Applied with Ripple Modifier :amplitude 1=.06m, amplitude 2=.15m
Wave Lenght=1.0m, phase=.1, decay=.001
Positioned it about .5m below the ground floor fo the building.
To model the main rocks,
Create a box, lenght=12m, width=2, height=8m segments 40 x 20 x20
Apply with Noise Modifier to make it rough and bumpy.
Then apply with turbosmooth modifier to smoothen the surface
Position the bottom just level with the riverbed.
Accessorized the scene with small rocks, same procedure with the main
rocks but with a smaller scale
The raw scene model will now look like on the figure below

3.To model the water falls. From the Creating Panel, select Geometry and choose Particle Systems. On object type
choose PArray. Then drag anywhere on the screen to create a PArray Icon. Size of the icon doesnt matter, as long as
you see it then it would be fine. Or go to Tab Menu, choose Create then browsing down, choose Particles, there you can
find also PArray

4. To model the water source. Go to Creating Panel then Standard Primitives and on Object Type rollout choose box. On
your top viewport, create a box about the width of the main rocks say lenght=8m, width=0.1, depth=0.2m. Positioned it
on top of the main rock or where the waterfalls be located. Named it as source box. See figure below

5. Linking the source box to the particles. Select PArray Icon, go to modify, under Basic Parameters go down on Object
Base Emitter and press the box Pick Object then select the source box. Now click anywhere on the screen to turn off
the selection

6. Now go to you perspective viewport and zoom a bit on the source box facing to where the water will fall.box ,
select the source box right click and choose convert to poly. Then on modifying panel select polygon, then select the
front of the source box. Turn off the selection, by clicking on the gray box aligned with the word - Editable Poly,
this will just turn off the highlighted portion but still the selection is active.

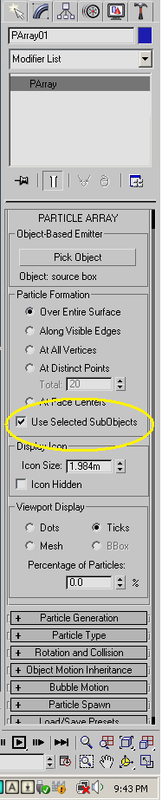
7. Select again the PArray Icon, go to modify and underneath the Particle Formation tick the box of Use Selected Sub-
objects. This means that water will come out only on the face of the source box you selected.
8. Now make the four viewport viewable, zoom in to the source box and make some initial testing, move your time slider
to 20 or 30 and see what happens. The particles emit at horizontal direction

9. Fine tuning particles for initial settings. , from the Viewport Display of PArray select Ticks, and for the
Percentage of the Particles make 100%.
On the Particle Generation click on Use Rate=100, for the speed= .2 meter,
variation 50, divergence 20
Speed -The velocity of the particle at birth, along the normal,
in units traveled per frame.
Variation - Applies a percentage of variation to the speed of
emission for each particle.
Divergence - Applies an angular degree of variation by which
each particle's velocity can vary from the emitter normal.
On Particle Timing, emit start at 0, stop at 100, Display until 100. life at 100 and variation at 25. On Particle
size, put .06m, variation size about 10. This means that drops of water is about 60mm so it is viewable on my camera.
See illustrated image for the initial settings.

10. Now adjust the time slider on about frame 40. As you can see in the image below, the Particles now have some
development

11. Redirecting the Particles to fall downwards. For the meantime, drag the time slider back to frame 0, then
maximized now your top viewport.
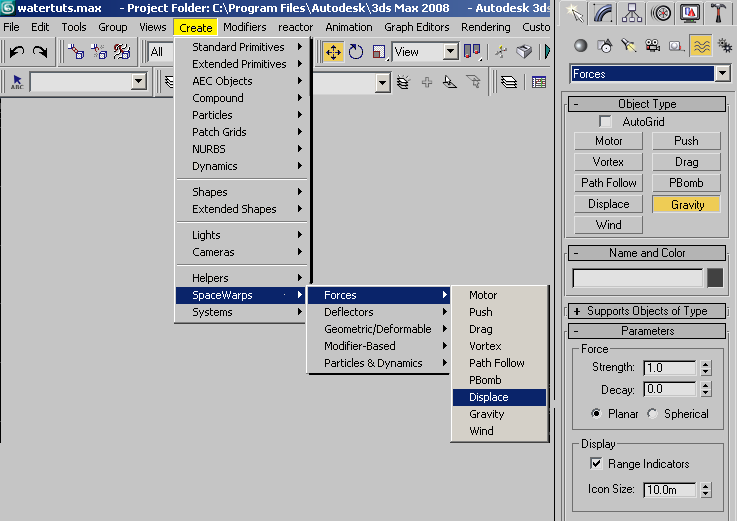
From the Creating Panel, select space warp (wave symbol), then on Object Type select Forces, then Gravity or go to tab
menu, select create - space warps-forces then gravitty. Or go to Tab Panel and choose Create Menu, on the pull down
menu items select SpaceWarps - Forces - then Gravity. See illustration below
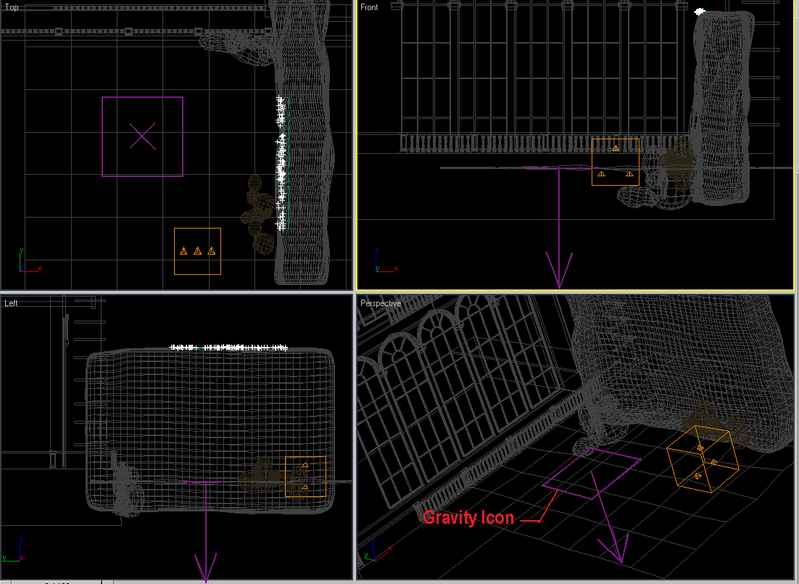
Drag anywhere from the screen to make a gravity icon. On top its a square icon with x on center and on elevation its a
line with an arrrow. The arrow indicates the direction of the force. Size and location doesnt matter as long as you
see it. See figure below
Make the top viewport active, go to main tollbar and click on Bind to Space Warp icon, then click on Gravity Icon (the
mouse pointer will change into small box with wavy diagonal lines) and drag them it to the Particles Icon. The
particles will be highlighted in a second which means the binding is okay. Then go to modifying panel, on parameters,
adjust strenght = .04
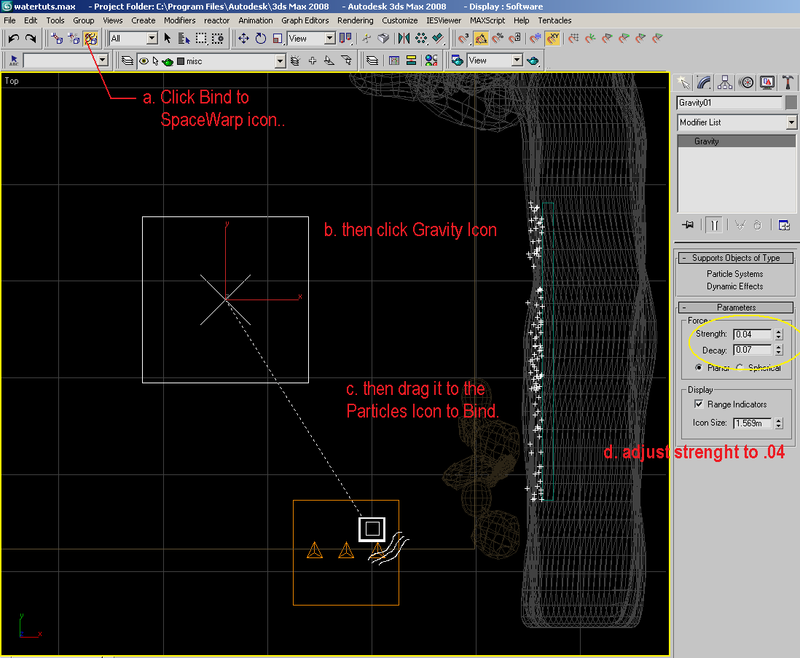
Strength = Increasing Strength increases the effect of gravity; that is, how objects move in relation to the Gravity
icon's direction arrow. Strength less than 0.0 creates negative gravity, which repels particles moving in the same
direction and attracts particles moving in the opposite direction. When Strength is set to 0.0, the Gravity space warp
has no effect.
Decay = When Decay is set to 0.0, the Gravity space warp has the same strength throughout world space. Increasing the
Decay value causes gravity strength to diminish as distance increases from the position of the gravity warp object.
Default=0.0.
12. Now play on your time slider at frame 25 and see the flow of the particles. We now corrected the direction and
orientation of the flow of the particles. But as you can see, it goes down directly down at the bottom, instead at the
water surface. We will now correct this to the next procedure. See figure below

13. Move back the time slider to 0, right click gravity icon and select hide selection. Go to Creating Panel, and
select Space warps browse down the selection and select Deflectors and from the list click deflector. On top viewport
drag on the location of the waterfalls, and assume the size of your water surface. Then on left or front view position
it or aligned with water surface.

14. Make the top view active, go to main toolbar and select bind to space warp icon, then select defletor icon and
wait until the icon change then drag it to the Particle Icon. Then go to modifying panel and on parameters and adjust
the bounce. For this I make it .25, and variation to 40.
Bounce - Controls the speed at which particles bounce off the deflector. At a setting of 1.0, particles bounce off the
deflector at the same speed they struck it. At 0.0, particles do not bounce at all. At values between 0.0 and 1.0,
particles bounce off the deflector at a speed reduced from their initial speed. At values greater than 1.0, particles
bounce off the deflector at a speed greater than their initial speed. Default=1.0.
Variation - The amount by which each particle can vary from the Bounce setting.
Now the setup is almost complete, play with your timeslider and see the reaction of the particles. Move the time
slider to 35. See image below

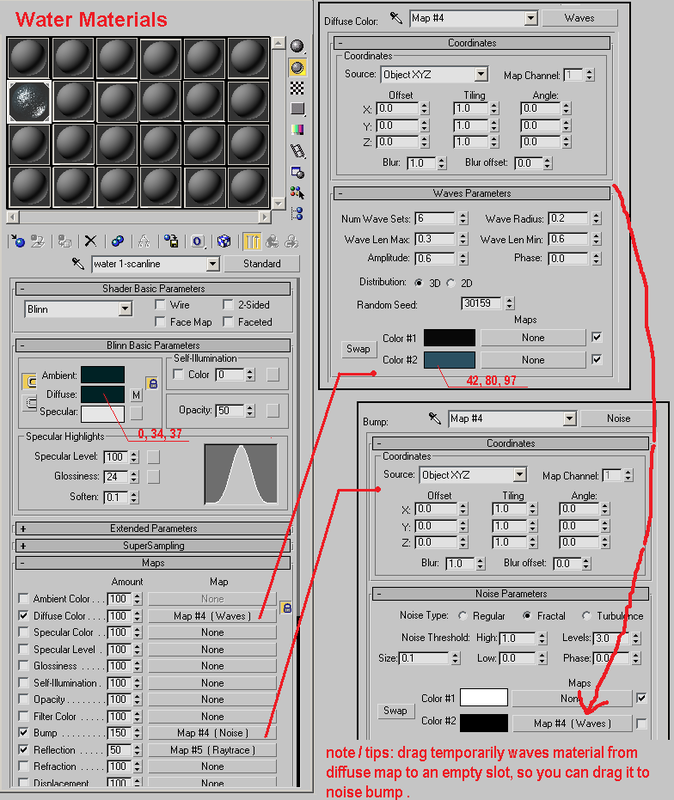
15. Applied now the materials to the models. See my materials below

16. Final fine tuning of particles. Position the time slider at 40 frame. Click PArray Particles, go to modify and
from Particle generation adjust Use rate to 600. Then right click on the Particles, activate object properties, and
enable Motion Blur, select image then click ok. See figure

Unhide and unfreeze all objects, click on camera, go to modify and activate Render Effect Pass with a total pass of 2.
And finally press F10, go to Renderer, Object Motion Blur click apply. Frame duration to .5 samples to 10, duration
subdivision to 10. Select source box, right click , choose object properties and untick Renderable.
Then fire up RENDER.
This is my raw scene figures ( unrendered)

The day scene render

The night scene render

Comments and critics are welcome
All Rights Reserved:
Creating Waterfalls Tutorials
Arch Ronel K. Pabico
rpadc2002@yahoo.com
I want to share my work on how to create a Waterfalls from 3D Max Particle System.
Scene Preparation
1. To start with, set units to meters, and renderer to default scanline renderer.
You can download my raw model for the building located on the following link.
raw model scenet(3dmax 8 and above)
rawmodelscene.zip
Raw image should look like the image below
2.Modelling the accessories.
To model the riverbed..
Create a plain lenght = 20m, width 25m, segments = 8 x 8
Applied with Noise Modifier : scale=0, strenght x=1.7, y=1.5, z=.25
Positioned it and leveled with the building bottom
To model the water surface
Create a plain lenght = 20m, width 16m, segments = 8 x 8
Applied with Ripple Modifier :amplitude 1=.06m, amplitude 2=.15m
Wave Lenght=1.0m, phase=.1, decay=.001
Positioned it about .5m below the ground floor fo the building.
To model the main rocks,
Create a box, lenght=12m, width=2, height=8m segments 40 x 20 x20
Apply with Noise Modifier to make it rough and bumpy.
Then apply with turbosmooth modifier to smoothen the surface
Position the bottom just level with the riverbed.
Accessorized the scene with small rocks, same procedure with the main
rocks but with a smaller scale
The raw scene model will now look like on the figure below
3.To model the water falls. From the Creating Panel, select Geometry and choose Particle Systems. On object type
choose PArray. Then drag anywhere on the screen to create a PArray Icon. Size of the icon doesnt matter, as long as
you see it then it would be fine. Or go to Tab Menu, choose Create then browsing down, choose Particles, there you can
find also PArray
4. To model the water source. Go to Creating Panel then Standard Primitives and on Object Type rollout choose box. On
your top viewport, create a box about the width of the main rocks say lenght=8m, width=0.1, depth=0.2m. Positioned it
on top of the main rock or where the waterfalls be located. Named it as source box. See figure below
5. Linking the source box to the particles. Select PArray Icon, go to modify, under Basic Parameters go down on Object
Base Emitter and press the box Pick Object then select the source box. Now click anywhere on the screen to turn off
the selection
6. Now go to you perspective viewport and zoom a bit on the source box facing to where the water will fall.box ,
select the source box right click and choose convert to poly. Then on modifying panel select polygon, then select the
front of the source box. Turn off the selection, by clicking on the gray box aligned with the word - Editable Poly,
this will just turn off the highlighted portion but still the selection is active.
7. Select again the PArray Icon, go to modify and underneath the Particle Formation tick the box of Use Selected Sub-
objects. This means that water will come out only on the face of the source box you selected.
8. Now make the four viewport viewable, zoom in to the source box and make some initial testing, move your time slider
to 20 or 30 and see what happens. The particles emit at horizontal direction
9. Fine tuning particles for initial settings. , from the Viewport Display of PArray select Ticks, and for the
Percentage of the Particles make 100%.
On the Particle Generation click on Use Rate=100, for the speed= .2 meter,
variation 50, divergence 20
Speed -The velocity of the particle at birth, along the normal,
in units traveled per frame.
Variation - Applies a percentage of variation to the speed of
emission for each particle.
Divergence - Applies an angular degree of variation by which
each particle's velocity can vary from the emitter normal.
On Particle Timing, emit start at 0, stop at 100, Display until 100. life at 100 and variation at 25. On Particle
size, put .06m, variation size about 10. This means that drops of water is about 60mm so it is viewable on my camera.
See illustrated image for the initial settings.
10. Now adjust the time slider on about frame 40. As you can see in the image below, the Particles now have some
development
11. Redirecting the Particles to fall downwards. For the meantime, drag the time slider back to frame 0, then
maximized now your top viewport.
From the Creating Panel, select space warp (wave symbol), then on Object Type select Forces, then Gravity or go to tab
menu, select create - space warps-forces then gravitty. Or go to Tab Panel and choose Create Menu, on the pull down
menu items select SpaceWarps - Forces - then Gravity. See illustration below
Drag anywhere from the screen to make a gravity icon. On top its a square icon with x on center and on elevation its a
line with an arrrow. The arrow indicates the direction of the force. Size and location doesnt matter as long as you
see it. See figure below
Make the top viewport active, go to main tollbar and click on Bind to Space Warp icon, then click on Gravity Icon (the
mouse pointer will change into small box with wavy diagonal lines) and drag them it to the Particles Icon. The
particles will be highlighted in a second which means the binding is okay. Then go to modifying panel, on parameters,
adjust strenght = .04
Strength = Increasing Strength increases the effect of gravity; that is, how objects move in relation to the Gravity
icon's direction arrow. Strength less than 0.0 creates negative gravity, which repels particles moving in the same
direction and attracts particles moving in the opposite direction. When Strength is set to 0.0, the Gravity space warp
has no effect.
Decay = When Decay is set to 0.0, the Gravity space warp has the same strength throughout world space. Increasing the
Decay value causes gravity strength to diminish as distance increases from the position of the gravity warp object.
Default=0.0.
12. Now play on your time slider at frame 25 and see the flow of the particles. We now corrected the direction and
orientation of the flow of the particles. But as you can see, it goes down directly down at the bottom, instead at the
water surface. We will now correct this to the next procedure. See figure below
13. Move back the time slider to 0, right click gravity icon and select hide selection. Go to Creating Panel, and
select Space warps browse down the selection and select Deflectors and from the list click deflector. On top viewport
drag on the location of the waterfalls, and assume the size of your water surface. Then on left or front view position
it or aligned with water surface.
14. Make the top view active, go to main toolbar and select bind to space warp icon, then select defletor icon and
wait until the icon change then drag it to the Particle Icon. Then go to modifying panel and on parameters and adjust
the bounce. For this I make it .25, and variation to 40.
Bounce - Controls the speed at which particles bounce off the deflector. At a setting of 1.0, particles bounce off the
deflector at the same speed they struck it. At 0.0, particles do not bounce at all. At values between 0.0 and 1.0,
particles bounce off the deflector at a speed reduced from their initial speed. At values greater than 1.0, particles
bounce off the deflector at a speed greater than their initial speed. Default=1.0.
Variation - The amount by which each particle can vary from the Bounce setting.
Now the setup is almost complete, play with your timeslider and see the reaction of the particles. Move the time
slider to 35. See image below
15. Applied now the materials to the models. See my materials below
16. Final fine tuning of particles. Position the time slider at 40 frame. Click PArray Particles, go to modify and
from Particle generation adjust Use rate to 600. Then right click on the Particles, activate object properties, and
enable Motion Blur, select image then click ok. See figure
Unhide and unfreeze all objects, click on camera, go to modify and activate Render Effect Pass with a total pass of 2.
And finally press F10, go to Renderer, Object Motion Blur click apply. Frame duration to .5 samples to 10, duration
subdivision to 10. Select source box, right click , choose object properties and untick Renderable.
Then fire up RENDER.
This is my raw scene figures ( unrendered)
The day scene render
The night scene render
Comments and critics are welcome
All Rights Reserved:
Creating Waterfalls Tutorials
Arch Ronel K. Pabico
rpadc2002@yahoo.com

render master- Game Master

- Number of posts : 3274
Age : 103
Location : riyadh, saudi arabia
Registration date : 27/09/2008
Re: Creating Waterfalls Tutorials
![]() by Guest Sun Nov 09, 2008 11:22 pm
by Guest Sun Nov 09, 2008 11:22 pm
Thank you so much sir Onel..Very useful tutorials..Printed all of them...Salamat po ulit and more power po sa inyo.. 
Guest- Guest
Re: Creating Waterfalls Tutorials
![]() by render master Sun Nov 09, 2008 11:30 pm
by render master Sun Nov 09, 2008 11:30 pm
ARCHITHEKTHURA wrote:Thank you so much sir Onel..Very useful tutorials..Printed all of them...Salamat po ulit and more power po sa inyo..
thnks sir sa pag-aapreciate. more to come sir.
on the list:
-Creating Rain Tutorials - parameter wiring method
-UV Unwrap
-Creating Advance material ( scanline mats)
-Tuts for all Reactors
-Tuts for all particles and dynamics
-and more.
( mukhang di ko na rin ipapaprint book ko nito, kase mapopost na rito
 ) hehehehehehe
render master- Game Master
- Number of posts : 3274
Age : 103
Location : riyadh, saudi arabia
Registration date : 27/09/2008
Re: Creating Waterfalls Tutorials
![]() by leeeeeeeee Sun Nov 09, 2008 11:39 pm
by leeeeeeeee Sun Nov 09, 2008 11:39 pm
ang lupit nito sir onel. . .. galing.... thanks sa walang sawang pag share...
wala ka bang complete set of tutorials mo sir ung naka PDF??? ehehe.
(nag request pa.)
wala ka bang complete set of tutorials mo sir ung naka PDF??? ehehe.
(nag request pa.)

leeeeeeeee- CGP Apprentice

- Number of posts : 799
Age : 41
Location : Brunei
Registration date : 18/09/2008 -

Re: Creating Waterfalls Tutorials
![]() by Guest Sun Nov 09, 2008 11:49 pm
by Guest Sun Nov 09, 2008 11:49 pm
render master wrote:ARCHITHEKTHURA wrote:Thank you so much sir Onel..Very useful tutorials..Printed all of them...Salamat po ulit and more power po sa inyo..
thnks sir sa pag-aapreciate. more to come sir.
on the list:
-Creating Rain Tutorials - parameter wiring method
-UV Unwrap
-Creating Advance material ( scanline mats)
-Tuts for all Reactors
-Tuts for all particles and dynamics
-and more.
( mukhang di ko na rin ipapaprint book ko nito, kase mapopost na rito
Wow daming kasunod sir Onel.I hope you can still get credits for this.Dami mo ng natutulungan dito.Thanks po sir ulit and Thanks in advance din po sa iba pang darating.Laking tulong din po nito lalo na po sa tulad kong mahina talga sa in and outs ng Max at least nakakakuha ako ng ideas sa tutorials nyo.Hope someday i can repay you sir,thanks po and God bless..
Guest- Guest
Re: Creating Waterfalls Tutorials
![]() by render master Mon Nov 10, 2008 12:00 am
by render master Mon Nov 10, 2008 12:00 am
leeeeeeeee wrote:ang lupit nito sir onel. . .. galing.... thanks sa walang sawang pag share...
wala ka bang complete set of tutorials mo sir ung naka PDF??? ehehe.
(nag request pa.)
di lang naka PDF sir, naka hardbound pa na libro.
3D MAX DEEP HORIZON Vol 1 - ( basic to advance techniques)
3D MAX DEEP HORIZON Vol 2 - ( particles, reactors and dynamics)
Simplifying Vray Tutorial
render master- Game Master
- Number of posts : 3274
Age : 103
Location : riyadh, saudi arabia
Registration date : 27/09/2008
Re: Creating Waterfalls Tutorials
![]() by kawpaitek Sun Dec 07, 2008 5:32 pm
by kawpaitek Sun Dec 07, 2008 5:32 pm
sir thanks for sharing this tut. great stuff! keep it up
kawpaitek- CGP Newbie

- Number of posts : 27
Age : 41
Location : Paranaque, Philippines
Registration date : 25/11/2008
Re: Creating Waterfalls Tutorials
![]() by nomeradona Sun Dec 07, 2008 7:20 pm
by nomeradona Sun Dec 07, 2008 7:20 pm
kita ko sa evermotion to dati bro. pang international ang tut na to.

nomeradona- SketchUp Guru
- Number of posts : 7293
Age : 55
Location : HCMC Vietnam
Registration date : 22/09/2008 -
Re: Creating Waterfalls Tutorials
![]() by mammoo_03 Thu Aug 27, 2009 12:40 pm
by mammoo_03 Thu Aug 27, 2009 12:40 pm
astig ito. matindi!!! thanks for sharing sir ronel!!! simply the best!!!

mammoo_03- The Exhibitioner

- Number of posts : 2417
Age : 44
Location : manila, makati, dubai
Registration date : 20/09/2008 -
Re: Creating Waterfalls Tutorials
![]() by remlex Mon Aug 31, 2009 1:33 pm
by remlex Mon Aug 31, 2009 1:33 pm
thank you render master..ang dami mo tlagang natulungan 

remlex- CGP Guru

- Number of posts : 1450
Age : 51
Location : Bumalik na uli sa Qatar..
Registration date : 08/07/2009
Re: Creating Waterfalls Tutorials
![]() by mocca Tue Sep 01, 2009 2:47 am
by mocca Tue Sep 01, 2009 2:47 am
salamat.. npakauseful tlga 4 me.. hehe
mocca- CGP Newbie
- Number of posts : 13
Registration date : 29/05/2009
Re: Creating Waterfalls Tutorials
![]() by render master Tue Sep 01, 2009 3:07 am
by render master Tue Sep 01, 2009 3:07 am
salamat sir, oo nga sir it was thier front page beforenomeradona wrote:kita ko sa evermotion to dati bro. pang international ang tut na to.
thanks sa pagdaan sir - medyo di nga lang polido ang output, tweak nyo na lang, making the particles bit smaller then adjust the amount will do plus some more motion blurmammoo_03 wrote:astig ito. matindi!!! thanks for sharing sir ronel!!! simply the best!!!
nyeeeek , nagsi-share lang sir.remlex wrote:thank you render master..ang dami mo tlagang natulungan
salamat din sir. hope and sana ng makatulong. hope to see your works with these.mocca wrote:salamat.. npakauseful tlga 4 me.. hehe
render master- Game Master
- Number of posts : 3274
Age : 103
Location : riyadh, saudi arabia
Registration date : 27/09/2008
westcoastwindblow- CGP Newbie
- Number of posts : 73
Age : 38
Location : hidden villige
Registration date : 11/08/2009
Re: Creating Waterfalls Tutorials
![]() by meeccod Tue Sep 01, 2009 4:04 am
by meeccod Tue Sep 01, 2009 4:04 am
sir link naman modeling ng terrain and road na sumasabay sa terrain ng lupa.. tutorial sana...
ganda nfg tutorial n to
ganda nfg tutorial n to

meeccod- CGP Newbie
- Number of posts : 70
Age : 37
Location : makati
Registration date : 01/09/2009
Re: Creating Waterfalls Tutorials
![]() by render master Tue Sep 01, 2009 4:31 am
by render master Tue Sep 01, 2009 4:31 am
meeccod wrote:sir link naman modeling ng terrain and road na sumasabay sa terrain ng lupa.. tutorial sana...
ganda nfg tutorial n to
wait mo sir sa 3D Max Modelling Tips and Tricks, wait mode lang
render master- Game Master
- Number of posts : 3274
Age : 103
Location : riyadh, saudi arabia
Registration date : 27/09/2008
» 3DSMAX Tutorials : Creating Pillow
» WIPs - creating rain tutorials
» Creating Random Grass
» creating grass in 3d max
» creating bougainvillea with ivy gen
» WIPs - creating rain tutorials
» Creating Random Grass
» creating grass in 3d max
» creating bougainvillea with ivy gen
Page 1 of 1
Permissions in this forum:
You cannot reply to topics in this forum|
|
|