Exterior Render Manipulation/Post-Production in Photoshop
+18
tian-tian
wyntallo
noninar
Norman
caviteautoclub
anthony_als
remlex
kurdaps!
aldrinv2
nomeradona
mokong
AUSTRIA
bongskeigle
bokkins
8t
edosayla
jhames joe albert infante
ERICK
22 posters
:: Tutorials :: Photoshop Tutorials
Page 2 of 2
Page 2 of 2 •  1, 2
1, 2
 Exterior Render Manipulation/Post-Production in Photoshop
First topic message reminder :
Hi guys just want to share my workflow in Photoshop Post-production. This may not be suitable to your taste, but an additional knowledge in your Photoshop skills. And I just want to give denzarki a credit for giving me a chance to explore more on his style; a little luck had made this to be a successful one. Don’t want to leave you waiting, let’s make this rolling. Here it goes;
1. As per my preference I saved my image (beauty pass) as .png format as to leave my background open for any backdrops. (See Image below)

2. Open any background (I got this image at 1000skies.com) Then place it behind your render. A prompt will be shown that the target document has a different depth than the source document etc. Just click Yes and rescale if possible
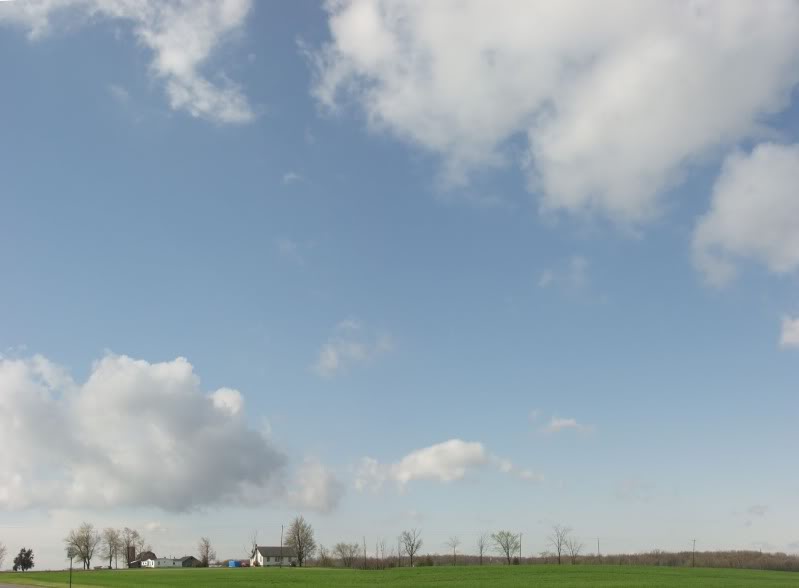

3. Click the background layer then hit Ctrl+M (Curves) to adjust the brightness, contrast of your backdrop (see Image below)

4. Once you're satisfied with brightness, go to Layers>Right Click your render>Merge down

5. Now once your done with merging down, we'll make our render edit its Gamma; Click Image>Adjustments>Exposure; a dialog box will open,

set the Gamma Correction to 1.5; dont worry if your render turned out to be very bright, we'll fix that later ok?
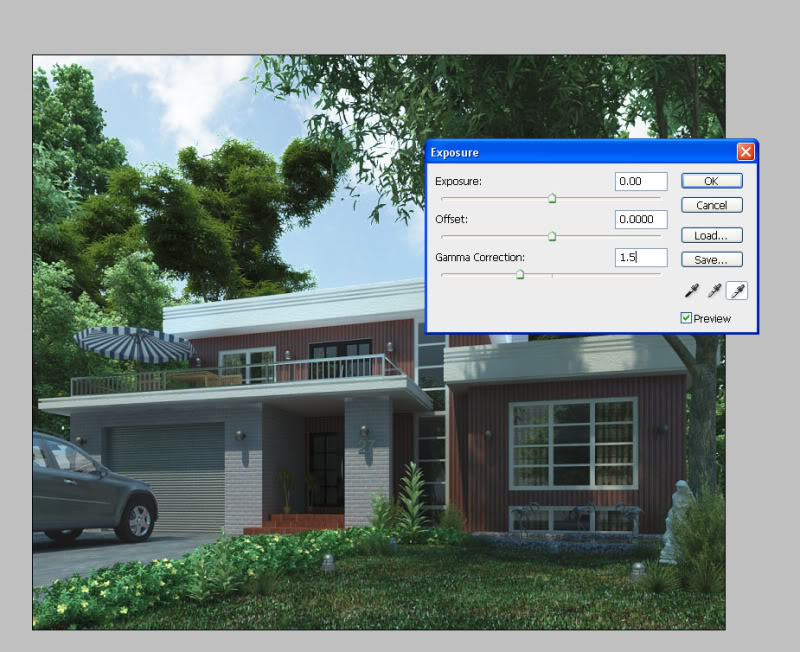
6. Now, next is Color Balancing (my favorite part... hehehe). Here comes the color styling part, well this depends on your taste, but as for bluish tint preference, here's what you should follow. Hit Ctrl+B (Color Balance)

On the bottom row, Under Tone balance click on Shadows radio button, adjust sliders as shown below

Now click Midtones radio button...

7. Hit Ctrl+M (Curves) adjust as necessary (for contrast I guess)

8. Let's put some vignetting on our render but not too much. Click Filter tab>Distort> Lens Correction

Here's what you should have right now...

9. Give it some Gaussian Blur... Click Ctrl+J to duplicate the layer then go to Filter>Blur>Gaussian Blur...
Just give it 1 px

Change the Opacity to 30 then Merge down again...

10. As for the flare, in my previous post, I used Knoll Light Factory Plug-in for Photoshop but this seemed to be inapplicable right now coz i dont have that plug-in here in the office. Now lets try something else..
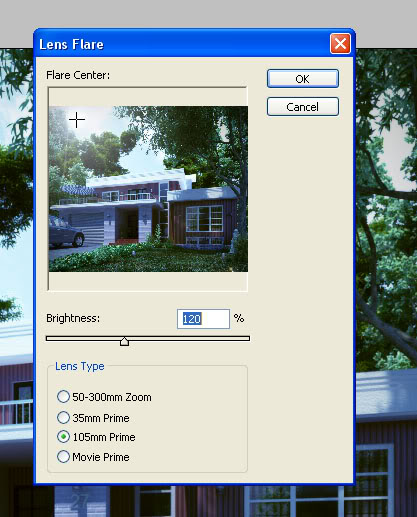
Here's what you should have right now...

11. Now we've come a long long way... few more to go... Let's add some spice with the render by giving it Chromatic Abberation.. giving CA too much will destroy the beauty of your render. Here's my process of putting CA on my renders. Hit Ctrl+J to duplicate layer, then go to Filter>Distort>Lens Correction and adjust as per image shown below

12. On the bottom part of the layer Click Add Layer Mask then Click "B" to activate brush tool

13. Now make sure you have black color selected (look at the highlighted part on the left) then start brushing through your house model, leaving unbrushed be the one with CA effect in it...

14. As you will notice this time, beside your layer, the effect of layer masking..
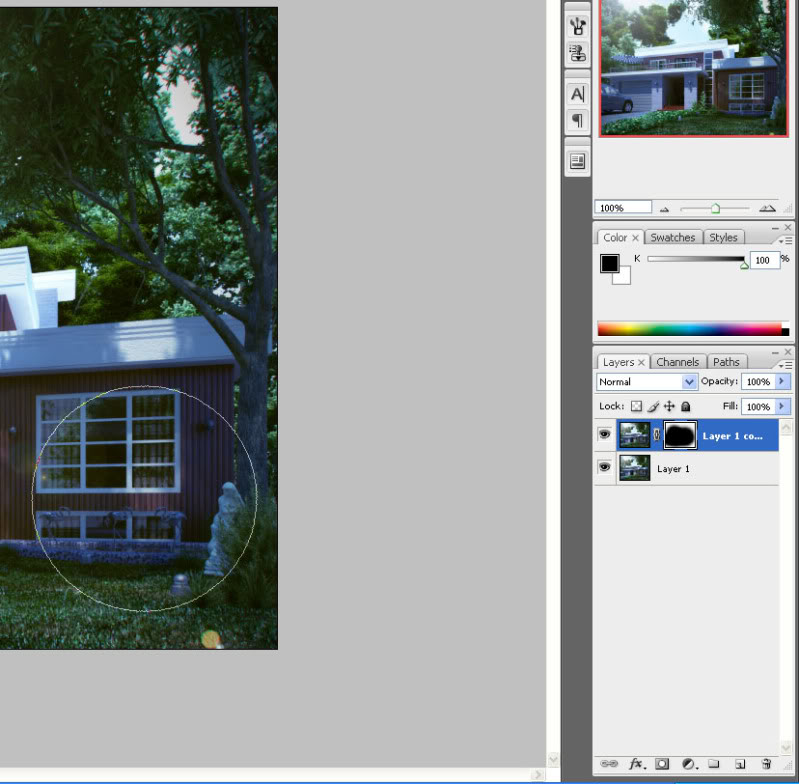
15. Here's what you should have right now after merging down.

16. Hit Ctrl+M again for some adjustments then Sharpen your Image (Optional). And its done... Post!!!
Final Image
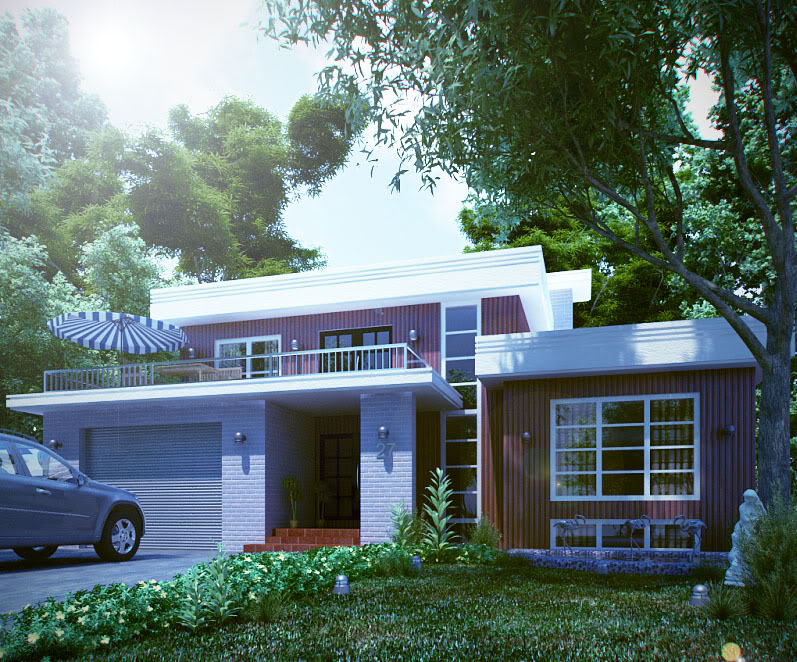
Hope this helped you in a way... Open for any criticism if you feel you are mislead. Goodluck and happy Post-processing!!!
Hi guys just want to share my workflow in Photoshop Post-production. This may not be suitable to your taste, but an additional knowledge in your Photoshop skills. And I just want to give denzarki a credit for giving me a chance to explore more on his style; a little luck had made this to be a successful one. Don’t want to leave you waiting, let’s make this rolling. Here it goes;
1. As per my preference I saved my image (beauty pass) as .png format as to leave my background open for any backdrops. (See Image below)

2. Open any background (I got this image at 1000skies.com) Then place it behind your render. A prompt will be shown that the target document has a different depth than the source document etc. Just click Yes and rescale if possible


3. Click the background layer then hit Ctrl+M (Curves) to adjust the brightness, contrast of your backdrop (see Image below)

4. Once you're satisfied with brightness, go to Layers>Right Click your render>Merge down

5. Now once your done with merging down, we'll make our render edit its Gamma; Click Image>Adjustments>Exposure; a dialog box will open,

set the Gamma Correction to 1.5; dont worry if your render turned out to be very bright, we'll fix that later ok?

6. Now, next is Color Balancing (my favorite part... hehehe). Here comes the color styling part, well this depends on your taste, but as for bluish tint preference, here's what you should follow. Hit Ctrl+B (Color Balance)

On the bottom row, Under Tone balance click on Shadows radio button, adjust sliders as shown below

Now click Midtones radio button...

7. Hit Ctrl+M (Curves) adjust as necessary (for contrast I guess)

8. Let's put some vignetting on our render but not too much. Click Filter tab>Distort> Lens Correction

Here's what you should have right now...

9. Give it some Gaussian Blur... Click Ctrl+J to duplicate the layer then go to Filter>Blur>Gaussian Blur...
Just give it 1 px

Change the Opacity to 30 then Merge down again...

10. As for the flare, in my previous post, I used Knoll Light Factory Plug-in for Photoshop but this seemed to be inapplicable right now coz i dont have that plug-in here in the office. Now lets try something else..

Here's what you should have right now...

11. Now we've come a long long way... few more to go... Let's add some spice with the render by giving it Chromatic Abberation.. giving CA too much will destroy the beauty of your render. Here's my process of putting CA on my renders. Hit Ctrl+J to duplicate layer, then go to Filter>Distort>Lens Correction and adjust as per image shown below

12. On the bottom part of the layer Click Add Layer Mask then Click "B" to activate brush tool

13. Now make sure you have black color selected (look at the highlighted part on the left) then start brushing through your house model, leaving unbrushed be the one with CA effect in it...

14. As you will notice this time, beside your layer, the effect of layer masking..

15. Here's what you should have right now after merging down.

16. Hit Ctrl+M again for some adjustments then Sharpen your Image (Optional). And its done... Post!!!
Final Image

Hope this helped you in a way... Open for any criticism if you feel you are mislead. Goodluck and happy Post-processing!!!

 Re: Exterior Render Manipulation/Post-Production in Photoshop
kurdaps! wrote:Clever...
Thanks for posting Sir...
thanks po sir kurdaps...
 Re: Exterior Render Manipulation/Post-Production in Photoshop
lot of praps to you bro  very helpful tong tutorial mo and tamang-tama lang ang post-processing
 very helpful tong tutorial mo and tamang-tama lang ang post-processing
Guest- Guest
 Re: Exterior Render Manipulation/Post-Production in Photoshop
thanks for sharing brow!... 


remlex- CGP Guru

- Number of posts : 1450
Age : 51
Location : Bumalik na uli sa Qatar..
Registration date : 08/07/2009
 Re: Exterior Render Manipulation/Post-Production in Photoshop
mahusay itong workflow na ito sir erick,,, malaking tulong po ito sa akin na mahina sa post production,,, thanks for sharing sir.. 
 Re: Exterior Render Manipulation/Post-Production in Photoshop
kietsmark wrote:lot of praps to you brovery helpful tong tutorial mo and tamang-tama lang ang post-processing
thanks dude keits... pogi avatar ah.. hehehe...
 Re: Exterior Render Manipulation/Post-Production in Photoshop
remlex wrote:thanks for sharing brow!...
thanks sir remlex...
 Re: Exterior Render Manipulation/Post-Production in Photoshop
anthony_als wrote:mahusay itong workflow na ito sir erick,,, malaking tulong po ito sa akin na mahina sa post production,,, thanks for sharing sir..
salamat po at nagustuhan mo sir anthony...
 Re: Exterior Render Manipulation/Post-Production in Photoshop
caviteautoclub wrote:thanks sir.. galing
thanks din po ser
 Re: Exterior Render Manipulation/Post-Production in Photoshop
ang bangis mo na tlga erick!!!! wa ako ma say!!!!!

Norman- CGP Expert

- Number of posts : 3228
Registration date : 21/06/2009
 Re: Exterior Render Manipulation/Post-Production in Photoshop
f-fortyone wrote:ang bangis mo na tlga erick!!!! wa ako ma say!!!!!
thanks norms... ikaw ang mabangis... at malupet sa chicks.. hehehe.. thanks dude
 Re: Exterior Render Manipulation/Post-Production in Photoshop
thanks sa post mo na tutorials sir ha...my matutunan naman ako.

noninar- CGP Newbie

- Number of posts : 164
Age : 42
Location : riyadh
Registration date : 18/09/2009
 Re: Exterior Render Manipulation/Post-Production in Photoshop
noninar wrote:thanks sa post mo na tutorials sir ha...my matutunan naman ako.
thanks dude... you can use it anytime... post ka para malaman natin kung ok ang approach.. thanks ulit
 Re: Exterior Render Manipulation/Post-Production in Photoshop
domo arigato, tomodachi san..hehe
trans: thanx a lot pre..
trans: thanx a lot pre..

wyntallo- CGP Newbie

- Number of posts : 63
Age : 38
Location : Philippines / Iloilo
Registration date : 16/12/2009
 Re: Exterior Render Manipulation/Post-Production in Photoshop
daming steps pero okay  thanks for the heads up sir!
 Re: Exterior Render Manipulation/Post-Production in Photoshop
sir erick., panu po ba magsave ng .png file na walang background,. newbie kasi aku sa max., parating my background kahit png format pinipili ko..

tian-tian- CGP Apprentice

- Number of posts : 405
Age : 38
Location : tacloban/Quezon City
Registration date : 18/11/2008
 Re: Exterior Render Manipulation/Post-Production in Photoshop
hohoho...will try this for my next render. thanks a lot, erick! really appreciate this tutorial.

Faust- CGP Newbie

- Number of posts : 39
Age : 36
Location : Lucena City
Registration date : 04/12/2009
 Re: Exterior Render Manipulation/Post-Production in Photoshop
Nandito ka lang pala,heheh..TFS master Erick! 


brodger- CGP Guru

- Number of posts : 1747
Age : 46
Location : ligid ha Daguitan X Burawon
Registration date : 14/05/2010
 Re: Exterior Render Manipulation/Post-Production in Photoshop
Maraming salamt po sir laking tulong nito.

effreymm- CGP Guru

- Number of posts : 1617
Age : 45
Location : Sunshine City Laoag/Ilocos Norte/Doha Qatar
Registration date : 17/07/2009
 Re: Exterior Render Manipulation/Post-Production in Photoshop
sir hindi ko po mai merge down ng ayos yung back drop ko sa png image ko baka po pwedeng paki himay yung procedure sa step no 2,ang ginagawa ko po kasi dati i pinipaste into ko lang yung bg sa selected area ko ,then kaunting edit yun na.. advance ty po!

lemuell- CGP Newbie

- Number of posts : 14
Age : 44
Location : imus, cavite
Registration date : 04/03/2010
Page 2 of 2 •  1, 2
1, 2
 Similar topics
» Photoshop post production – Easy color correction tutorial
» 1st post..2 weeks using vray..can you give me good exterior lighting manipulation pls?
» Photoshop Composition ( Photo Manipulation 2)
» my 1st post exterior render
» 3rd post - exterior render
» 1st post..2 weeks using vray..can you give me good exterior lighting manipulation pls?
» Photoshop Composition ( Photo Manipulation 2)
» my 1st post exterior render
» 3rd post - exterior render
:: Tutorials :: Photoshop Tutorials
Page 2 of 2
Permissions in this forum:
You cannot reply to topics in this forum


