Exterior Render Manipulation/Post-Production in Photoshop
+18
tian-tian
wyntallo
noninar
Norman
caviteautoclub
anthony_als
remlex
kurdaps!
aldrinv2
nomeradona
mokong
AUSTRIA
bongskeigle
bokkins
8t
edosayla
jhames joe albert infante
ERICK
22 posters
:: Tutorials :: Photoshop Tutorials
Page 1 of 2
Page 1 of 2 • 1, 2 
 Exterior Render Manipulation/Post-Production in Photoshop
Hi guys just want to share my workflow in Photoshop Post-production. This may not be suitable to your taste, but an additional knowledge in your Photoshop skills. And I just want to give denzarki a credit for giving me a chance to explore more on his style; a little luck had made this to be a successful one. Don’t want to leave you waiting, let’s make this rolling. Here it goes;
1. As per my preference I saved my image (beauty pass) as .png format as to leave my background open for any backdrops. (See Image below)

2. Open any background (I got this image at 1000skies.com) Then place it behind your render. A prompt will be shown that the target document has a different depth than the source document etc. Just click Yes and rescale if possible
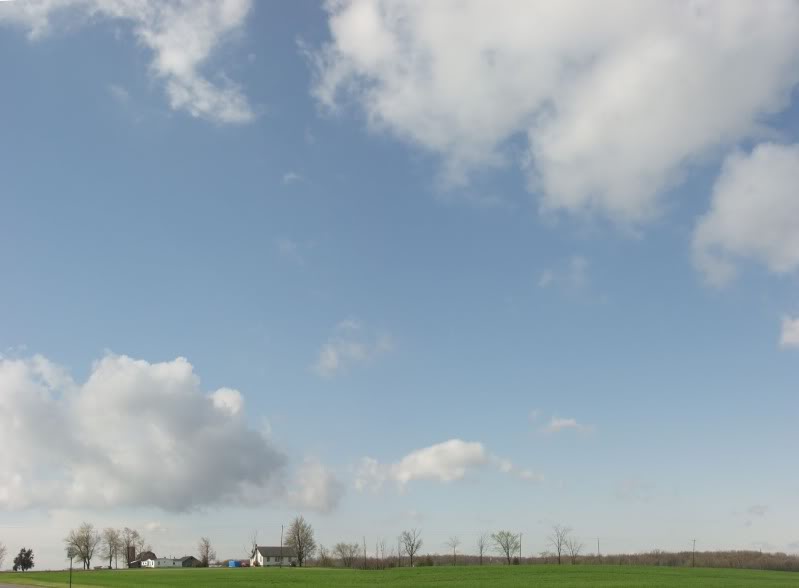

3. Click the background layer then hit Ctrl+M (Curves) to adjust the brightness, contrast of your backdrop (see Image below)

4. Once you're satisfied with brightness, go to Layers>Right Click your render>Merge down

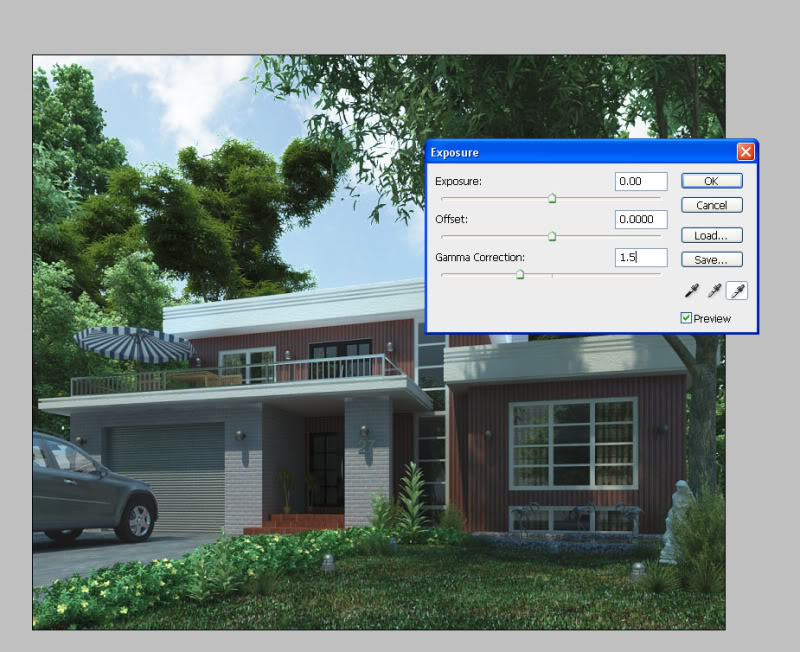
5. Now once your done with merging down, we'll make our render edit its Gamma; Click Image>Adjustments>Exposure; a dialog box will open,

set the Gamma Correction to 1.5; dont worry if your render turned out to be very bright, we'll fix that later ok?
6. Now, next is Color Balancing (my favorite part... hehehe). Here comes the color styling part, well this depends on your taste, but as for bluish tint preference, here's what you should follow. Hit Ctrl+B (Color Balance)

On the bottom row, Under Tone balance click on Shadows radio button, adjust sliders as shown below

Now click Midtones radio button...

7. Hit Ctrl+M (Curves) adjust as necessary (for contrast I guess)

8. Let's put some vignetting on our render but not too much. Click Filter tab>Distort> Lens Correction

Here's what you should have right now...

9. Give it some Gaussian Blur... Click Ctrl+J to duplicate the layer then go to Filter>Blur>Gaussian Blur...
Just give it 1 px

Change the Opacity to 30 then Merge down again...

10. As for the flare, in my previous post, I used Knoll Light Factory Plug-in for Photoshop but this seemed to be inapplicable right now coz i dont have that plug-in here in the office. Now lets try something else..
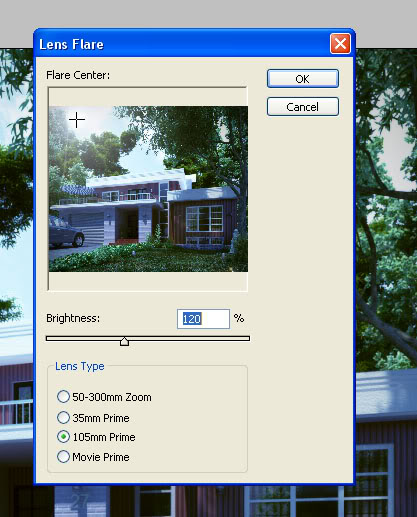
Here's what you should have right now...

11. Now we've come a long long way... few more to go... Let's add some spice with the render by giving it Chromatic Abberation.. giving CA too much will destroy the beauty of your render. Here's my process of putting CA on my renders. Hit Ctrl+J to duplicate layer, then go to Filter>Distort>Lens Correction and adjust as per image shown below

12. On the bottom part of the layer Click Add Layer Mask then Click "B" to activate brush tool

13. Now make sure you have black color selected (look at the highlighted part on the left) then start brushing through your house model, leaving unbrushed be the one with CA effect in it...

14. As you will notice this time, beside your layer, the effect of layer masking..
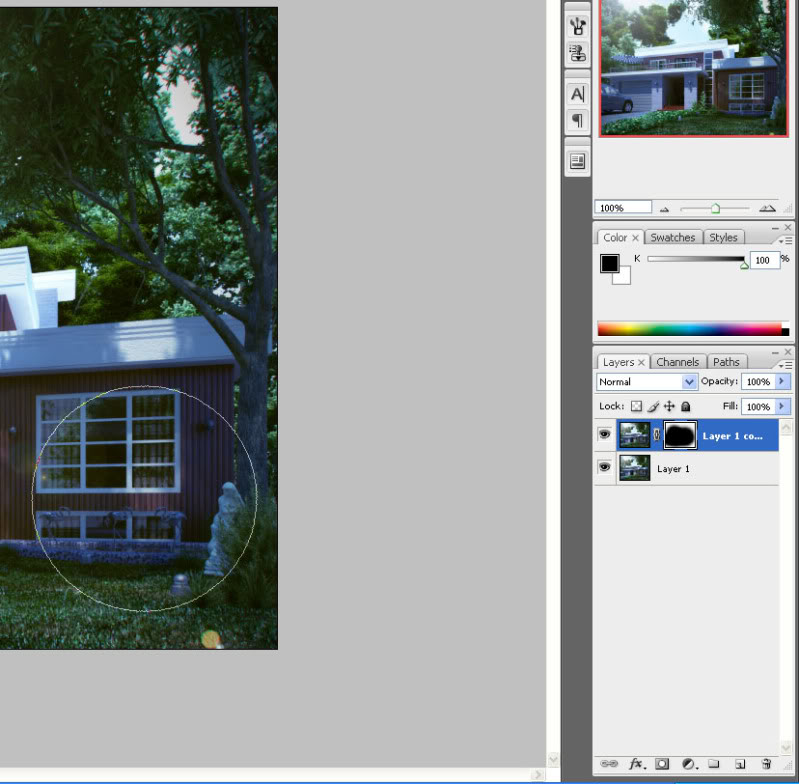
15. Here's what you should have right now after merging down.

16. Hit Ctrl+M again for some adjustments then Sharpen your Image (Optional). And its done... Post!!!
Final Image
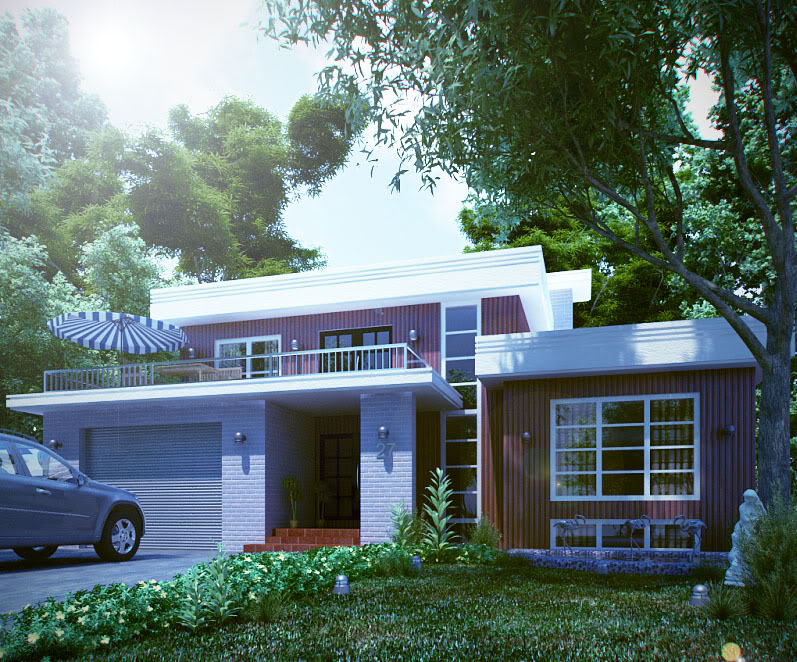
Hope this helped you in a way... Open for any criticism if you feel you are mislead. Goodluck and happy Post-processing!!!
1. As per my preference I saved my image (beauty pass) as .png format as to leave my background open for any backdrops. (See Image below)

2. Open any background (I got this image at 1000skies.com) Then place it behind your render. A prompt will be shown that the target document has a different depth than the source document etc. Just click Yes and rescale if possible


3. Click the background layer then hit Ctrl+M (Curves) to adjust the brightness, contrast of your backdrop (see Image below)

4. Once you're satisfied with brightness, go to Layers>Right Click your render>Merge down

5. Now once your done with merging down, we'll make our render edit its Gamma; Click Image>Adjustments>Exposure; a dialog box will open,

set the Gamma Correction to 1.5; dont worry if your render turned out to be very bright, we'll fix that later ok?

6. Now, next is Color Balancing (my favorite part... hehehe). Here comes the color styling part, well this depends on your taste, but as for bluish tint preference, here's what you should follow. Hit Ctrl+B (Color Balance)

On the bottom row, Under Tone balance click on Shadows radio button, adjust sliders as shown below

Now click Midtones radio button...

7. Hit Ctrl+M (Curves) adjust as necessary (for contrast I guess)

8. Let's put some vignetting on our render but not too much. Click Filter tab>Distort> Lens Correction

Here's what you should have right now...

9. Give it some Gaussian Blur... Click Ctrl+J to duplicate the layer then go to Filter>Blur>Gaussian Blur...
Just give it 1 px

Change the Opacity to 30 then Merge down again...

10. As for the flare, in my previous post, I used Knoll Light Factory Plug-in for Photoshop but this seemed to be inapplicable right now coz i dont have that plug-in here in the office. Now lets try something else..

Here's what you should have right now...

11. Now we've come a long long way... few more to go... Let's add some spice with the render by giving it Chromatic Abberation.. giving CA too much will destroy the beauty of your render. Here's my process of putting CA on my renders. Hit Ctrl+J to duplicate layer, then go to Filter>Distort>Lens Correction and adjust as per image shown below

12. On the bottom part of the layer Click Add Layer Mask then Click "B" to activate brush tool

13. Now make sure you have black color selected (look at the highlighted part on the left) then start brushing through your house model, leaving unbrushed be the one with CA effect in it...

14. As you will notice this time, beside your layer, the effect of layer masking..

15. Here's what you should have right now after merging down.

16. Hit Ctrl+M again for some adjustments then Sharpen your Image (Optional). And its done... Post!!!
Final Image

Hope this helped you in a way... Open for any criticism if you feel you are mislead. Goodluck and happy Post-processing!!!

 Re: Exterior Render Manipulation/Post-Production in Photoshop
hehe sir ayus tong tutorial mo ah!! salamat.. ganto din yung pinagaaralan ko ngayun eh hehe shadows at midtone .. 


jhames joe albert infante- CGP Expert

- Number of posts : 2733
Age : 39
Location : San Mateo Isabela/Singapore
Registration date : 18/11/2008
 Re: Exterior Render Manipulation/Post-Production in Photoshop
galing sir... try ko dn po 2... slamat...
 Re: Exterior Render Manipulation/Post-Production in Photoshop
Very nice bro! Lupit mo pala magtutorial ah. Di ka nagsasabi. Thanks for sharing this great idea! keep it up bro! 

 Re: Exterior Render Manipulation/Post-Production in Photoshop
jhames joe albert infante wrote:hehe sir ayus tong tutorial mo ah!! salamat.. ganto din yung pinagaaralan ko ngayun eh hehe shadows at midtone ..
salamat master jhames...
 Re: Exterior Render Manipulation/Post-Production in Photoshop
edosayla wrote:Thanks sir for sharing ...
thanks sir edosayla...
 Re: Exterior Render Manipulation/Post-Production in Photoshop
8t wrote:galing sir... try ko dn po 2... slamat...
thanks po sir 8t... (pano ko po ba bibigkasin ang pangalan mo? hehehe... j/k) thanks for dropping by
 Re: Exterior Render Manipulation/Post-Production in Photoshop
bokkins wrote:Very nice bro! Lupit mo pala magtutorial ah. Di ka nagsasabi. Thanks for sharing this great idea! keep it up bro!
nyak.. thanks po sir bokkins... gusto ko din talaga to i share... buti wala ako ginagawa kahapon dito sa office.... thanks ulit

bongskeigle- CGP Guru

- Number of posts : 1958
Age : 41
Location : Zebu
Registration date : 06/05/2009
 Re: Exterior Render Manipulation/Post-Production in Photoshop
nice job bro....honestly big help to kasi di na ako mangangapa galing nito bro comment ko lang tama naman ang adjustment
mo pero yung choice of color balance mo lang napasubra.... pero syempre magtatanong ako hahahah... ano ba pinagkaiba
ng merge down sa overlay? Parang mas prefer ko ang overlay instead mo merging
down tapos opacity mo lang para kasi lahat affected na magbago ang kulay.
Pero kung susundan ko ang tutorial mo marami
ako magagawa na effect Very nice TUTS bro....tama si Sir Boks ang galing mo gumawa ng tutorial...keep it up

AUSTRIA- CGP Le Corbusier

- Number of posts : 2422
Age : 45
Location : Abu Dhabi UAE
Registration date : 19/09/2008
 Re: Exterior Render Manipulation/Post-Production in Photoshop
bongskeigle wrote:thanks bro...
thanks dude
 Re: Exterior Render Manipulation/Post-Production in Photoshop
AUSTRIA wrote:nice job bro....honestly big help to kasi di na ako mangangapa galing nito bro comment ko lang tama naman ang adjustment
mo pero yung choice of color balance mo lang napasubra.... pero syempre magtatanong ako hahahah... ano ba pinagkaiba
ng merge down sa overlay? Parang mas prefer ko ang overlay instead mo merging
down tapos opacity mo lang para kasi lahat affected na magbago ang kulay.
Pero kung susundan ko ang tutorial mo marami
ako magagawa na effect Very nice TUTS bro....tama si Sir Boks ang galing mo gumawa ng tutorial...keep it up
dude.. thanks sa pagdaan.. regarding sa color balance... its your preference din naman kung ano gusto mo ma achieve...kung bluish tint, ganyan preference ko, and not always na ganyan.. kase not all the time eh ganyan kalalabasan nyan.... color balancing depends on the user input... regarding merge, i always go for merging down in a way na malinis lagi ang layering ko... and tama ka na talagang sasabay yan kase 1 layer na lang sya... but be sure na ok na ung ime merge mo... ung overlay kase, imho nakakagulo lang sakin (sakin lang po ha) nakakalito... pero tama ka rin na di affected ung iba sa pag control mo ng kulay... imagine mo na din.. ung naka overlay eh iniba mo ang color balance, ung isang layer naiwan? maghahalo ata ung edited from not.. as for my preference i always edit my image the whole itself... parang ang gulo ko na ata.. hahaha... anyway, kaya ko talaga gumawa ng tutorial na ganito per pag personal di na.. hahaha.. thanks ulit dude... sana me napulot ka....
 Re: Exterior Render Manipulation/Post-Production in Photoshop
galing sir .. keep up the good work ... wait na lng kami sa iba pang techniques .. 
 Re: Exterior Render Manipulation/Post-Production in Photoshop
ERICK wrote:AUSTRIA wrote:nice job bro....honestly big help to kasi di na ako mangangapa galing nito bro comment ko lang tama naman ang adjustment
mo pero yung choice of color balance mo lang napasubra.... pero syempre magtatanong ako hahahah... ano ba pinagkaiba
ng merge down sa overlay? Parang mas prefer ko ang overlay instead mo merging
down tapos opacity mo lang para kasi lahat affected na magbago ang kulay.
Pero kung susundan ko ang tutorial mo marami
ako magagawa na effect Very nice TUTS bro....tama si Sir Boks ang galing mo gumawa ng tutorial...keep it up
dude.. thanks sa pagdaan.. regarding sa color balance... its your preference din naman kung ano gusto mo ma achieve...kung bluish tint, ganyan preference ko, and not always na ganyan.. kase not all the time eh ganyan kalalabasan nyan.... color balancing depends on the user input... regarding merge, i always go for merging down in a way na malinis lagi ang layering ko... and tama ka na talagang sasabay yan kase 1 layer na lang sya... but be sure na ok na ung ime merge mo... ung overlay kase, imho nakakagulo lang sakin (sakin lang po ha) nakakalito... pero tama ka rin na di affected ung iba sa pag control mo ng kulay... imagine mo na din.. ung naka overlay eh iniba mo ang color balance, ung isang layer naiwan? maghahalo ata ung edited from not.. as for my preference i always edit my image the whole itself... parang ang gulo ko na ata.. hahaha... anyway, kaya ko talaga gumawa ng tutorial na ganito per pag personal di na.. hahaha.. thanks ulit dude... sana me napulot ka....
Hahaha dnt worry dude malinaw pagkaka explain mo at tama ka rin na depende sa user ang color balancing....
thanks tingnan mo nga naman ang panahon dati ikaw ang tinuturuan ko pero now ako na ang tinuturuan mo
ibang klase ka na dude eric. THANK YOU DUDE.......

AUSTRIA- CGP Le Corbusier

- Number of posts : 2422
Age : 45
Location : Abu Dhabi UAE
Registration date : 19/09/2008
 Re: Exterior Render Manipulation/Post-Production in Photoshop
thanks bro.. galeng ng tutorial mo.. magagamit ko to.. 

mokong- CGP Guru

- Number of posts : 1926
Age : 41
Location : Nagoya, Japan
Registration date : 02/03/2009
 Re: Exterior Render Manipulation/Post-Production in Photoshop
more more more.. pwede ka ng maging professor. well done erick alam ko marami matutulungan nyan...
 Re: Exterior Render Manipulation/Post-Production in Photoshop
nice tuts nauuso ito kaya dapat sumabay sa mga masters.. malaking tulong ito..keep up the good work.
 Re: Exterior Render Manipulation/Post-Production in Photoshop
edosayla wrote:galing sir .. keep up the good work ... wait na lng kami sa iba pang techniques ..
thanks po sa pagdaan ulit sir edosayla
 Re: Exterior Render Manipulation/Post-Production in Photoshop
AUSTRIA wrote:ERICK wrote:AUSTRIA wrote:nice job bro....honestly big help to kasi di na ako mangangapa galing nito bro comment ko lang tama naman ang adjustment
mo pero yung choice of color balance mo lang napasubra.... pero syempre magtatanong ako hahahah... ano ba pinagkaiba
ng merge down sa overlay? Parang mas prefer ko ang overlay instead mo merging
down tapos opacity mo lang para kasi lahat affected na magbago ang kulay.
Pero kung susundan ko ang tutorial mo marami
ako magagawa na effect Very nice TUTS bro....tama si Sir Boks ang galing mo gumawa ng tutorial...keep it up
dude.. thanks sa pagdaan.. regarding sa color balance... its your preference din naman kung ano gusto mo ma achieve...kung bluish tint, ganyan preference ko, and not always na ganyan.. kase not all the time eh ganyan kalalabasan nyan.... color balancing depends on the user input... regarding merge, i always go for merging down in a way na malinis lagi ang layering ko... and tama ka na talagang sasabay yan kase 1 layer na lang sya... but be sure na ok na ung ime merge mo... ung overlay kase, imho nakakagulo lang sakin (sakin lang po ha) nakakalito... pero tama ka rin na di affected ung iba sa pag control mo ng kulay... imagine mo na din.. ung naka overlay eh iniba mo ang color balance, ung isang layer naiwan? maghahalo ata ung edited from not.. as for my preference i always edit my image the whole itself... parang ang gulo ko na ata.. hahaha... anyway, kaya ko talaga gumawa ng tutorial na ganito per pag personal di na.. hahaha.. thanks ulit dude... sana me napulot ka....
Hahaha dnt worry dude malinaw pagkaka explain mo at tama ka rin na depende sa user ang color balancing....
thanks tingnan mo nga naman ang panahon dati ikaw ang tinuturuan ko pero now ako na ang tinuturuan mo
ibang klase ka na dude eric. THANK YOU DUDE.......
hahaha di naman master dude mod austria.. master ka pa din ng lahat.. nagkataon lang na tinutukan ko lang to at naishare ko lang... thanks ulit sa suporta...
 Re: Exterior Render Manipulation/Post-Production in Photoshop
mokong wrote:thanks bro.. galeng ng tutorial mo.. magagamit ko to..
salamat at nagustuhan mo sir mokong
 Re: Exterior Render Manipulation/Post-Production in Photoshop
nomeradona wrote:more more more.. pwede ka ng maging professor. well done erick alam ko marami matutulungan nyan...
thanks po sir nomer... post pa ulit ako pag meron ako... student pa lang ser di pa prof... hehehe thanks po...
 Re: Exterior Render Manipulation/Post-Production in Photoshop
aldrinv2 wrote:nice tuts nauuso ito kaya dapat sumabay sa mga masters.. malaking tulong ito..keep up the good work.
thanks po sir aldrinv2...
 Re: Exterior Render Manipulation/Post-Production in Photoshop
kurdaps! wrote:Clever...
Thanks for posting Sir...
thanks po sir kurdaps...
Page 1 of 2 • 1, 2 
 Similar topics
» Photoshop post production – Easy color correction tutorial
» 1st post..2 weeks using vray..can you give me good exterior lighting manipulation pls?
» Photoshop Composition ( Photo Manipulation 2)
» my 1st post exterior render
» 3rd post - exterior render
» 1st post..2 weeks using vray..can you give me good exterior lighting manipulation pls?
» Photoshop Composition ( Photo Manipulation 2)
» my 1st post exterior render
» 3rd post - exterior render
:: Tutorials :: Photoshop Tutorials
Page 1 of 2
Permissions in this forum:
You cannot reply to topics in this forum


