


3 Point Ligting in 3dsmax
5 posters
Page 1 of 1

3 Point Ligting in 3dsmax
![]() by edosayla Wed Feb 02, 2011 10:22 pm
by edosayla Wed Feb 02, 2011 10:22 pm
Hello mga kapatid share ko lang po itong technique na ginagamit ko for some of my works. Hope maka help din sa inyo ito. Again kung na post na po ito paki erase na lang thanks.
Three-point lighting is a very common lighting technique used in
cinematography and photography. Three-point lighting is a very flexible
technique and it can be used to illuminate the subject in an attractive
way. Three-point lighting consists of three separate lights which can be
used to control the lighting, shading and shadows of the subject:

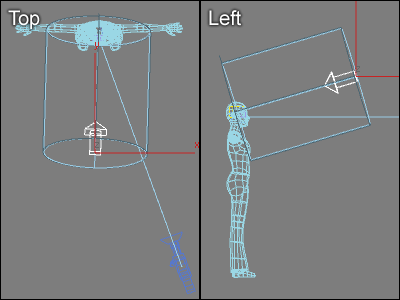
Picture 1. 3-point lighting in 3D Studio MAX

Picture 2. Using the default lighting (as in the picture above) in 3DS MAX is not the best option.
Key light is the main light source, it illuminates the subject the
most and it defines the overall lighting design of the scene. Key light
casts the strongest shadows to the subject.
Fill light is less bright than key light and is used to
illuminate the parts of the subject that cannot be reached by key light.
Fill light is also used to soften the shadows of key light and to
decrease the contrast of the subject's surface.
Back light is used to illuminate the edge of the subject from
behind in order to separate the subject from its background. Back light
can be very bright. Even if it's bright is doesn't compete with key
light because it highlights only the edges of the subject. Back light is
also known as rim light because it gives the subject a rim of light.
The idea of three-point lighting works also in 3D graphics but the
practice has some differences compared to real cinematography. In this
tutorial I discuss the three-point lighting setup in 3D Studio MAX.
Picture 2 is rendered
with 3D Studio MAX's default lighting. In other words, it has been
rendered before any light has been created. The default lighting of 3DS
MAX works well while modelling the subject but is not a good solution in
the rendering of the final image. There are at least two apparent
problems in picture 2. Firstly,
there are no shadows. And secondly, as you can see the left side of the
face is left in darkness and merges with the background. Let's
illuminate the face with three-point lighting setup in 3DS MAX.
KEYLIGHT
Key light represents the main light source. In real life the main
light source usually shines from above, so let's place the key light
above the face.
 Picture 3. In this case the key
light is placed so that it shines from the front and above of the
character. Key light is the main light source of the scene.
 Picture 4. The picture above is rendered with key light only.
Create a Target Directional light, place it according to picture 3 and give the following parameters to it:
(The settings above are used with a real size person. If your
model is of different size you must change Hotspot/Beam and
Falloff/Field accordingly. With this setup the shadows are pretty sharp.
Feel free to soften the shadows by increasing Sample Range.) Render a
test image. The lighting should be similar to picture 4.
FILL LIGHT
Create an Omni light according to picture 5 and give the following parameters to it:
 Picture 5. Fill light is used
to illuminate the part of the face that key light can't reach. The
intensity of fill light is much less than the intensity of key light.
(The intensity of fill light is always much less than the
intensity of key light. It's often a good idea to turn Specular off in
fill light so that it affects the diffuse characteristic of the surface
only.)
Picture 6 shows the face
rendered with fill light only. You can try that by turning off the key
light. It's often a good idea to test lights one at a time. When
multiple lights are turned on it's not always easy to figure out how
individual lights affect the illumination.
In real life fill lights are sometimes replaced by reflectors which reflect the light of key light.
In 3D Studio MAX you can create the same effect by using a lighting
technique called global illumination which creates indirect light by
tracing light as it bounces from surfaces.
 Picture 6. The picture above is rendered with fill light only.
BACK LIGHT / RIM LIGHT
Back light is needed when the contrast between the subject and the
background is not enough. In real life the effect of back light is much
stronger because of hair, clothes and other fuzzy surfaces. In 3D
graphics surfaces are usually perfectly smooth and there are no little
particles to pick up the light. Therefore, there is often a need to
create several back lights in 3D graphics.
Create an Omni light according to picture 7 and give the following parameters to it:

Picture 7. Back light is placed behind the character.
(It's often a good idea to turn Specular off in back light so that it affects the diffuse characteristic of the surface only.)
Picture 8 shows the face rendered with back light only. Back light can be bright because it illuminates the edge of the subject only.
 Picture 8. The picture above is rendered with back light only. Back light is placed so that it illuminates only the edges of the subject.
THREE POINT LIGHTING RENDERED
Picture 9 shows the final
rendering with three-point lighting setup in 3D Studio MAX. Compare this
picture to the picture rendered with the default lighting of 3DS MAX to
understand the differences between them.
Picture 9. The picture above is rendered with three-point lighting setup in 3D Studio MAX.
Three-point lighting is a very common lighting technique used in
cinematography and photography. Three-point lighting is a very flexible
technique and it can be used to illuminate the subject in an attractive
way. Three-point lighting consists of three separate lights which can be
used to control the lighting, shading and shadows of the subject:
Picture 1. 3-point lighting in 3D Studio MAX
Picture 2. Using the default lighting (as in the picture above) in 3DS MAX is not the best option.
- Key light
- Fill light
- Back light / Rim light
Key light is the main light source, it illuminates the subject the
most and it defines the overall lighting design of the scene. Key light
casts the strongest shadows to the subject.
Fill light is less bright than key light and is used to
illuminate the parts of the subject that cannot be reached by key light.
Fill light is also used to soften the shadows of key light and to
decrease the contrast of the subject's surface.
Back light is used to illuminate the edge of the subject from
behind in order to separate the subject from its background. Back light
can be very bright. Even if it's bright is doesn't compete with key
light because it highlights only the edges of the subject. Back light is
also known as rim light because it gives the subject a rim of light.
The idea of three-point lighting works also in 3D graphics but the
practice has some differences compared to real cinematography. In this
tutorial I discuss the three-point lighting setup in 3D Studio MAX.
Picture 2 is rendered
with 3D Studio MAX's default lighting. In other words, it has been
rendered before any light has been created. The default lighting of 3DS
MAX works well while modelling the subject but is not a good solution in
the rendering of the final image. There are at least two apparent
problems in picture 2. Firstly,
there are no shadows. And secondly, as you can see the left side of the
face is left in darkness and merges with the background. Let's
illuminate the face with three-point lighting setup in 3DS MAX.
KEYLIGHT
Key light represents the main light source. In real life the main
light source usually shines from above, so let's place the key light
above the face.
Picture 3. In this case the keylight is placed so that it shines from the front and above of the
character. Key light is the main light source of the scene.
Picture 4. The picture above is rendered with key light only.Create a Target Directional light, place it according to picture 3 and give the following parameters to it:
- General Parameters:
Shadows: On - Intensity/Color/Attenuation:
Multiplier: 0.8 - Directional Parameters:
Hotspot/Beam: 0,5
Falloff/Field: 0,51 - Shadow Map Params:
Bias: 0.0
Size: 2048
Sample Range: 4.0
(The settings above are used with a real size person. If your
model is of different size you must change Hotspot/Beam and
Falloff/Field accordingly. With this setup the shadows are pretty sharp.
Feel free to soften the shadows by increasing Sample Range.) Render a
test image. The lighting should be similar to picture 4.
FILL LIGHT
Create an Omni light according to picture 5 and give the following parameters to it:
Picture 5. Fill light is used to illuminate the part of the face that key light can't reach. The
intensity of fill light is much less than the intensity of key light.
- Intensity/Color/Attenuation:
Multiplier: 0.25 - Advanced Effects:
Specular: Off
(The intensity of fill light is always much less than the
intensity of key light. It's often a good idea to turn Specular off in
fill light so that it affects the diffuse characteristic of the surface
only.)
Picture 6 shows the face
rendered with fill light only. You can try that by turning off the key
light. It's often a good idea to test lights one at a time. When
multiple lights are turned on it's not always easy to figure out how
individual lights affect the illumination.
In real life fill lights are sometimes replaced by reflectors which reflect the light of key light.
In 3D Studio MAX you can create the same effect by using a lighting
technique called global illumination which creates indirect light by
tracing light as it bounces from surfaces.
Picture 6. The picture above is rendered with fill light only.BACK LIGHT / RIM LIGHT
Back light is needed when the contrast between the subject and the
background is not enough. In real life the effect of back light is much
stronger because of hair, clothes and other fuzzy surfaces. In 3D
graphics surfaces are usually perfectly smooth and there are no little
particles to pick up the light. Therefore, there is often a need to
create several back lights in 3D graphics.
Create an Omni light according to picture 7 and give the following parameters to it:
Picture 7. Back light is placed behind the character.
- Intensity/Color/Attenuation:
Multiplier: 1.0 - Advanced Effects:
Specular: Off
(It's often a good idea to turn Specular off in back light so that it affects the diffuse characteristic of the surface only.)
Picture 8 shows the face rendered with back light only. Back light can be bright because it illuminates the edge of the subject only.
Picture 8. The picture above is rendered with back light only. Back light is placed so that it illuminates only the edges of the subject.THREE POINT LIGHTING RENDERED
Picture 9 shows the final
rendering with three-point lighting setup in 3D Studio MAX. Compare this
picture to the picture rendered with the default lighting of 3DS MAX to
understand the differences between them.
Picture 9. The picture above is rendered with three-point lighting setup in 3D Studio MAX.Last edited by edosayla on Thu Feb 03, 2011 12:04 am; edited 1 time in total

edosayla- The Teacher

- Number of posts : 1367
Age : 47
Location : Cadiz, Talisay, Dubai
Registration date : 06/10/2008 -

Re: 3 Point Ligting in 3dsmax
![]() by bunny_blue06 Wed Feb 02, 2011 11:39 pm
by bunny_blue06 Wed Feb 02, 2011 11:39 pm
 salamat dito sir! malaking tulong talaga to'. more power sa CGP!
bunny_blue06- CGP Apprentice

- Number of posts : 530
Age : 39
Location : Doha, Qatar
Registration date : 25/12/2010


mez- CGP Expert

- Number of posts : 2692
Location : dxb
Registration date : 24/07/2010

aesonck- CGP Expert
- Number of posts : 2448
Age : 44
Location : Philippines. La Trinidad-Visayas
Registration date : 13/07/2010
Re: 3 Point Ligting in 3dsmax
![]() by ARNEL_PRO Tue Feb 08, 2011 7:14 pm
by ARNEL_PRO Tue Feb 08, 2011 7:14 pm
This is great sir thank you, do this technique applies to interior lighting sir?

ARNEL_PRO- CGP Apprentice
- Number of posts : 315
Age : 42
Location : makati
Registration date : 10/08/2009
Re: 3 Point Ligting in 3dsmax
![]() by edosayla Tue Feb 08, 2011 8:25 pm
by edosayla Tue Feb 08, 2011 8:25 pm
ARNEL_PRO wrote:This is great sir thank you, do this technique applies to interior lighting sir?
this technique is meant for baking textures .. before thay can be imported to a Game Engine.
edosayla- The Teacher
- Number of posts : 1367
Age : 47
Location : Cadiz, Talisay, Dubai
Registration date : 06/10/2008 -
» Moving the "Project Base point/Survey Point"
» 3dsmax Tutorial : Exterior Backdoor Kitchen - 3dsmax Design 2013 render in Iray 2.1
» 3dsmax Newbie! Having troubles applying/making materials on 3dsmax.
» 3dsmax Tutorial : Vray RT in 3dsmax Design 2013
» 3dsmax 2012 file for 3dsmax 2009?
» 3dsmax Tutorial : Exterior Backdoor Kitchen - 3dsmax Design 2013 render in Iray 2.1
» 3dsmax Newbie! Having troubles applying/making materials on 3dsmax.
» 3dsmax Tutorial : Vray RT in 3dsmax Design 2013
» 3dsmax 2012 file for 3dsmax 2009?
Page 1 of 1
Permissions in this forum:
You cannot reply to topics in this forum