Creting a Sketch Effect in Photoshop ( Updated)
+8
smileybatara
Butz_Arki
qcksilver
Leslie Adona
nomeradona
torvicz
Muggz
render master
12 posters
:: Tutorials :: Photoshop Tutorials
Page 1 of 1
 Creting a Sketch Effect in Photoshop ( Updated)
.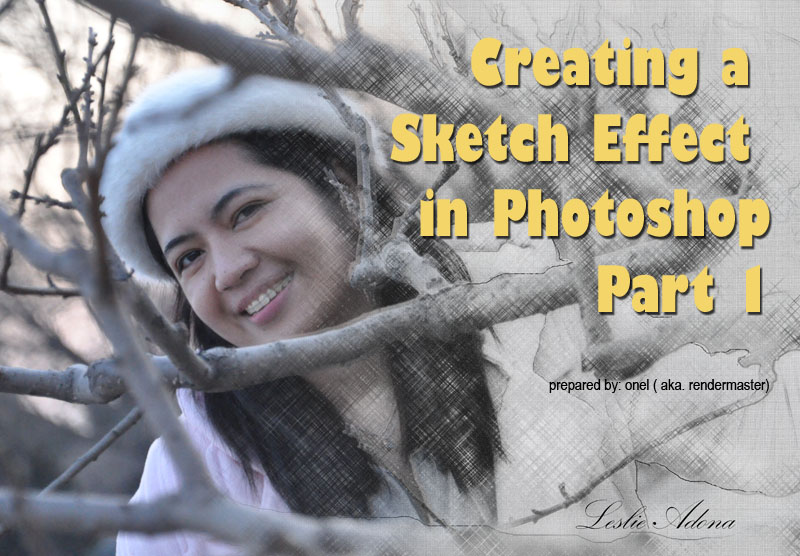
I would like to share my workflows on how to make a Sketch Effect in Photoshop. Thanks to Leslie Adona for allowing me to use her photos.
1. Open the photo you want to edit. Enhanced it ( color corrected, contrast, brightened if necessary)

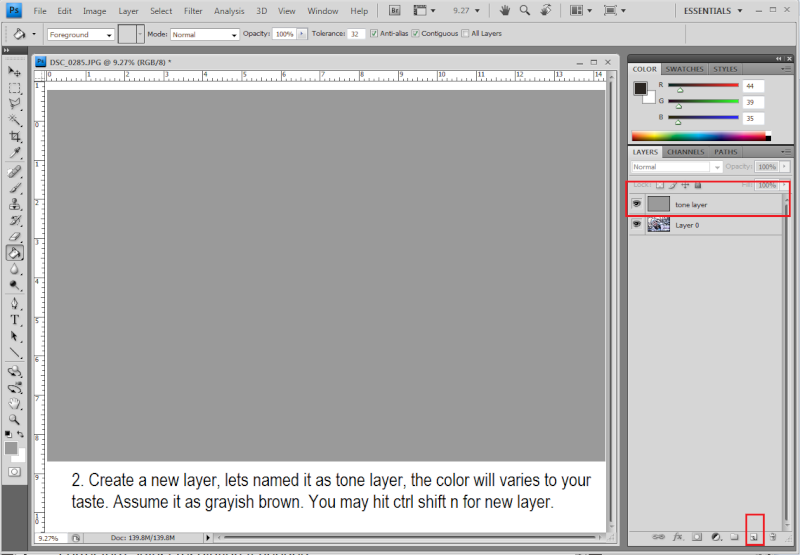
2. Create New layer ( ctrl shift N ) renamed it say tone layer. this will be the base color of the image.
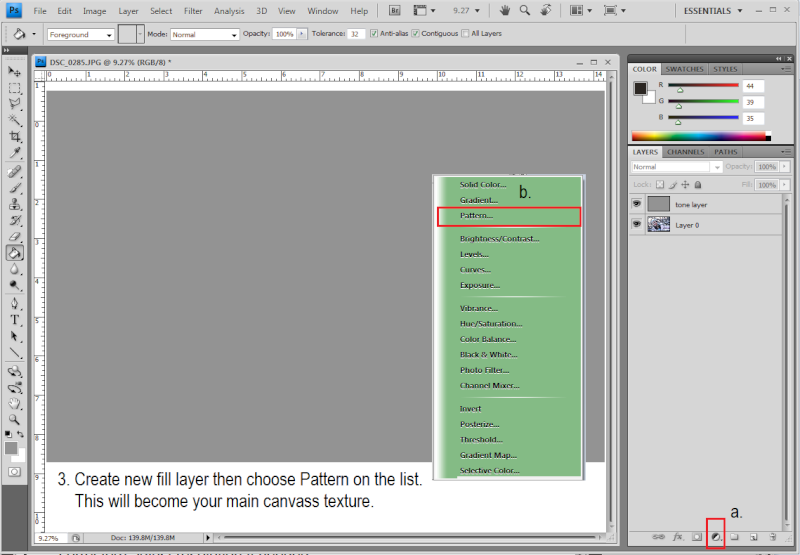
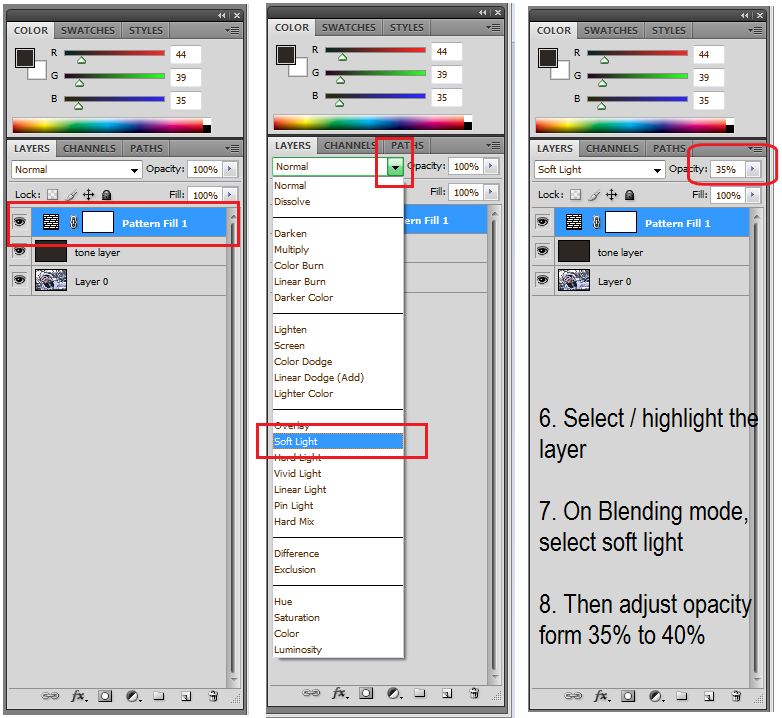
3. Create a new fill layer. Just hit the icon at the bottom of the stacked ( create new fill icon), then select Pattern
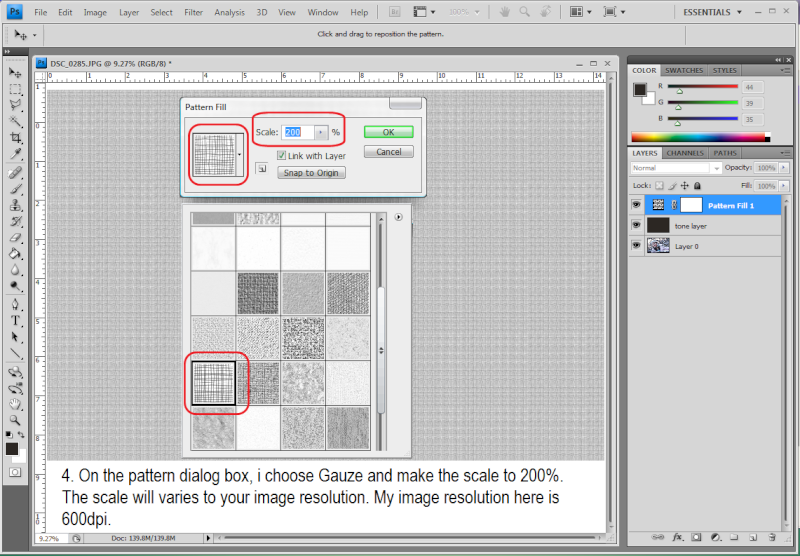
4. From the list select the pattern you preffered. Here i choose Gauge at 200 percent scale.
5. If the pattern you prefered is not on the list, just hit the right arrow icon to see the libraries.

6. Highlight now the newly created layer, rename it as Pattern Fill. Go to Blending Mode, select soft light then adjust opacity to 35% - 40%.
7. Duplicate now your main picture. To duplicate, just highlight the layer, right click the choose duplicate or drag that layer to new layer icon at the bottom, rename it as outline layer
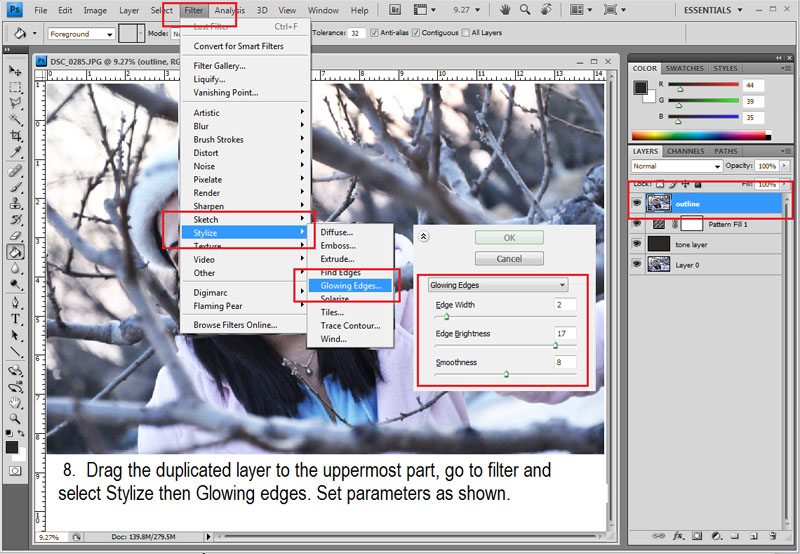
8. Drag now the duplicated layer on the top most part of the layer stacked. Go to Filter Menu -->> Stylize -->> Glowing Edges. Adjust parameters Edge= 2, Edge Brightnes = 17, Smoothness = 8.
9. Desaturate it ( ctrl shift u) then invert ( ctrl i)

see continuation...

I would like to share my workflows on how to make a Sketch Effect in Photoshop. Thanks to Leslie Adona for allowing me to use her photos.
1. Open the photo you want to edit. Enhanced it ( color corrected, contrast, brightened if necessary)

2. Create New layer ( ctrl shift N ) renamed it say tone layer. this will be the base color of the image.

3. Create a new fill layer. Just hit the icon at the bottom of the stacked ( create new fill icon), then select Pattern

4. From the list select the pattern you preffered. Here i choose Gauge at 200 percent scale.

5. If the pattern you prefered is not on the list, just hit the right arrow icon to see the libraries.

6. Highlight now the newly created layer, rename it as Pattern Fill. Go to Blending Mode, select soft light then adjust opacity to 35% - 40%.

7. Duplicate now your main picture. To duplicate, just highlight the layer, right click the choose duplicate or drag that layer to new layer icon at the bottom, rename it as outline layer
8. Drag now the duplicated layer on the top most part of the layer stacked. Go to Filter Menu -->> Stylize -->> Glowing Edges. Adjust parameters Edge= 2, Edge Brightnes = 17, Smoothness = 8.

9. Desaturate it ( ctrl shift u) then invert ( ctrl i)

see continuation...
Last edited by render master on Sat Mar 20, 2010 11:04 pm; edited 3 times in total

render master- Game Master

- Number of posts : 3274
Age : 104
Location : riyadh, saudi arabia
Registration date : 27/09/2008
 Re: Creting a Sketch Effect in Photoshop ( Updated)
continuation....
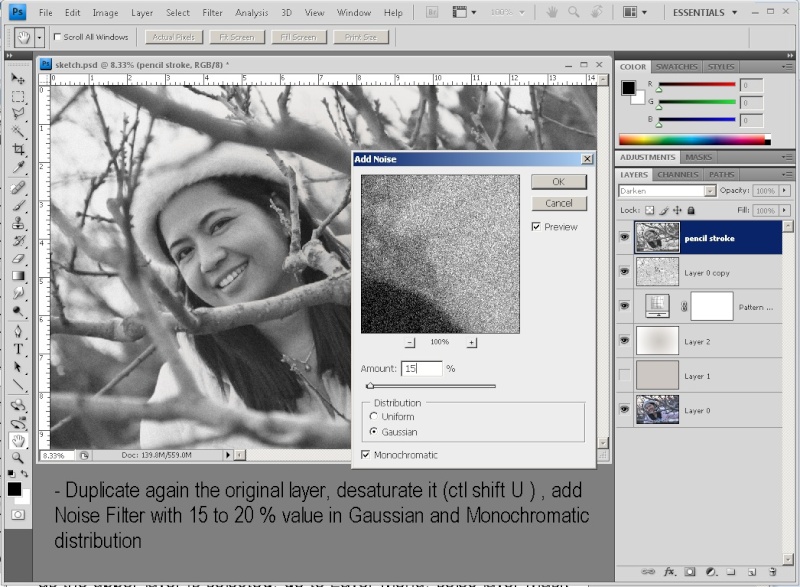
10. Duplicate again the original layer, rename to pencil sketch, make it the uppermost part layer, desaturate it ( ctrl shift U ), add noise filter with 15-20% value and with monochromatic gaussian distribution.
11. While the layer is still selected, go to to Layer Menu, select Layer Mask then Hide All.
The drawings are now ready for some scribling.

12. Select now the Pastel on Charcoal Paper Brush on Dry Media Brush Collection. Resize brush to = 9, then start scribling with a slanted brush stroke, left and right as if you are sketching on a paper.

13. Adjust brush distribution. Press brush icon on top, Press also F5. Select Other Dynamic then adjust Opacity and Flow Jitter to Pen pressure.

Customizing Your Brush
You will find here, sketching is a bit tiring, because you have to create the line stroke one at a time, so lets us tweak and customize our own brush.
-Make a new layer, create some 4 line stroke, slanted, 2 line opposite each other which resembles your pen stroke.
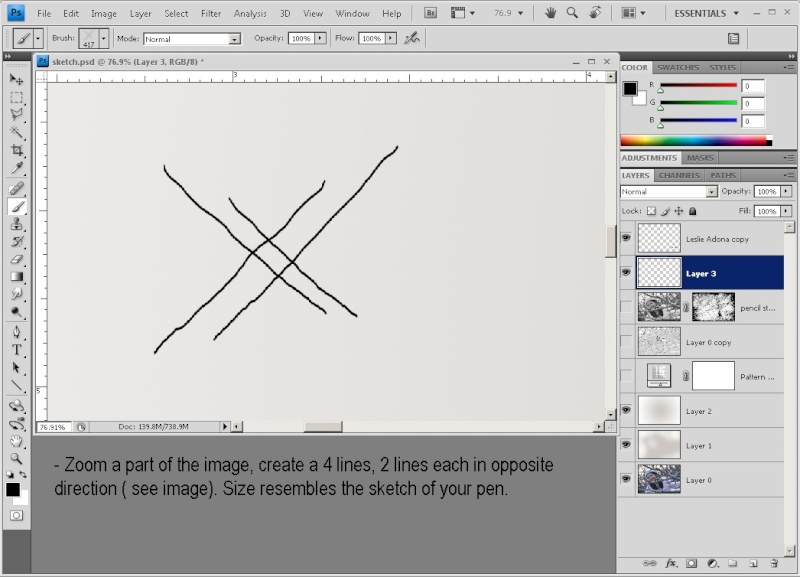
-Marque to select the lines you created, press move tool, nudge them or press your left and right arrow to isolate your selection. Go to edit menu, then define brush presets. Rename your brush, Delete now the layer and use your newly created brush. Adapt Procedure no. 13 and start dragging on your image. you will see that its now more convenient. Just drag your mouse to the area you want. Combine small and bigger size brush by making pressing the left or right bracket on key board. ( [ or ] ) Enjoy.

You may also find Creating Simple brush here http://www.cgpinoy.org/photoshop-tutorials-f49/creating-your-own-brush-t4343.htm
14. And now the finish product.
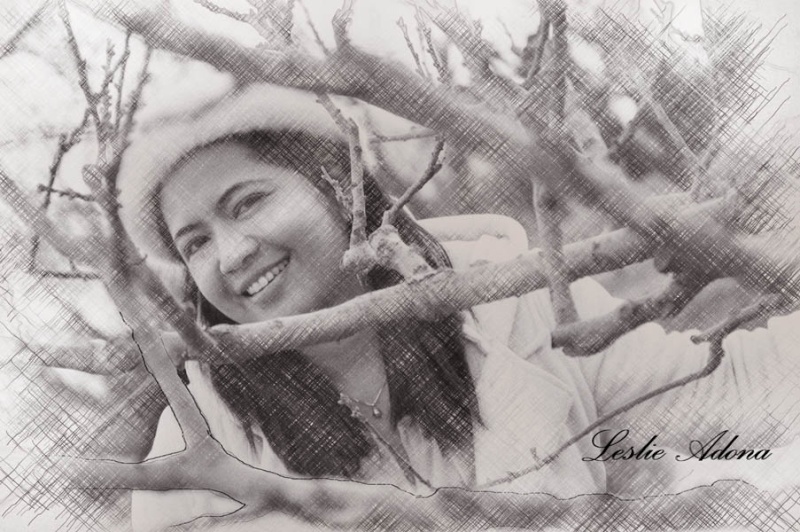
Hope it helps. Many thanks to Leslie Adona for allowing me to use her pictures.
10. Duplicate again the original layer, rename to pencil sketch, make it the uppermost part layer, desaturate it ( ctrl shift U ), add noise filter with 15-20% value and with monochromatic gaussian distribution.

11. While the layer is still selected, go to to Layer Menu, select Layer Mask then Hide All.
The drawings are now ready for some scribling.

12. Select now the Pastel on Charcoal Paper Brush on Dry Media Brush Collection. Resize brush to = 9, then start scribling with a slanted brush stroke, left and right as if you are sketching on a paper.

13. Adjust brush distribution. Press brush icon on top, Press also F5. Select Other Dynamic then adjust Opacity and Flow Jitter to Pen pressure.

Customizing Your Brush
You will find here, sketching is a bit tiring, because you have to create the line stroke one at a time, so lets us tweak and customize our own brush.
-Make a new layer, create some 4 line stroke, slanted, 2 line opposite each other which resembles your pen stroke.

-Marque to select the lines you created, press move tool, nudge them or press your left and right arrow to isolate your selection. Go to edit menu, then define brush presets. Rename your brush, Delete now the layer and use your newly created brush. Adapt Procedure no. 13 and start dragging on your image. you will see that its now more convenient. Just drag your mouse to the area you want. Combine small and bigger size brush by making pressing the left or right bracket on key board. ( [ or ] ) Enjoy.

You may also find Creating Simple brush here http://www.cgpinoy.org/photoshop-tutorials-f49/creating-your-own-brush-t4343.htm
14. And now the finish product.

Hope it helps. Many thanks to Leslie Adona for allowing me to use her pictures.
Last edited by render master on Sun Mar 21, 2010 5:35 am; edited 7 times in total

render master- Game Master

- Number of posts : 3274
Age : 104
Location : riyadh, saudi arabia
Registration date : 27/09/2008
 Re: Creting a Sketch Effect in Photoshop ( Updated)
una nako!!!! ang galing neto master,,,, 


Muggz- CGP Guru

- Number of posts : 1569
Age : 41
Location : Zaragosa City/Sazi's Bar
Registration date : 03/02/2009
 Re: Creting a Sketch Effect in Photoshop ( Updated)
bitin dude ronel.....
gusto kong matutunan to....continue mo na...hehe
salamat!
gusto kong matutunan to....continue mo na...hehe
salamat!
Last edited by torvicz on Sun Feb 21, 2010 5:41 am; edited 1 time in total

torvicz- Sgt. Pepper

- Number of posts : 3235
Location : dubai, uae
Registration date : 01/10/2008
 Re: Creting a Sketch Effect in Photoshop ( Updated)
maraming salamat onel sa walang sawang pagwrite ng mga tutorials.
 Re: Creting a Sketch Effect in Photoshop ( Updated)
hhehehe kase magaling ang model, este camera ng modelMuggz wrote:una nako!!!! ang galing neto master,,,,

render master- Game Master

- Number of posts : 3274
Age : 104
Location : riyadh, saudi arabia
Registration date : 27/09/2008
 Re: Creting a Sketch Effect in Photoshop ( Updated)
Hahahhaaha o tingnan mo nga naman oh cute ng model mo....hahahaha... 

Leslie Adona- Prinsesa

- Number of posts : 734
Age : 46
Location : Beijing, China
Registration date : 13/10/2008
 Re: Creting a Sketch Effect in Photoshop ( Updated)
ehe render master ang cute nga ng model cyempre ate ko yan ehe

qcksilver- CGP Guru

- Number of posts : 1940
Age : 42
Location : bahrain/pampanga
Registration date : 08/02/2010
 Re: Creting a Sketch Effect in Photoshop ( Updated)
Tutorial now updated... thanks for viewing guys.

render master- Game Master

- Number of posts : 3274
Age : 104
Location : riyadh, saudi arabia
Registration date : 27/09/2008
 Re: Creting a Sketch Effect in Photoshop ( Updated)
Thanks Onel... 


Leslie Adona- Prinsesa

- Number of posts : 734
Age : 46
Location : Beijing, China
Registration date : 13/10/2008
 Re: Creting a Sketch Effect in Photoshop ( Updated)
Leslie Adona wrote:Thanks Onel...
welcome po mam

render master- Game Master

- Number of posts : 3274
Age : 104
Location : riyadh, saudi arabia
Registration date : 27/09/2008
 Re: Creting a Sketch Effect in Photoshop ( Updated)
tnx... for sharing sir ...share more...and sir alam mo po ba ung parang painting ang daring ung charcoal ata ang tawag dun sa mga painting shop...

smileybatara- CGP Newbie

- Number of posts : 107
Age : 32
Location : philippines
Registration date : 22/08/2009
 Re: Creting a Sketch Effect in Photoshop ( Updated)
Thanks for sharing your tutorial with us.
Very useful content.
Very useful content.
KC- CGP Newbie

- Number of posts : 16
Age : 34
Location : forums
Registration date : 08/01/2010
 Re: Creting a Sketch Effect in Photoshop ( Updated)
salamat! madagdagan na naman ang kaalaman ko!

rialave- Number of posts : 2
Age : 36
Location : cavite
Registration date : 03/05/2010
 Re: Creting a Sketch Effect in Photoshop ( Updated)
Thanks for sharing Sir Ronel!

janton- CGP Newbie

- Number of posts : 126
Age : 56
Location : Riyadh KSA
Registration date : 27/05/2010
:: Tutorials :: Photoshop Tutorials
Page 1 of 1
Permissions in this forum:
You cannot reply to topics in this forum


