


Creating Neon Lights in Scanline
4 posters
Page 1 of 1

Creating Neon Lights in Scanline
![]() by render master Sun Nov 09, 2008 10:02 pm
by render master Sun Nov 09, 2008 10:02 pm
Creating Neon Lights with Scanline

On this tutorial, i will show you my workflow in creating /rendering neon lights with 3dMax Default scanline rendering
in just simple steps.
1. Scene preparation:
unit - meters
renderer - scanline
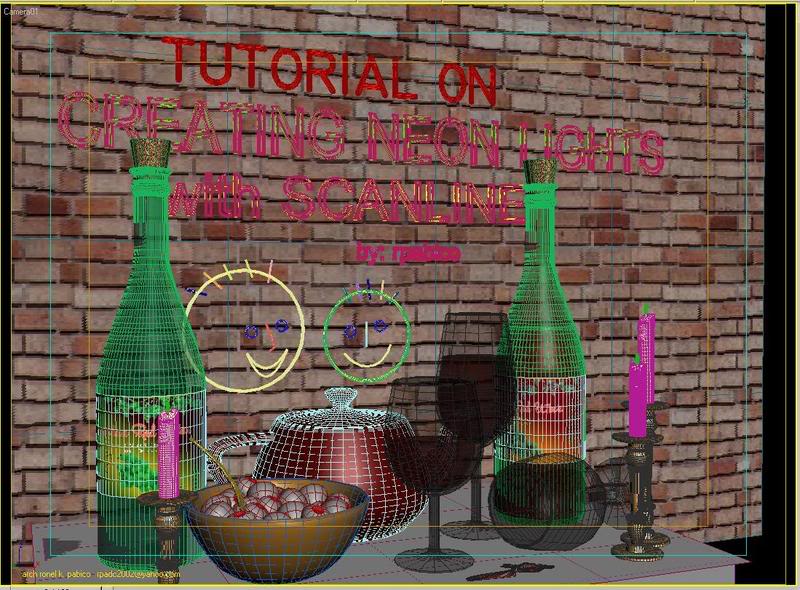
2. Creating a scene. First create a simple wall by dragging a plane in your front viewport. Here i created a plane with dimension 8.0m x 10.0m, and with a segment of 4 x 4.
Then i provided it with a brick maps, which is located on 3dmax default material.
Then for the neon objects, '' CREATING NEON LIGHTS with SCANLINE'' , just go to creating and modifying panel, select shapes then text. Go to your front viewport and create a text there. Then activate rendering sub menu panel, and tick the box Enable on Rendering, Enable in Viewport and Generate Mapping Coordinates. Then tick the radio button Radial and provide thickness amount and number of sides like the see figure below.

For some graphic figures (face figures) i just use line and circle with the same parameters with the text. Then go to top or left viewport and move the wall away of about 1 cm to the text and graphic figures.
Add some 3d accessories for the scene, see figure below
3. Light Preparation
Actually the scene has no lights at all. It is lighted only with the neon i created.
Here is the preparation of the materials. Press M, fo materials. Renamed it say neon green. Click on diffuse color and change it to green color ( depends on the neon color you want to make), same with the ambient color. Tick the box for self illumination. Then drag the color you make on diffuse to the color of self illumination slot.
On the browser that will appear, select Advance Material Overide. Select Keep old material as sub-material, then press ok. On the Advance Lighting Overide Material adjust the reflectance sacle to 100%, color bleed to
50%, Luminance Scale 100%. Now this the primary setup of the lights, you can adjust it as soon as it will satisfy your requirements. See figure below.

4. RenderinG Preparation
Press 8 for the environment, just leave it as it is for the meantime. Then go to Exposure control and select Automatic Exposure and check Active
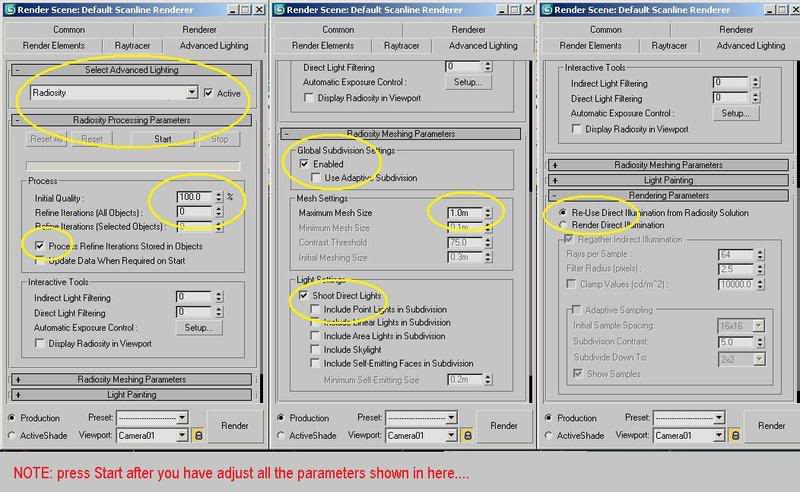
Press F10 for render Scene Dialog Box. (We will use scanline for now). Go to advance Lighting, activate radiosity. n radiosity parameters, make the initial qualty to 75% ( adjust it to 100% later for your final scene).
Tick te box for Process refine Iterations.....
On radiosity meshing Parameters, enabled Global Subdivision Settings. Here I provide 1.0m, Then tick the box Shoot Direct Lights
On Rendering Parameters of Radiosity, tick resuse Direct Illumination from radiostiy solution. Then fired up
Start to compute radiosity, wait until finish ( see my setup below)
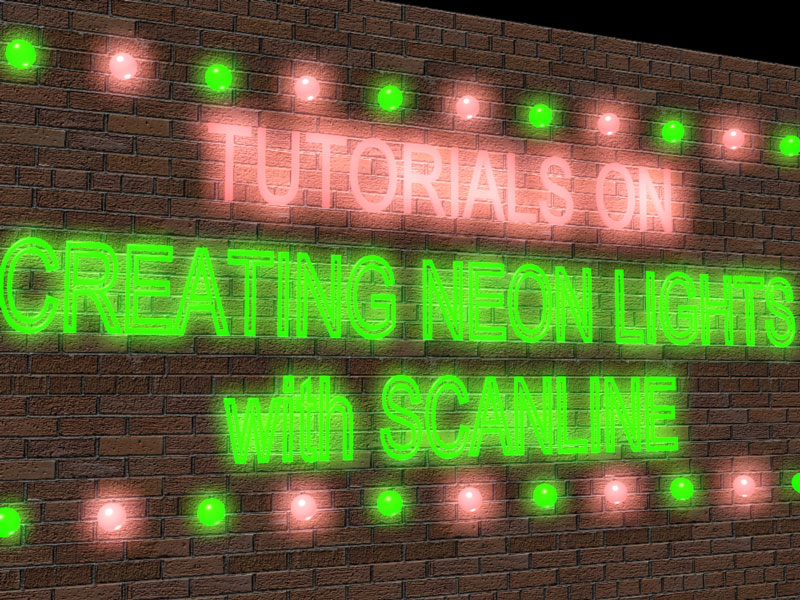
Here is my final image
Comments and critics are always welcome!
all rights reserved:
CRETING NEON LIGHTS with SCANLINE
arch ronel k. pabico
rpadc2002@yahoo.com
On this tutorial, i will show you my workflow in creating /rendering neon lights with 3dMax Default scanline rendering
in just simple steps.
1. Scene preparation:
unit - meters
renderer - scanline
2. Creating a scene. First create a simple wall by dragging a plane in your front viewport. Here i created a plane with dimension 8.0m x 10.0m, and with a segment of 4 x 4.
Then i provided it with a brick maps, which is located on 3dmax default material.
Then for the neon objects, '' CREATING NEON LIGHTS with SCANLINE'' , just go to creating and modifying panel, select shapes then text. Go to your front viewport and create a text there. Then activate rendering sub menu panel, and tick the box Enable on Rendering, Enable in Viewport and Generate Mapping Coordinates. Then tick the radio button Radial and provide thickness amount and number of sides like the see figure below.
For some graphic figures (face figures) i just use line and circle with the same parameters with the text. Then go to top or left viewport and move the wall away of about 1 cm to the text and graphic figures.
Add some 3d accessories for the scene, see figure below
3. Light Preparation
Actually the scene has no lights at all. It is lighted only with the neon i created.
Here is the preparation of the materials. Press M, fo materials. Renamed it say neon green. Click on diffuse color and change it to green color ( depends on the neon color you want to make), same with the ambient color. Tick the box for self illumination. Then drag the color you make on diffuse to the color of self illumination slot.
On the browser that will appear, select Advance Material Overide. Select Keep old material as sub-material, then press ok. On the Advance Lighting Overide Material adjust the reflectance sacle to 100%, color bleed to
50%, Luminance Scale 100%. Now this the primary setup of the lights, you can adjust it as soon as it will satisfy your requirements. See figure below.
4. RenderinG Preparation
Press 8 for the environment, just leave it as it is for the meantime. Then go to Exposure control and select Automatic Exposure and check Active
Press F10 for render Scene Dialog Box. (We will use scanline for now). Go to advance Lighting, activate radiosity. n radiosity parameters, make the initial qualty to 75% ( adjust it to 100% later for your final scene).
Tick te box for Process refine Iterations.....
On radiosity meshing Parameters, enabled Global Subdivision Settings. Here I provide 1.0m, Then tick the box Shoot Direct Lights
On Rendering Parameters of Radiosity, tick resuse Direct Illumination from radiostiy solution. Then fired up
Start to compute radiosity, wait until finish ( see my setup below)
Here is my final image
Comments and critics are always welcome!
all rights reserved:
CRETING NEON LIGHTS with SCANLINE
arch ronel k. pabico
rpadc2002@yahoo.com
Last edited by render master on Mon Apr 26, 2010 2:27 am; edited 1 time in total

render master- Game Master

- Number of posts : 3274
Age : 104
Location : riyadh, saudi arabia
Registration date : 27/09/2008
Re: Creating Neon Lights in Scanline
![]() by render master Sun Nov 09, 2008 10:04 pm
by render master Sun Nov 09, 2008 10:04 pm
just bringing it back where it belongs..... 
render master- Game Master
- Number of posts : 3274
Age : 104
Location : riyadh, saudi arabia
Registration date : 27/09/2008
Jay2x- CGP Apprentice

- Number of posts : 743
Age : 37
Location : Pampanga
Registration date : 09/11/2008
Re: Creating Neon Lights in Scanline
![]() by Guest Sun Nov 23, 2008 8:05 am
by Guest Sun Nov 23, 2008 8:05 am
Jay2x wrote:sir my ganito b sa vray?
You can map a vraylight material to your neon objects.
BTW, vraylights are also mappable - so you can use that as video screen or to pump mapped-illumination thru windows, doors, slits, openings, or even nostrils...
Guest- Guest
Re: Creating Neon Lights in Scanline
![]() by Grafico Sun Nov 23, 2008 9:19 am
by Grafico Sun Nov 23, 2008 9:19 am
video Post is also the best solution to acheive that neon effect glow using scanline... and perhaps the most flexible, FAST and effective way of not having to wait for radiosity computation nor GI calculations.
I'm not hijacking this thread but here's a brief tuts:
1. Make a Red neon on standard material by having Diffuse color as Red and check Self-illumination with the same diffuse color ,then apply that to the text "TUTORIALS ON".
2. Right-click the text and choose Object properties then assign a G-Buffer Object ID say 2.
3. Make another neon material but change it to Green following the statement 1 and assign that to the text "CREATING NEON....."
4. Right click that text and assign an Object ID of say 3.
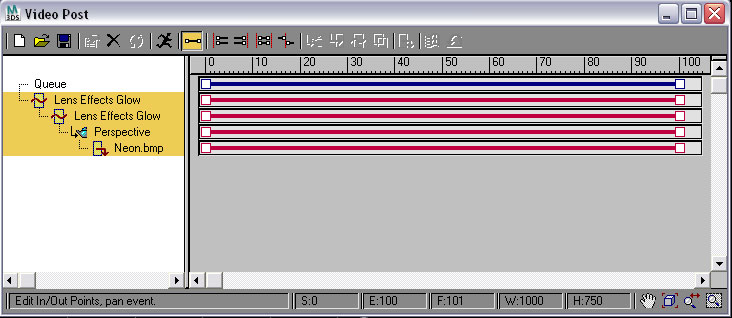
5. Fire up Video Post under Rendering Menu.
6. On the Video Post dialog box, add Scene event as perspective (if theres no camera).
7. Still on the dialog box click perspective under Queue and add image filter event. Select Lens effect glow
on the dropdown list and click Setup. On the Lens Effect dialog box change Object ID to 2 for the Red material
and on Preference Tab change the Size value as well as Intensity and click Preview to view the result. Click OK.
8. select again the perspective under Queue and again add image filter event. Select Lens affect and click setup.
On the lens effect dialog box change object ID to 3 to correspond to our Green neon material and change the size and intensity values. You could click preview to see the result.
9. Click Queue on the Video Post dialog box then click Execute sequence.
10. You could still edit the event filters by double clicking it.
11. To save the file, Select Perspective below the Queue on the VP dialog box and add Image output event.
12. Now click Queue again, click execute sequence and render away......
___________________________________
http://www.filipinographics.blogspot.com/
I'm not hijacking this thread but here's a brief tuts:
1. Make a Red neon on standard material by having Diffuse color as Red and check Self-illumination with the same diffuse color ,then apply that to the text "TUTORIALS ON".
2. Right-click the text and choose Object properties then assign a G-Buffer Object ID say 2.
3. Make another neon material but change it to Green following the statement 1 and assign that to the text "CREATING NEON....."
4. Right click that text and assign an Object ID of say 3.
5. Fire up Video Post under Rendering Menu.
6. On the Video Post dialog box, add Scene event as perspective (if theres no camera).
7. Still on the dialog box click perspective under Queue and add image filter event. Select Lens effect glow
on the dropdown list and click Setup. On the Lens Effect dialog box change Object ID to 2 for the Red material
and on Preference Tab change the Size value as well as Intensity and click Preview to view the result. Click OK.
8. select again the perspective under Queue and again add image filter event. Select Lens affect and click setup.
On the lens effect dialog box change object ID to 3 to correspond to our Green neon material and change the size and intensity values. You could click preview to see the result.
9. Click Queue on the Video Post dialog box then click Execute sequence.
10. You could still edit the event filters by double clicking it.
11. To save the file, Select Perspective below the Queue on the VP dialog box and add Image output event.
12. Now click Queue again, click execute sequence and render away......
___________________________________
http://www.filipinographics.blogspot.com/
Grafico- CGP Newbie

- Number of posts : 17
Location : Deep underground
Registration date : 01/11/2008 -

Re: Creating Neon Lights in Scanline
![]() by Guest Mon Nov 24, 2008 6:24 pm
by Guest Mon Nov 24, 2008 6:24 pm
oh what a blast from the past...
Guest- Guest
Re: Creating Neon Lights in Scanline
![]() by v_wrangler Wed May 13, 2009 7:52 pm
by v_wrangler Wed May 13, 2009 7:52 pm
Guest wrote:Jay2x wrote:sir my ganito b sa vray?
You can map a vraylight material to your neon objects.
BTW, vraylights are also mappable - so you can use that as video screen or to pump mapped-illumination thru windows, doors, slits, openings, or even nostrils...
BTW, you can now convert objects to light emitters in the new version of vray.

v_wrangler- CGP Loverboy

- Number of posts : 1994
Age : 54
Location : Northern Mountains
Registration date : 29/03/2009 -
» Patulong sana paano magkabit ng fans at neon lights sa case
» Creating Lights in Photoshop
» scanline...ps...internet...scanline ulit...
» sci-fi neon website
» another scanline
» Creating Lights in Photoshop
» scanline...ps...internet...scanline ulit...
» sci-fi neon website
» another scanline
Page 1 of 1
Permissions in this forum:
You cannot reply to topics in this forum|
|
|