


LIGHTING: Using Ambient Occlussion
5 posters
Page 1 of 1


v_wrangler- CGP Loverboy

- Number of posts : 1994
Age : 54
Location : Northern Mountains
Registration date : 29/03/2009 -

VRAY Ambient Occlussion by CGArtist Frank Yosores
![]() by v_wrangler Thu Apr 09, 2009 6:32 am
by v_wrangler Thu Apr 09, 2009 6:32 am
I'm posting this document from 2005 written by my friend Frayo (He did Ryukendo with us of course!):
Original docs can be found in my blog as well -
http://vertexwrangler.multiply.com/journal/item/10/VRAY_Ambient_Occlussion_by_CGArtist_Frank_Yosores_as_posted_at_3DP
Please note that this was written years ago, so references to software versions pertains to old releases. Some features not available before might also be common or part of the current releases.
VRAY Ambient Occlussion
by Frank Yosores
AO (Ambient Occlusion) works by simply calculating the angle between face normals of nearby surfaces. The greater the angle between these faces relative to each other, the lesser the occlusion. thus the lesser 'dirt' there will be on the area where those faces meet...and this is conversely true. we use the term 'dirt' because the map is called Vray dirtmap. This is not be confused with dirt generator plugins like quickdirt. this results into an image simulating the dispersion of light in a diffused lighting condition.

This process of generating AO does not need lighting and shadow information so rendering time is significantly reduced.
We will then apply the same method of compositing passes as we did the last quasi-tutorial. but this time using ambient occlusion pass in place of the E-light (fake GI) pass. in the previous method using E-Light, light and shadow information will still need to be calculated, while in the ambient pass we are going to make we wont need light and shadow information.
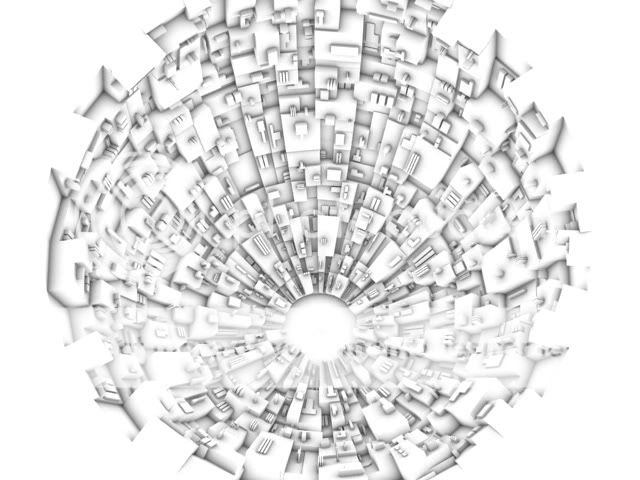
Tthe set up is very easy. In the latest version of Vray v1.47.02, there is a new map called Vray dirtmap in the material/map browser. you simply place this map in the diffuse map slot of a white standard material. set self-illumination to 100. adjust the Vray dirtmap parameters. and render.
This image shows a greebled poly in shaded wire. we will render this geometry.
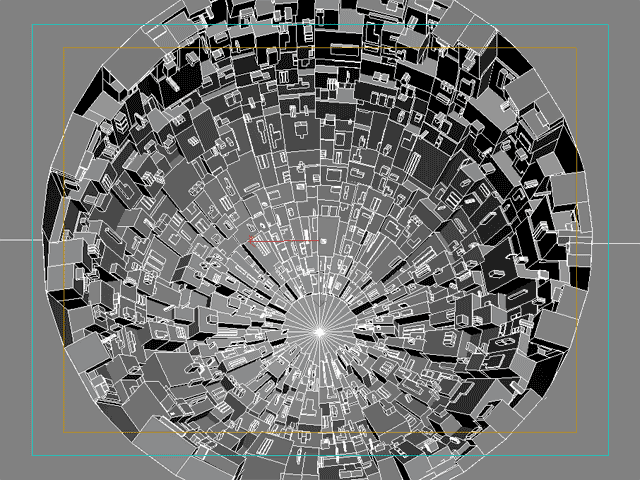
note:all renders do not include specularity and bump. This is simplified just to get the idea accross
Tthis is the rendered image using the standard white material with Vray dirtmap in the diffuse map slot, self-illumination set to 100. notice how the corners are shaded. in the default setup a material with self-illumination set to 100 will not pick up any shading.
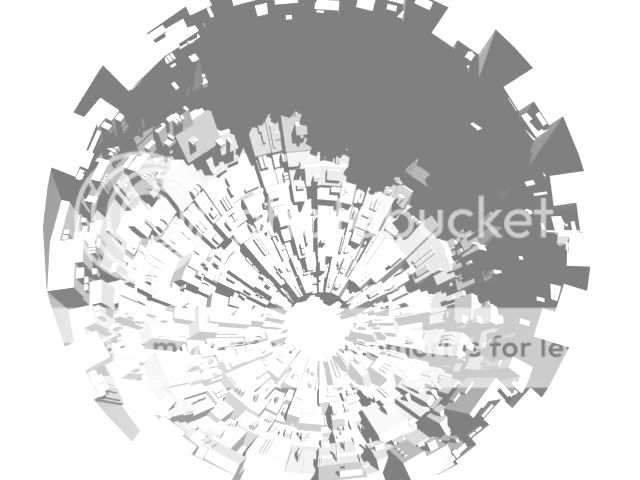
This is a render with a direct light using a white standard material for all the surfaces with a self illumination of 50.
Using the same principle as before...the dirtmap render (fake GI) and the direct lighting render are blended over the the diffuse color render using multiply mode. diffuse color renders were done using Simbiont, a 3d procedural shader. since Simbiont doesn't have a parameter for self-illumination a target direct light was used with lighting set to emit Ambient light only and multiplier at 1.5. Adding a light is unecessary if you use a standard material. Using Simbiont is not necessary either, i just used it in this case due to the nature of my geometry.
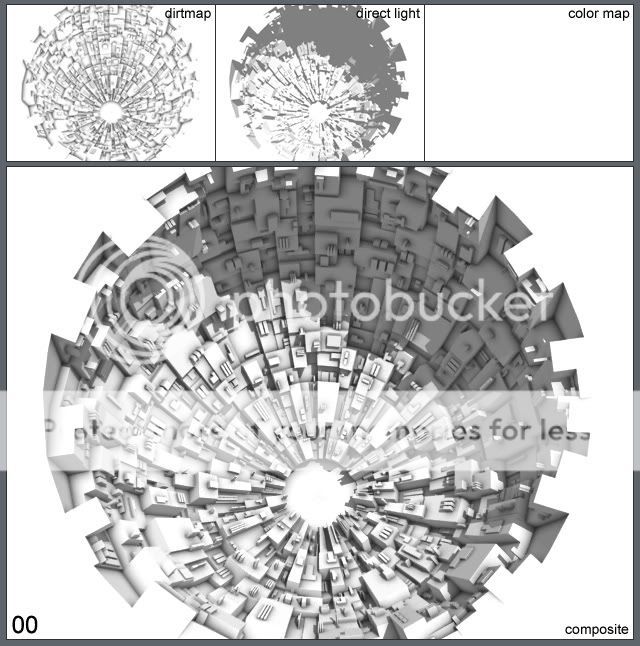
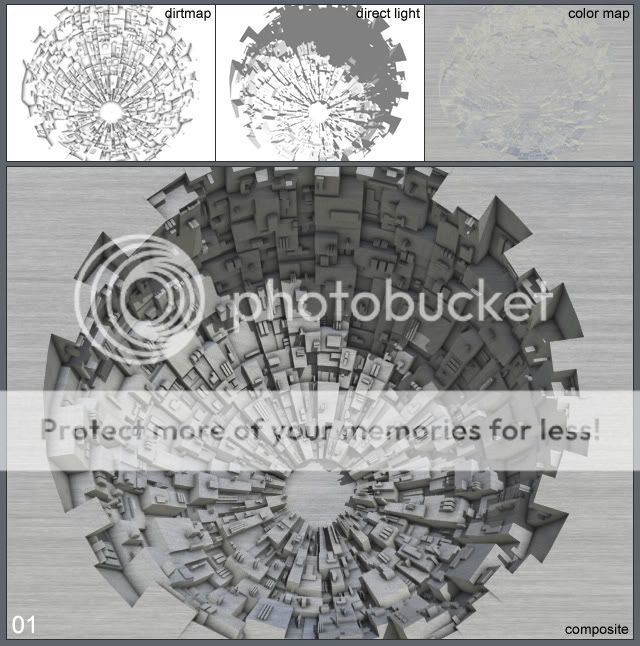
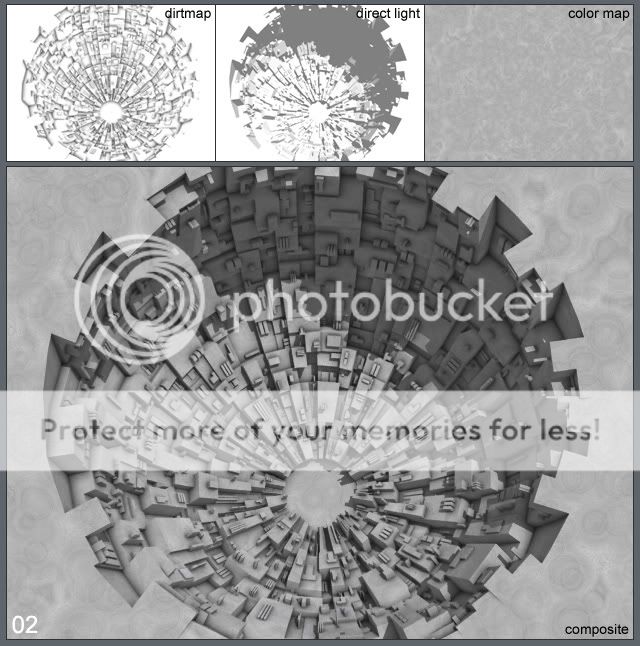
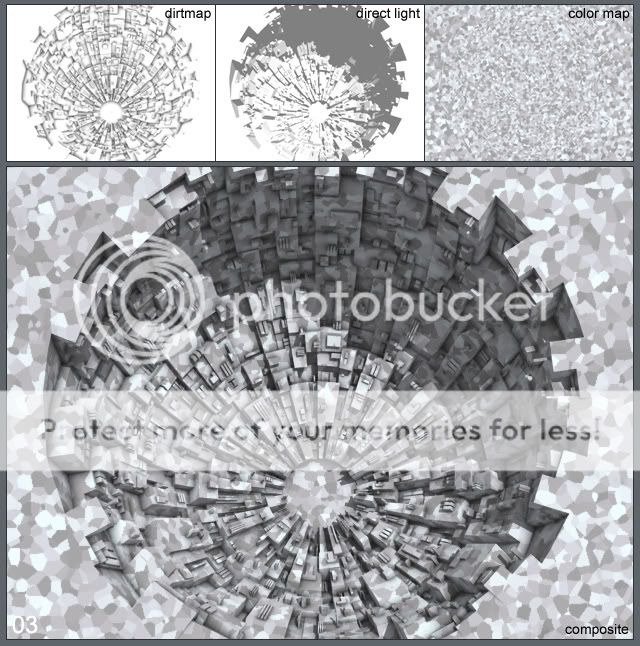


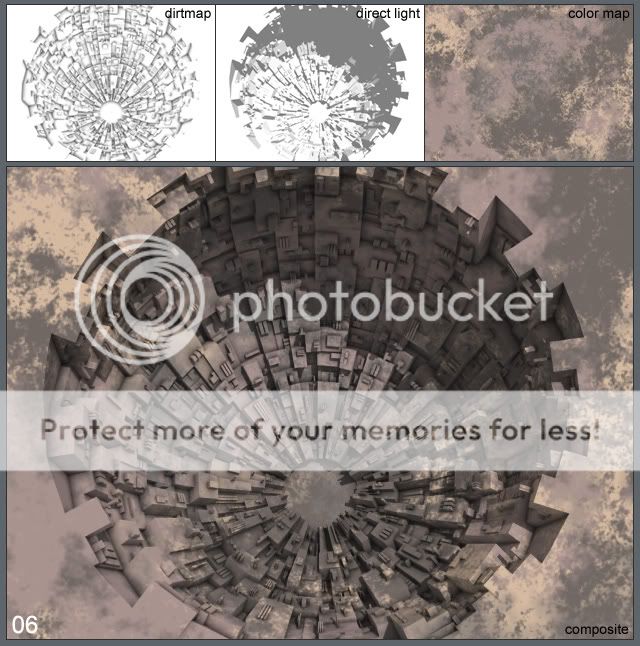

Note that only the diffuse color renders were rendered again. the same dirt map rendered and directlight rendered images were used and recycled. if these images were rendered using real GI...it would have taken probably twice the time it took to render all these images plus typing this tutorial.
The limitation is that - there will be no color bleeding or the bouncing of illumination by colored surfaces to nearby surfaces. That is what GI is for. Although AO does not exactly mimic GI, its applications are invaluable.
Original docs can be found in my blog as well -
http://vertexwrangler.multiply.com/journal/item/10/VRAY_Ambient_Occlussion_by_CGArtist_Frank_Yosores_as_posted_at_3DP
Please note that this was written years ago, so references to software versions pertains to old releases. Some features not available before might also be common or part of the current releases.
VRAY Ambient Occlussion
by Frank Yosores
AO (Ambient Occlusion) works by simply calculating the angle between face normals of nearby surfaces. The greater the angle between these faces relative to each other, the lesser the occlusion. thus the lesser 'dirt' there will be on the area where those faces meet...and this is conversely true. we use the term 'dirt' because the map is called Vray dirtmap. This is not be confused with dirt generator plugins like quickdirt. this results into an image simulating the dispersion of light in a diffused lighting condition.
This process of generating AO does not need lighting and shadow information so rendering time is significantly reduced.
We will then apply the same method of compositing passes as we did the last quasi-tutorial. but this time using ambient occlusion pass in place of the E-light (fake GI) pass. in the previous method using E-Light, light and shadow information will still need to be calculated, while in the ambient pass we are going to make we wont need light and shadow information.
Tthe set up is very easy. In the latest version of Vray v1.47.02, there is a new map called Vray dirtmap in the material/map browser. you simply place this map in the diffuse map slot of a white standard material. set self-illumination to 100. adjust the Vray dirtmap parameters. and render.
This image shows a greebled poly in shaded wire. we will render this geometry.
note:all renders do not include specularity and bump. This is simplified just to get the idea accross
Tthis is the rendered image using the standard white material with Vray dirtmap in the diffuse map slot, self-illumination set to 100. notice how the corners are shaded. in the default setup a material with self-illumination set to 100 will not pick up any shading.
This is a render with a direct light using a white standard material for all the surfaces with a self illumination of 50.
Using the same principle as before...the dirtmap render (fake GI) and the direct lighting render are blended over the the diffuse color render using multiply mode. diffuse color renders were done using Simbiont, a 3d procedural shader. since Simbiont doesn't have a parameter for self-illumination a target direct light was used with lighting set to emit Ambient light only and multiplier at 1.5. Adding a light is unecessary if you use a standard material. Using Simbiont is not necessary either, i just used it in this case due to the nature of my geometry.
Note that only the diffuse color renders were rendered again. the same dirt map rendered and directlight rendered images were used and recycled. if these images were rendered using real GI...it would have taken probably twice the time it took to render all these images plus typing this tutorial.
The limitation is that - there will be no color bleeding or the bouncing of illumination by colored surfaces to nearby surfaces. That is what GI is for. Although AO does not exactly mimic GI, its applications are invaluable.
v_wrangler- CGP Loverboy
- Number of posts : 1994
Age : 54
Location : Northern Mountains
Registration date : 29/03/2009 -
Re: LIGHTING: Using Ambient Occlussion
![]() by WenZ3D Thu Apr 09, 2009 9:28 pm
by WenZ3D Thu Apr 09, 2009 9:28 pm
Sir V are you using Photoshop to composite both pictures rendered by 3ds max? in animation these AO will surely speed up the rendering. Thanks V nice Tuts
WenZ3D- CGP Newbie

- Number of posts : 142
Age : 44
Location : Singapore
Registration date : 05/03/2009
Re: LIGHTING: Using Ambient Occlussion
![]() by v_wrangler Thu Apr 09, 2009 9:43 pm
by v_wrangler Thu Apr 09, 2009 9:43 pm
PS was only used in the example above to illustrate the idea. For stills, PS is fine. For animations - we use AF.
v_wrangler- CGP Loverboy
- Number of posts : 1994
Age : 54
Location : Northern Mountains
Registration date : 29/03/2009 -
Re: LIGHTING: Using Ambient Occlussion
![]() by nomeradona Thu Apr 09, 2009 10:20 pm
by nomeradona Thu Apr 09, 2009 10:20 pm
thanks vertex ang dami kung natututunan...

nomeradona- SketchUp Guru

- Number of posts : 7293
Age : 55
Location : HCMC Vietnam
Registration date : 22/09/2008 -
Re: LIGHTING: Using Ambient Occlussion
![]() by rockgem Thu Apr 09, 2009 10:35 pm
by rockgem Thu Apr 09, 2009 10:35 pm
thanks for posting this here sir V. it's nice to see that article from my good friend again.
rockgem- CGP Newbie
- Number of posts : 118
Age : 42
Location : Cebu and Singapore
Registration date : 21/12/2008 -
Re: LIGHTING: Using Ambient Occlussion
![]() by pixelburn Fri Apr 10, 2009 12:43 am
by pixelburn Fri Apr 10, 2009 12:43 am
sir wrangler, post ka naman ng work mo using ambient occlussion!!! sana matuto ako nito! keep it up!!! tanx for sharing!!! 

pixelburn- CGP Guru

- Number of posts : 1436
Age : 40
Location : Dubai, SAN PEDRO, LAGUNA, Brunei Darrusalam
Registration date : 09/04/2009
» LIGHTING: Ambient Lighting in Vray As An Alternative to GI and Dome Lighting
» BALE
» ambient occlusion
» ano po ang ambient occlusion?
» Ambient Occlusion Pass
» BALE
» ambient occlusion
» ano po ang ambient occlusion?
» Ambient Occlusion Pass
Page 1 of 1
Permissions in this forum:
You cannot reply to topics in this forum|
|
|